Owner’s guide
How to use the FireShield app
Everything the app does, in the order you will meet it — from the first screen after you sign in to setting the system to defend the house while you are away.
- Sections
- 11
- Steps
- 34
- Read time
- ~10 min
- Updated
- September 18
Contents
Your property at a glance
The first screen answers one question: is the system ready right now?
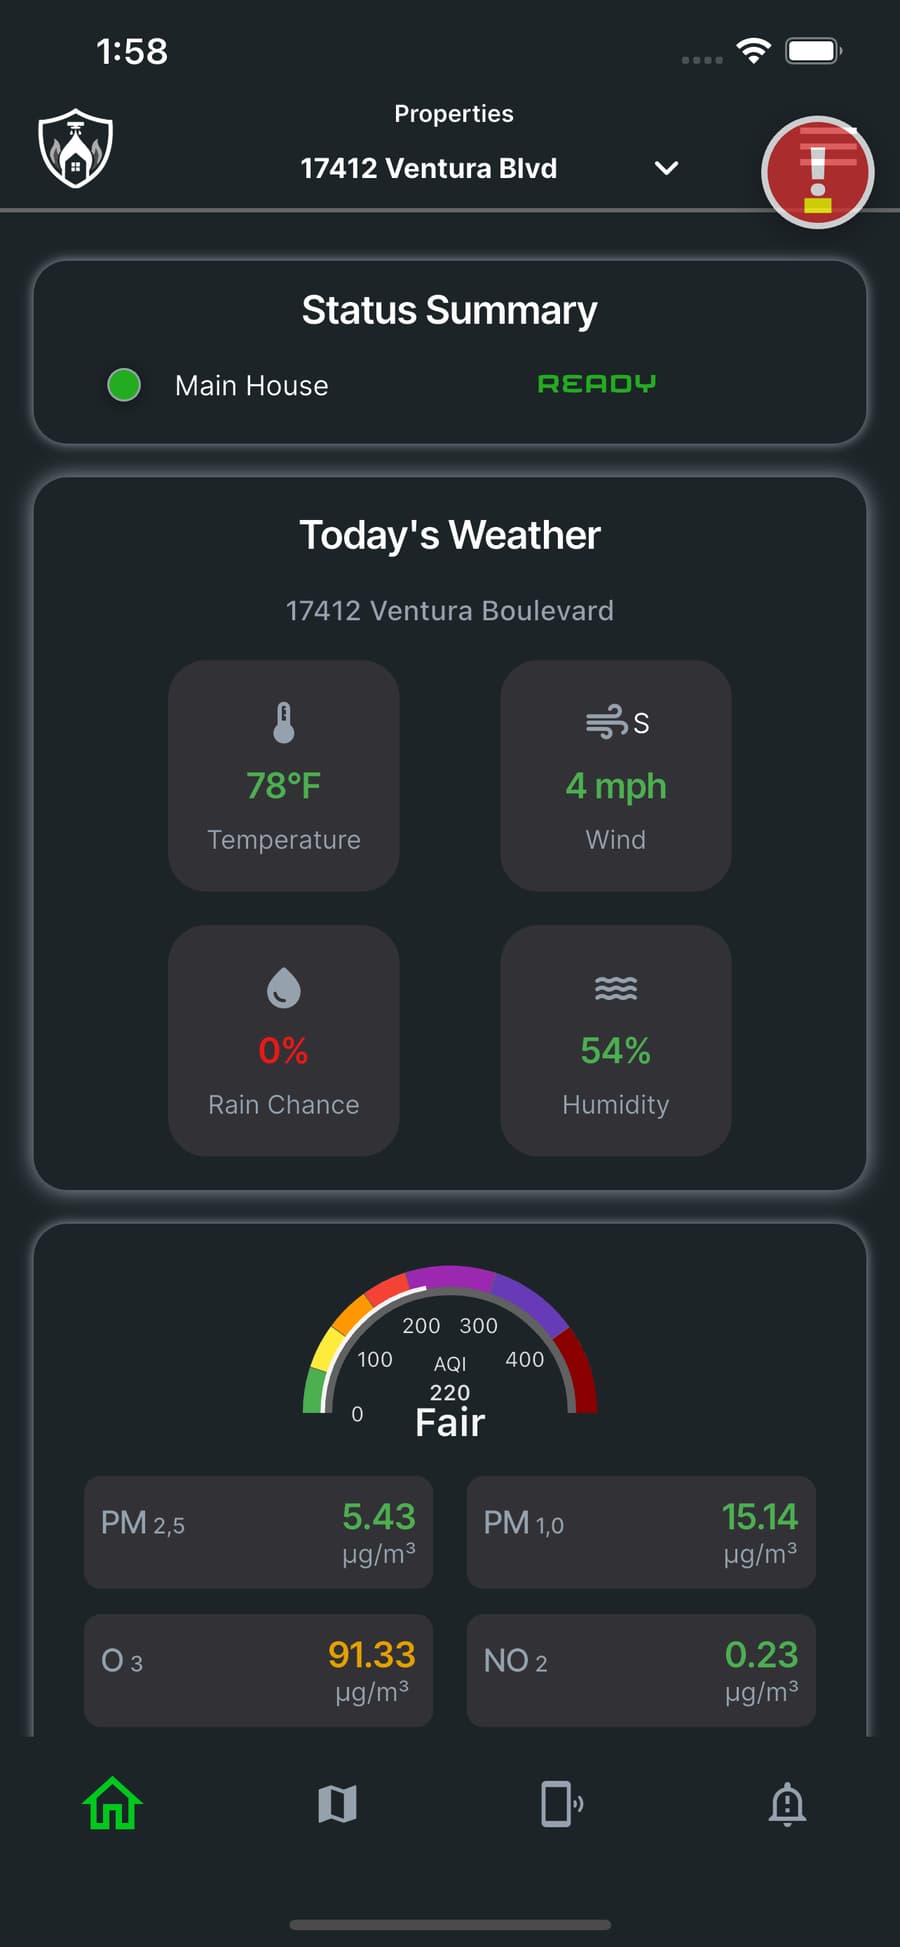
Read the status summary
The home screen opens on your property. At the top, every device on that property is listed with a colored dot and a word. Green and READY means the system is armed and waiting. If you own more than one property, tap the address at the very top to switch between them.
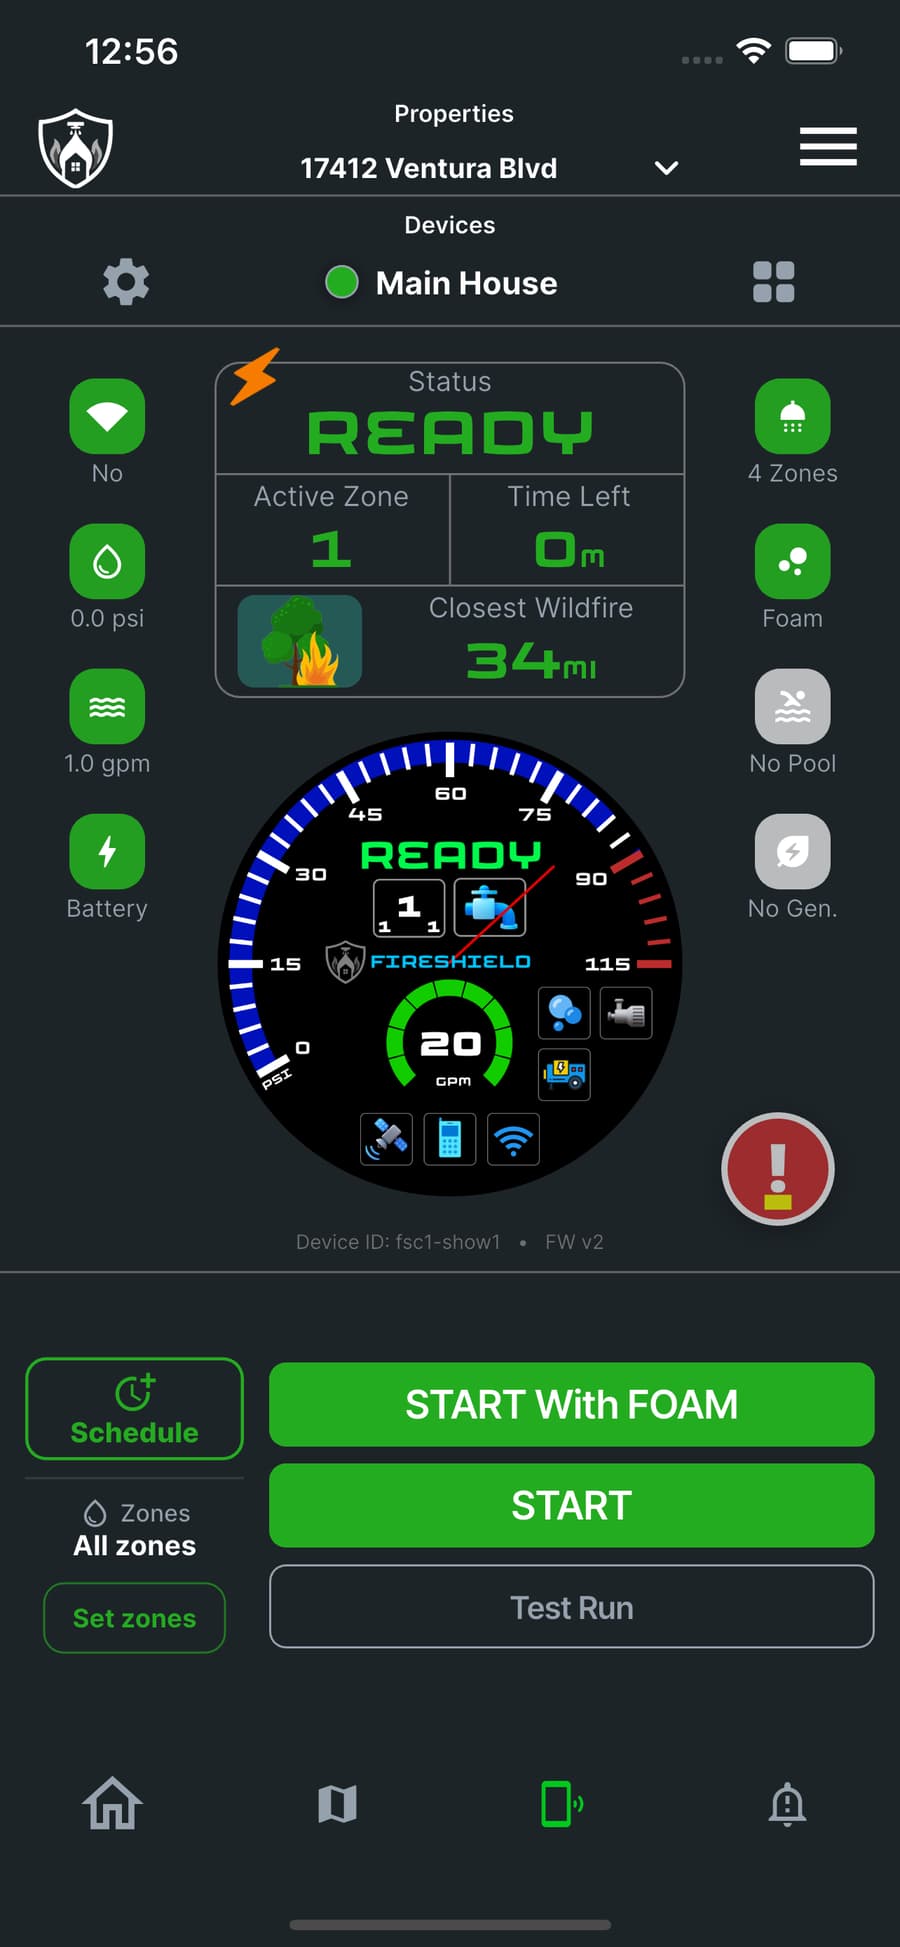
- READY — armed, nothing running.
- The colored dot repeats the same information at a glance, for when you are reading the screen in a hurry.
- Tap the address at the top to move between properties.
Check conditions before you decide anything
Under the status summary you get today's weather for the property itself, not the nearest city: temperature, wind speed and direction, rain chance and humidity. Below that is the air quality index. Low humidity with a rising wind is the combination that matters, and it is the reason the weather sits on the first screen rather than buried in a menu.
- Wind direction is shown as a compass letter — the side of the house the embers will come from.
- A rising air quality number usually means smoke is already reaching you.
The device screen
The controller, and what every indicator around it means.
Find the device you want
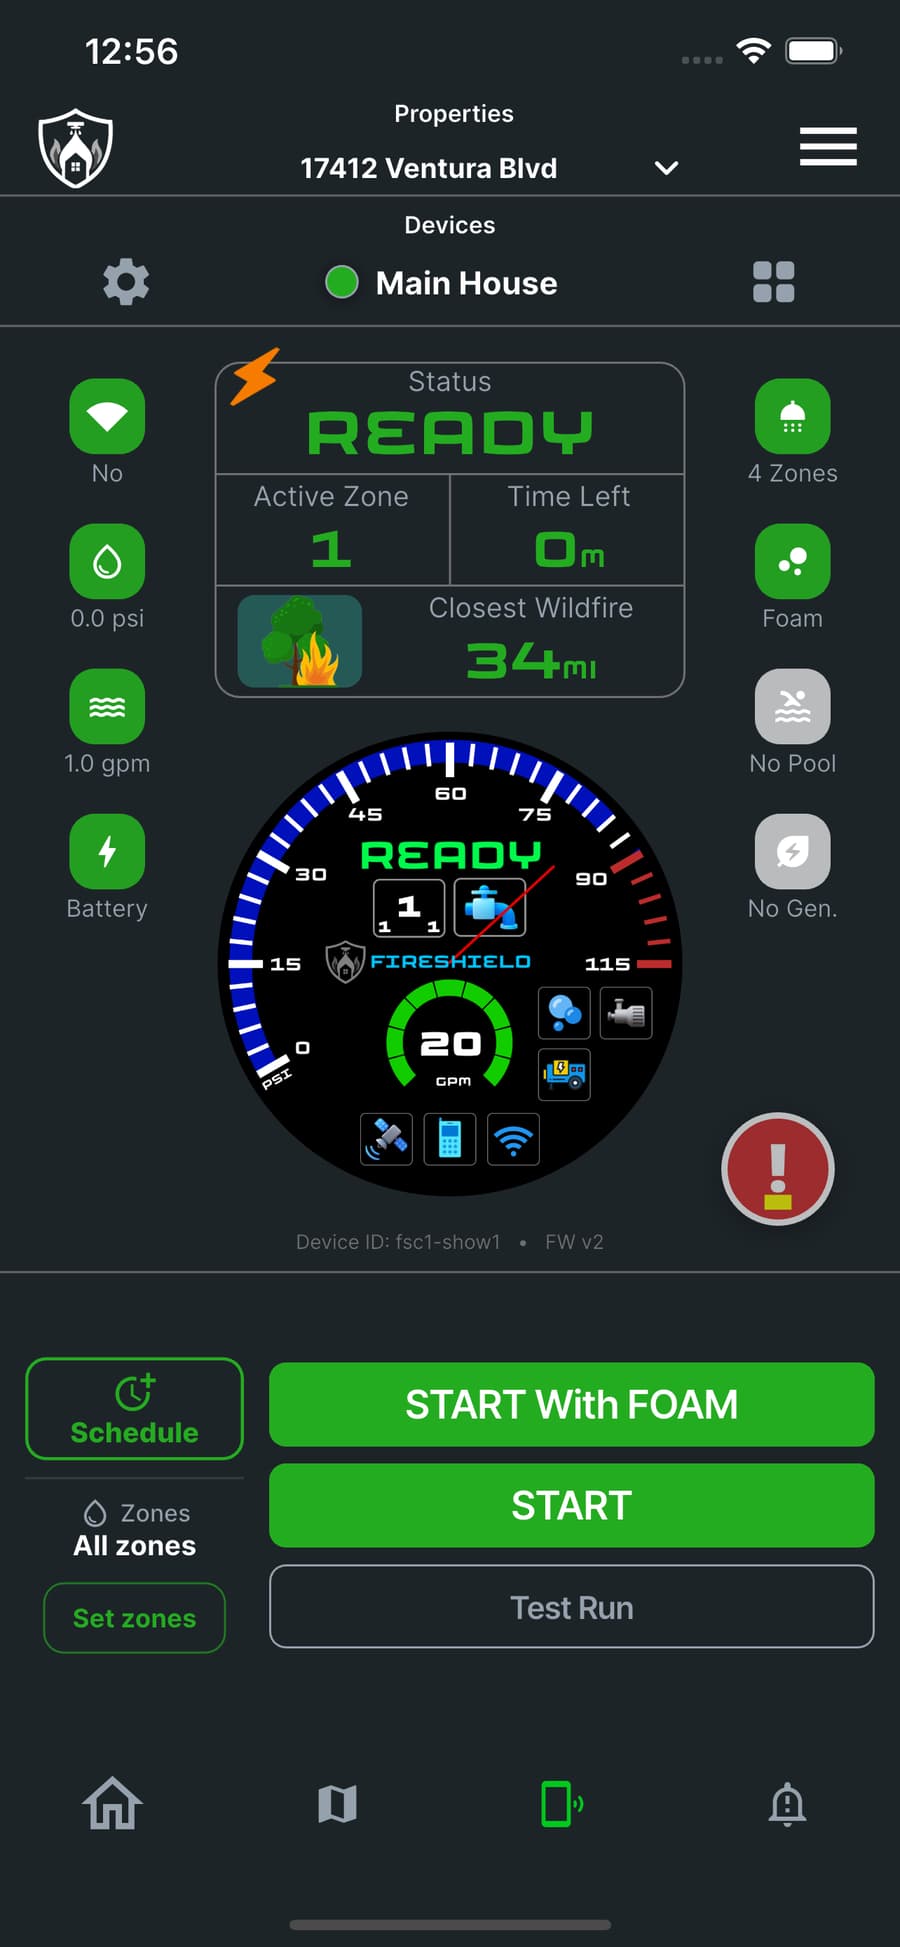
The device tab shows one controller at a time, named — Main House, Guest House, and so on. The gear on the left opens that device's automatic activation settings. The grid icon on the right lists every device on the property if you have more than one.
The controls: two at the top, five at the bottom
Everything you can press on this screen is either beside the device name or along the bottom. The two at the top change how the device is set up; the five at the bottom start something.
- Test Run is a short proving cycle — three loops through your zones, then it stops on its own.
- START runs water only. START with FOAM adds Class A foam.
- Schedule and Set zones decide when the next run happens and which zones it uses.
- More than one controller on the property? Swipe the device row left or right to move between them.
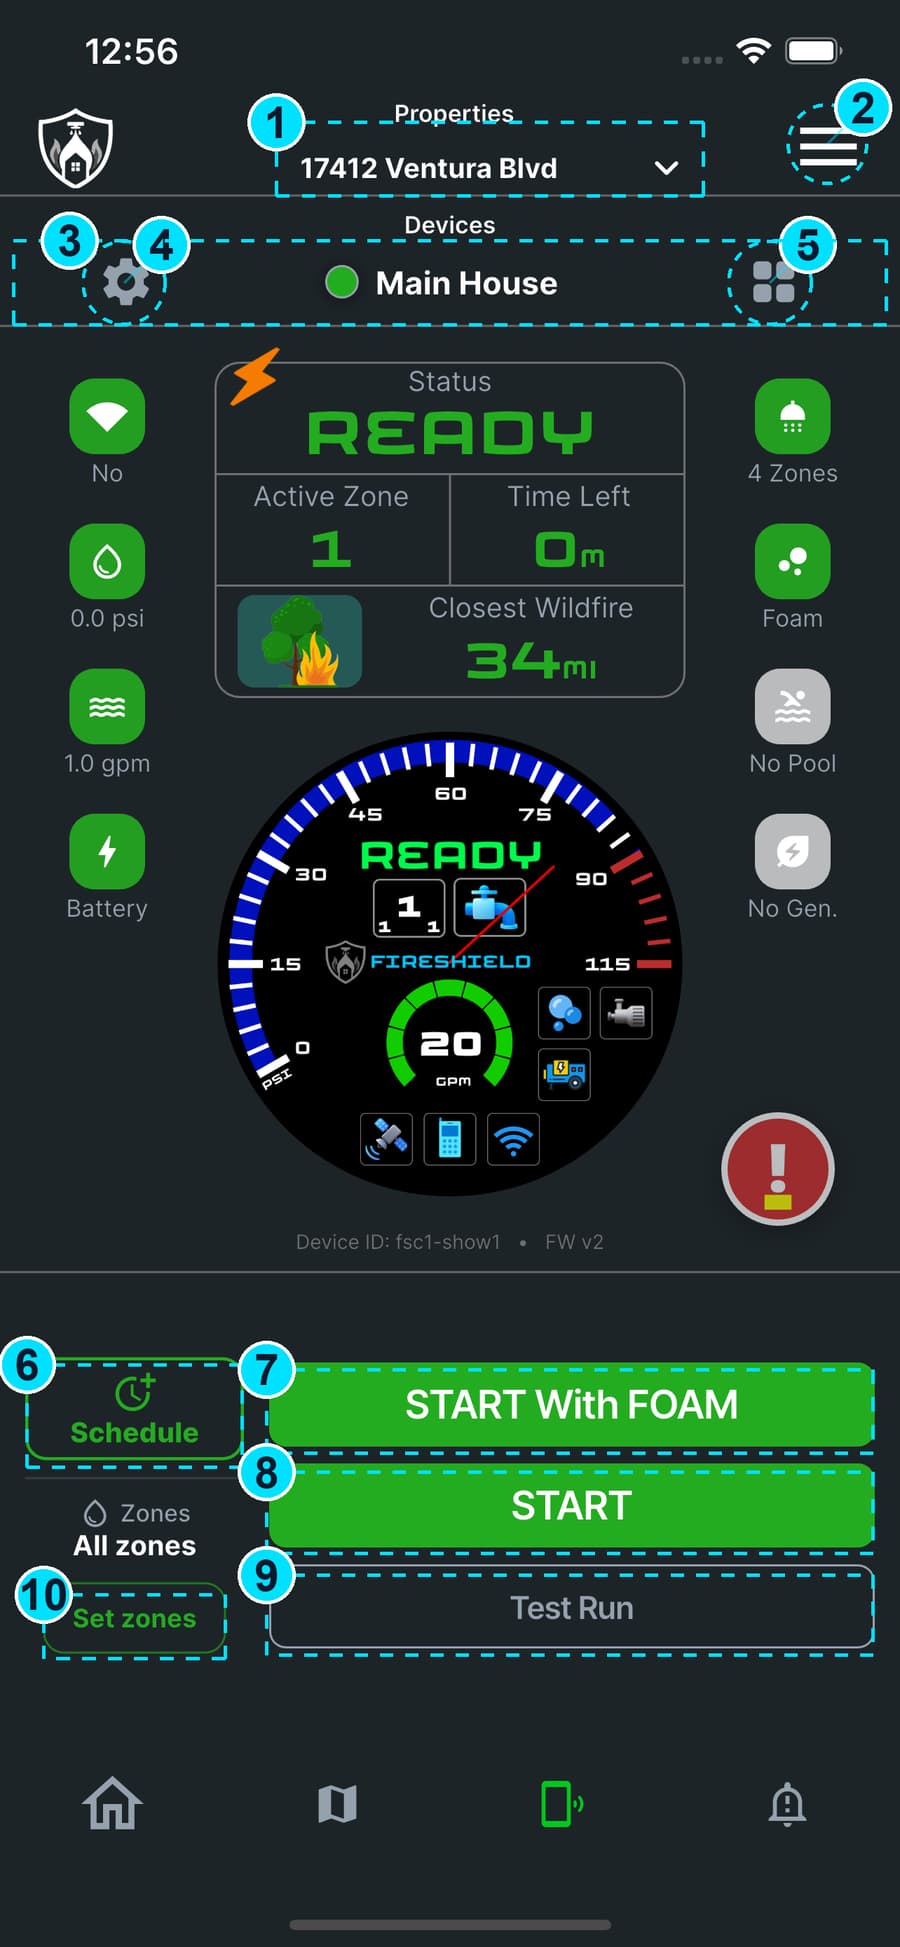
- 1Property — tap the address to switch between properties you look after
- 2Menu — account and app settings
- 3The device row — swipe it left or right to move between controllers when a property has more than one
- 4Device settings — automatic activation distance, delay, and the zones an automatic start uses
- 5Devices — lists every controller on this property at once
- 6Schedule — set the system to start on its own later
- 7START with FOAM — run now, with Class A foam
- 8START — run now, water only
- 9Test Run — three loops through the zones, then stops by itself
- 10Set zones — choose which zones the next run waters
Read the indicators down both sides
The tiles down the left and right of the status panel are the system’s own report on itself. Green means present and working. Gray means not fitted or not currently available — a property without a pool shows a gray pool tile, and that is normal rather than a fault. Above them, the status panel gives you the state, the zone running now, the time left on the run, and how far away the nearest active wildfire is.
- Left: connectivity, water pressure in psi, flow in gallons per minute, and power source.
- Right: number of zones, foam, pool, and generator.
- Gray is not an error. It means the option is not installed on your system.
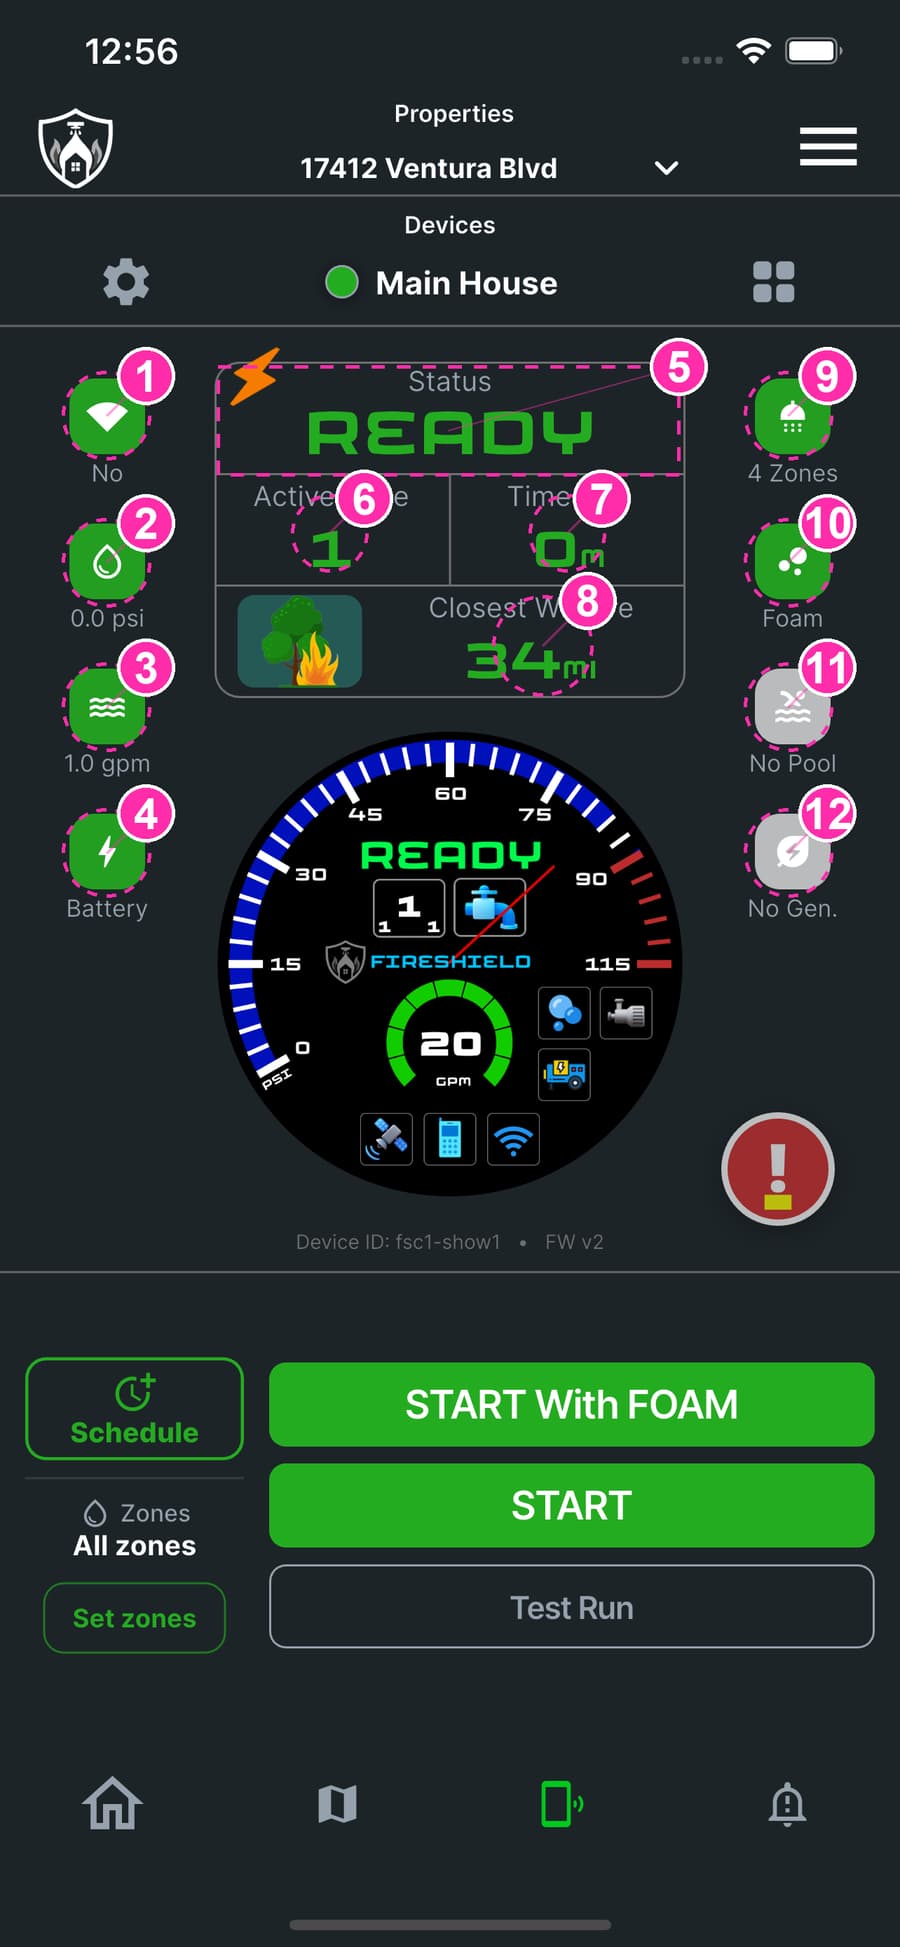
- 1Connectivity — Wi-Fi, cellular or satellite
- 2Water pressure, in psi
- 3Flow rate, in gallons per minute
- 4Power source — mains, battery or solar
- 5Status — READY, PENDING, ACTIVE or ENDING
- 6Which zone is running now
- 7Time left on the current run
- 8Distance to the nearest active wildfire
- 9Number of zones on your system
- 10Foam — fitted and available
- 11Pool or secondary water source
- 12Generator
Moving between devices and properties
Swipe left or right across the device panel to move to the next controller on the property. If you look after more than one property, tap the address at the very top to open the list and switch between them.
- Swipe left or right — next and previous device.
- Tap the address at the top — change property.
- The grid icon on the right lists every device on the current property at once.
The four states
What the screen looks like at each stage of a run.
READY, PENDING, ACTIVE, ENDING
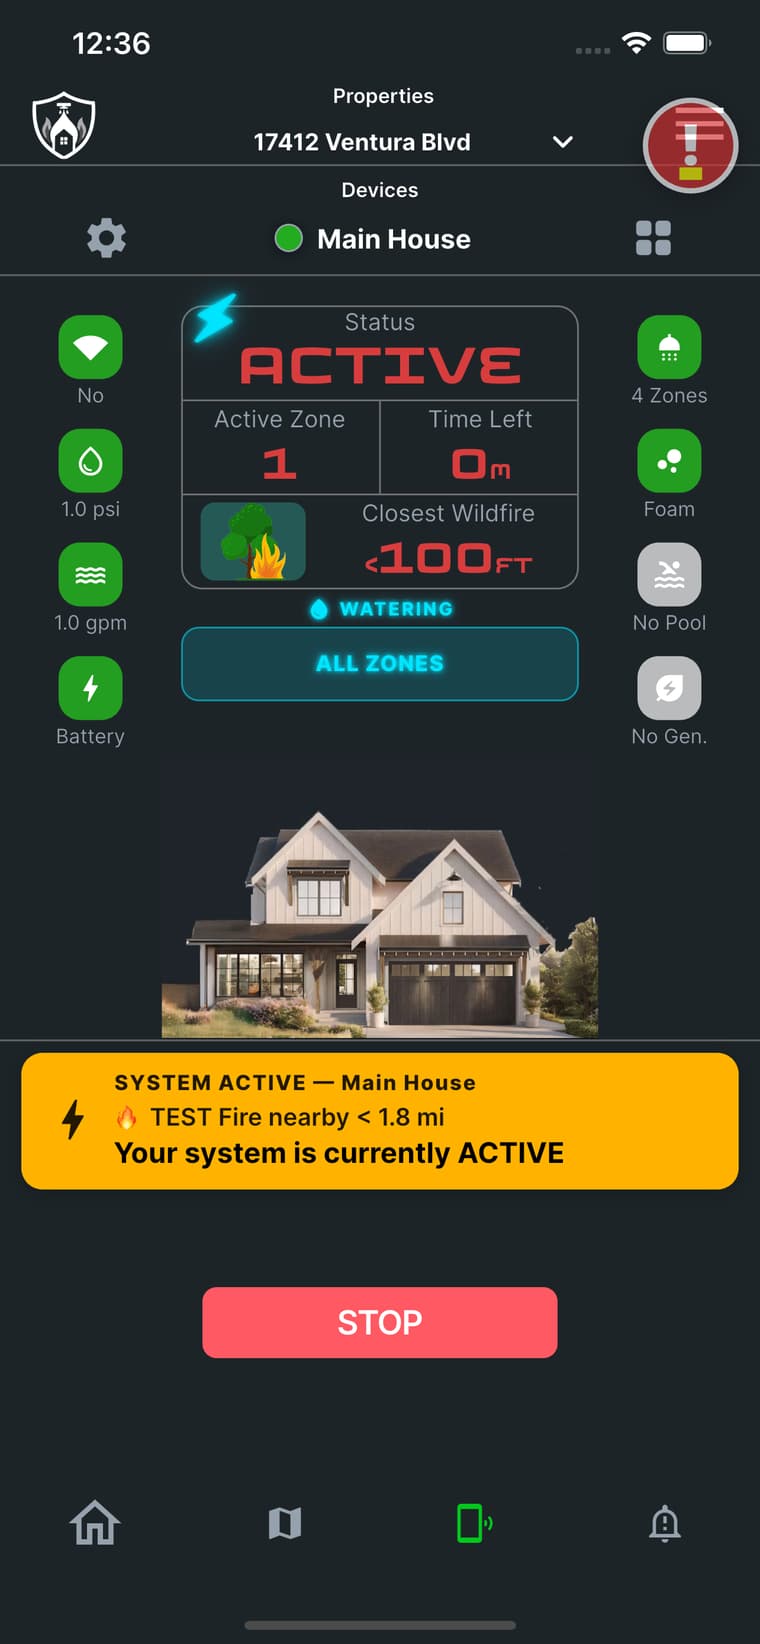
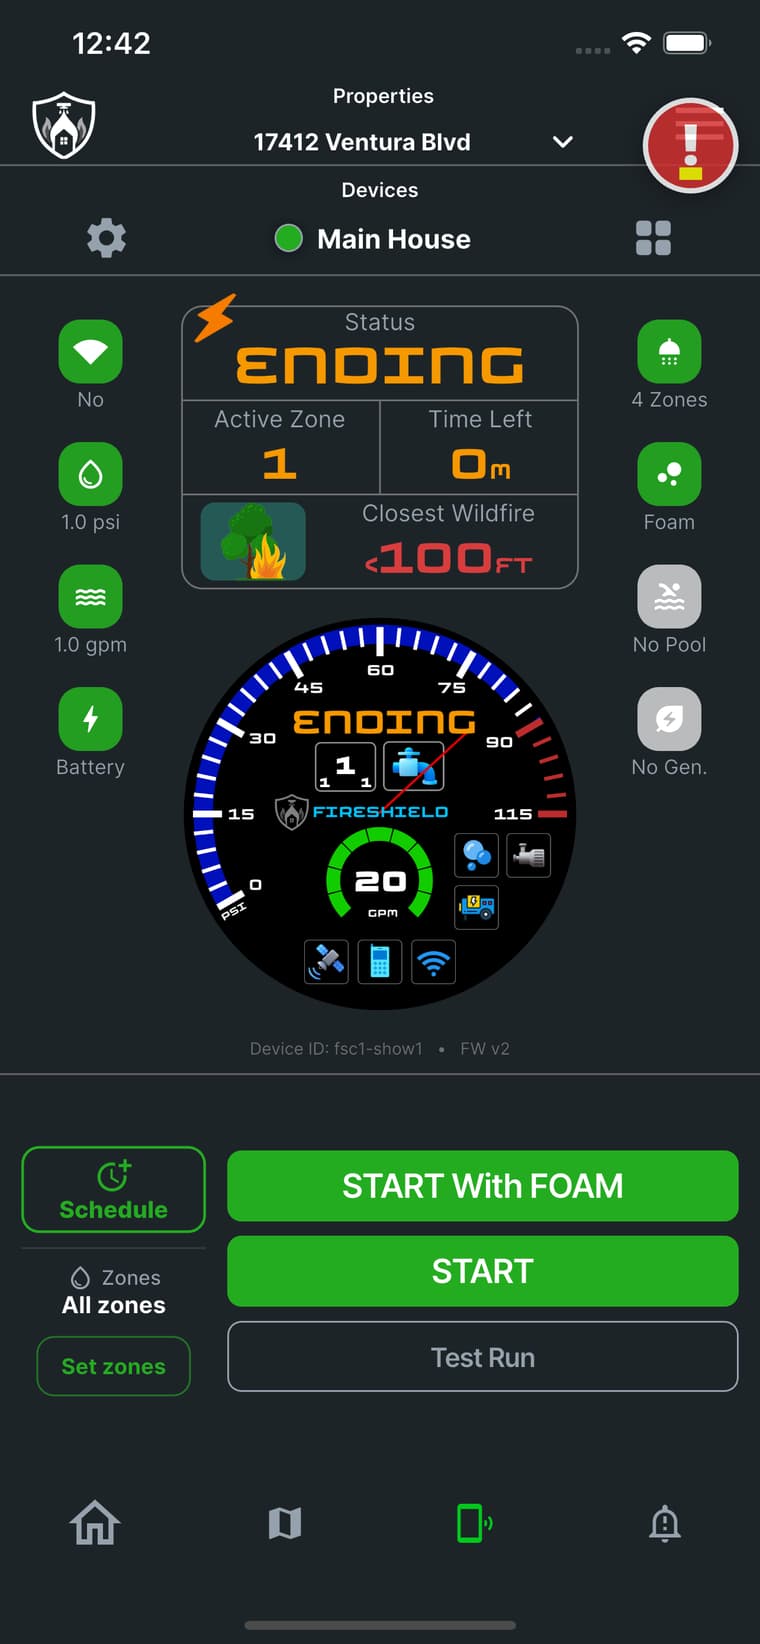
A run moves through the same four states every time. READY is the resting state. PENDING means something has asked the system to start and your delay is counting down — this is the only point at which you can stop it before any water moves. ACTIVE is the run itself. ENDING is the system draining and closing its valves afterwards.
- PENDING gives you both choices at once: start it immediately, or stop it.
- ACTIVE keeps a STOP on screen for as long as it runs.
- ENDING is not a fault. The system is clearing the lines before it settles back to READY.
Automatic activation
The two settings that decide whether the roof is wet in time.
Arm it, then set your distance
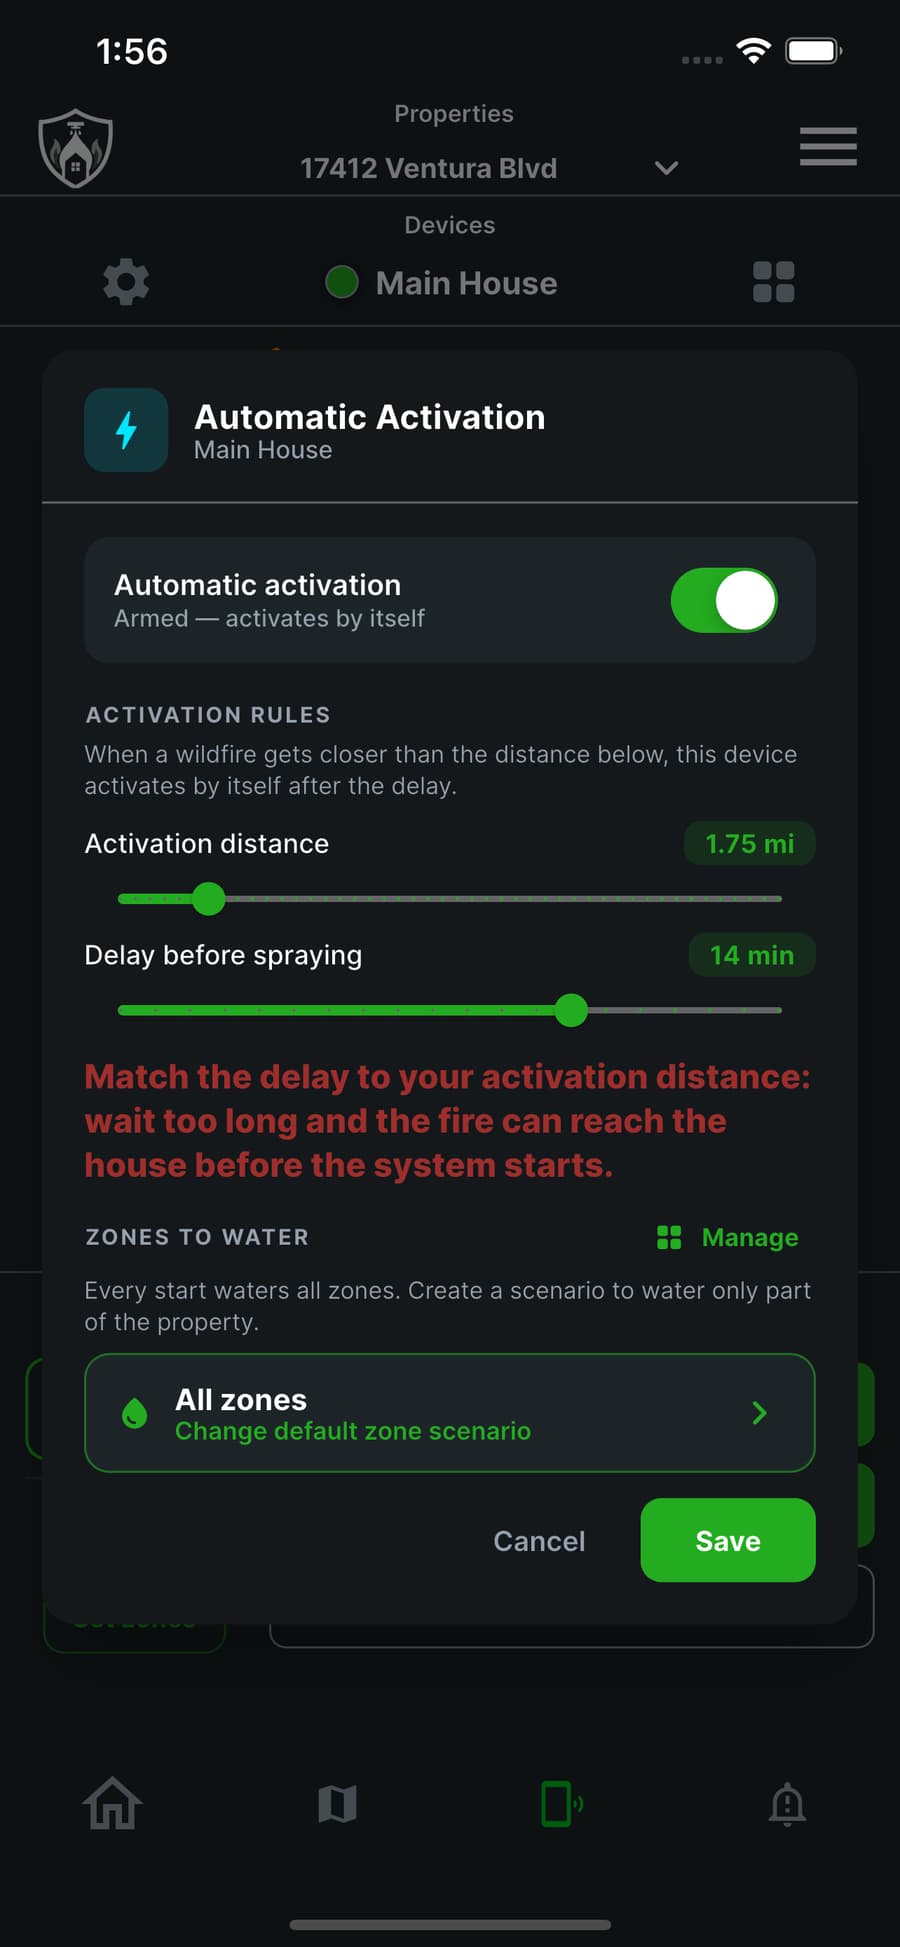
With automatic activation armed, the controller watches the distance between your property and the nearest active fire. When a fire comes closer than your activation distance, the system starts on its own. Set the distance for your terrain: tighter on a flat suburban street, wider on a ridge or a canyon lot where fire can run uphill towards you far faster than it moves across flat ground.
Then set the delay, and match it to the distance
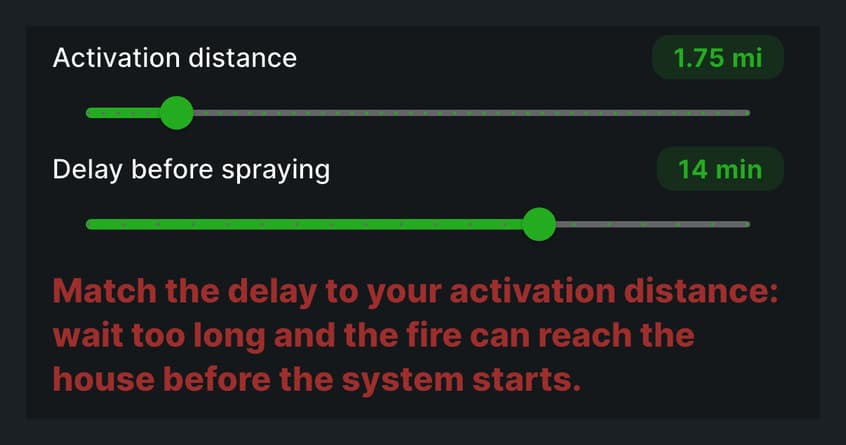
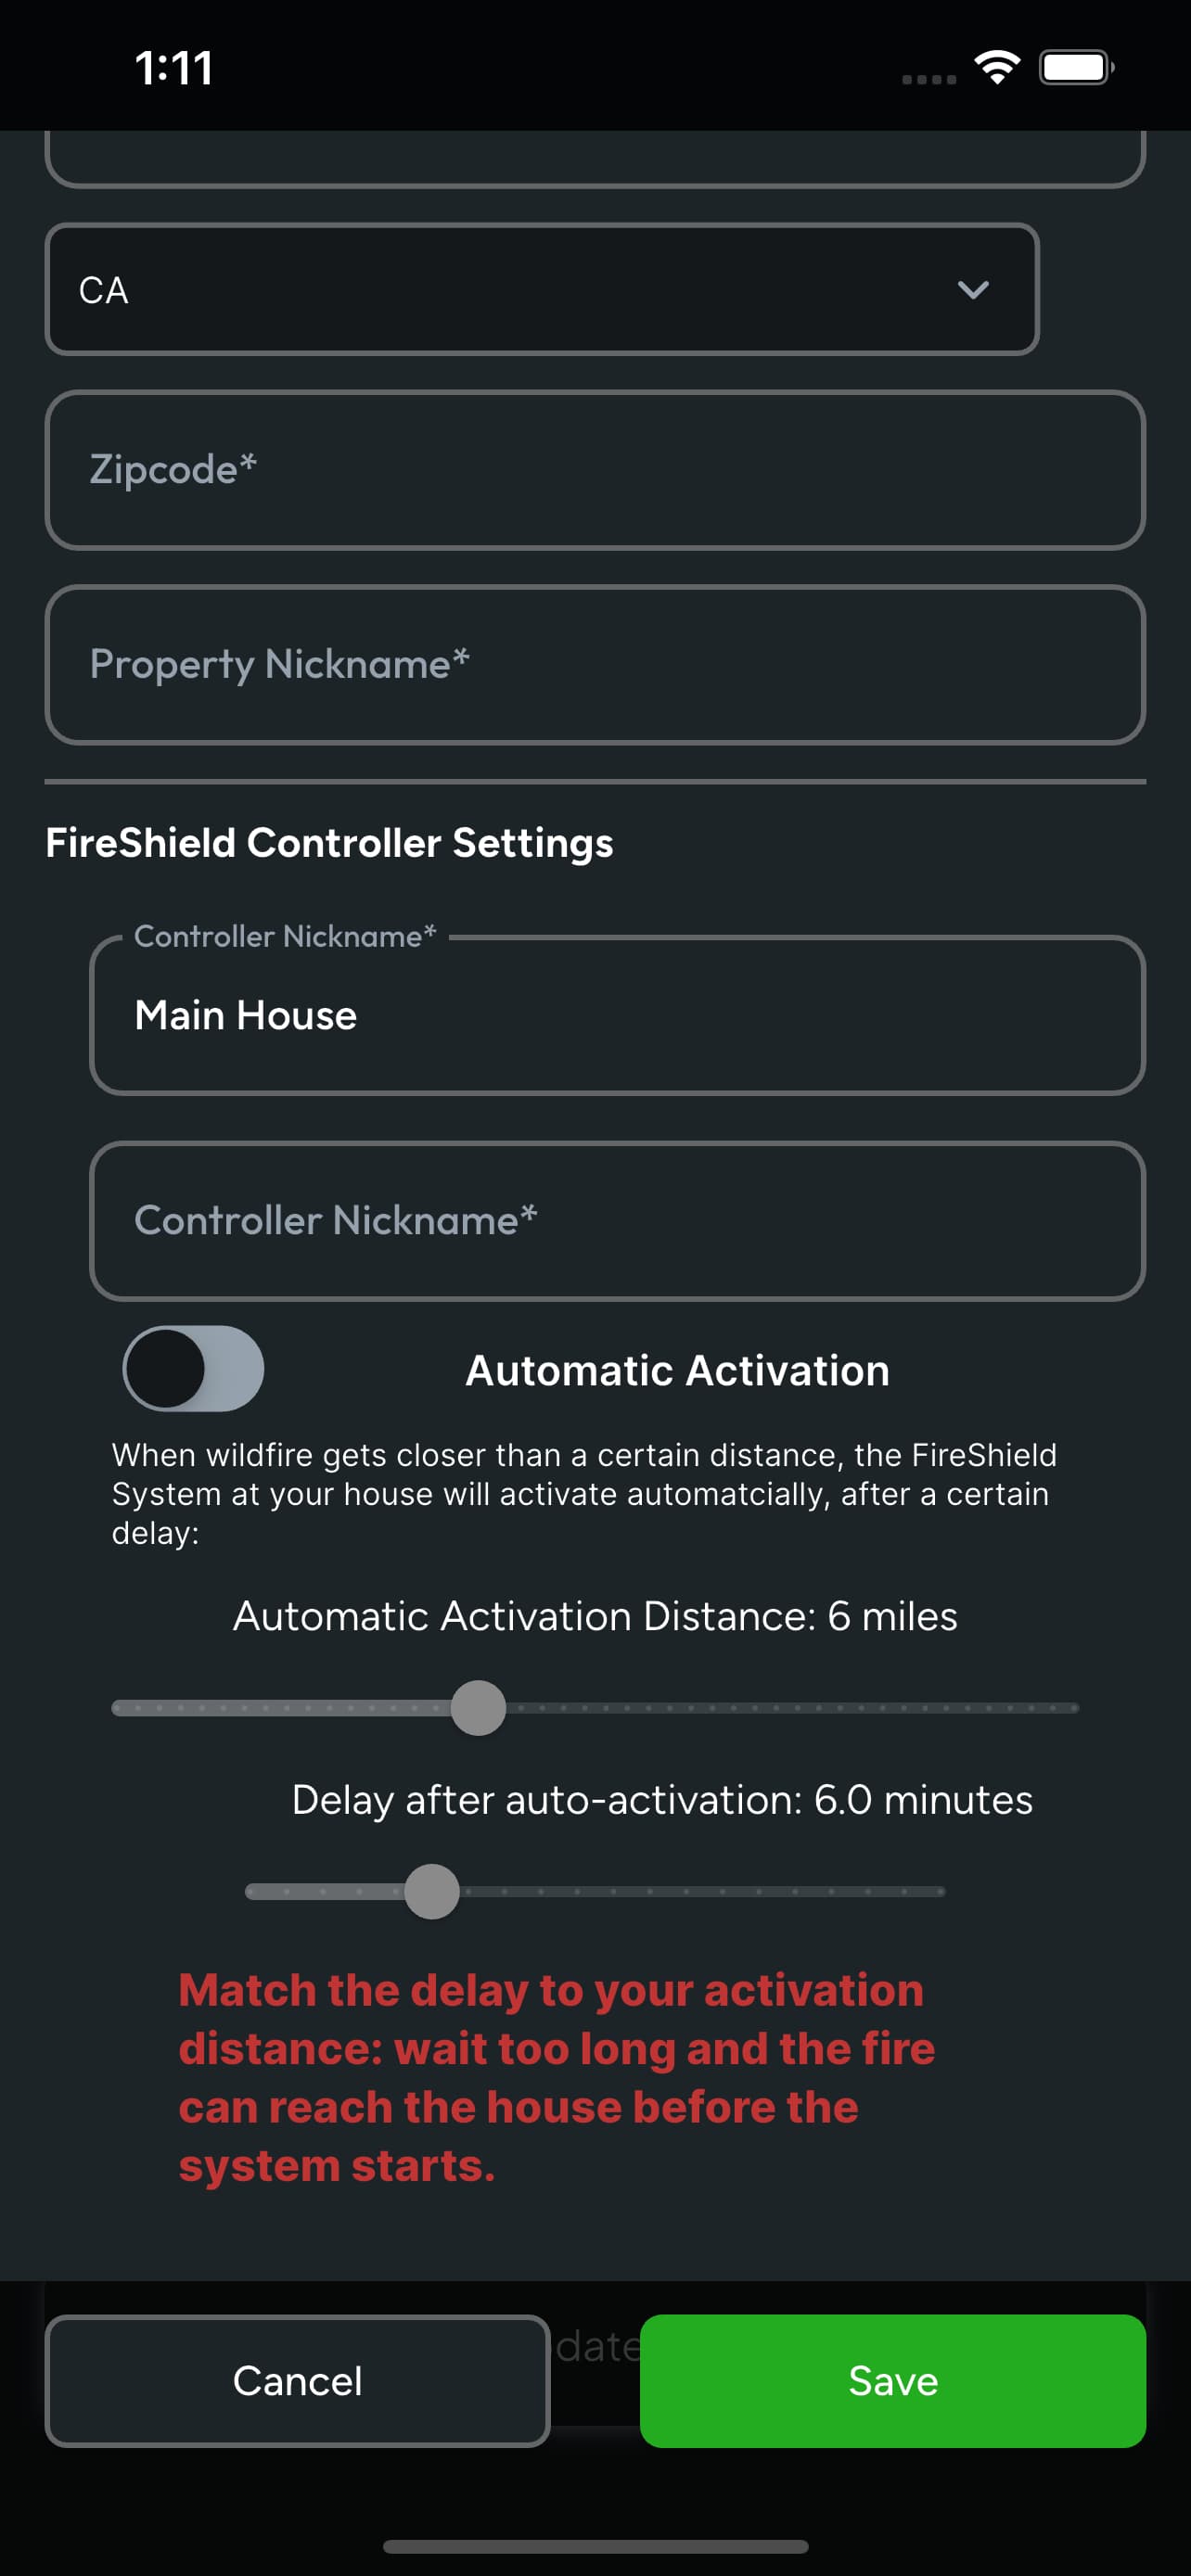
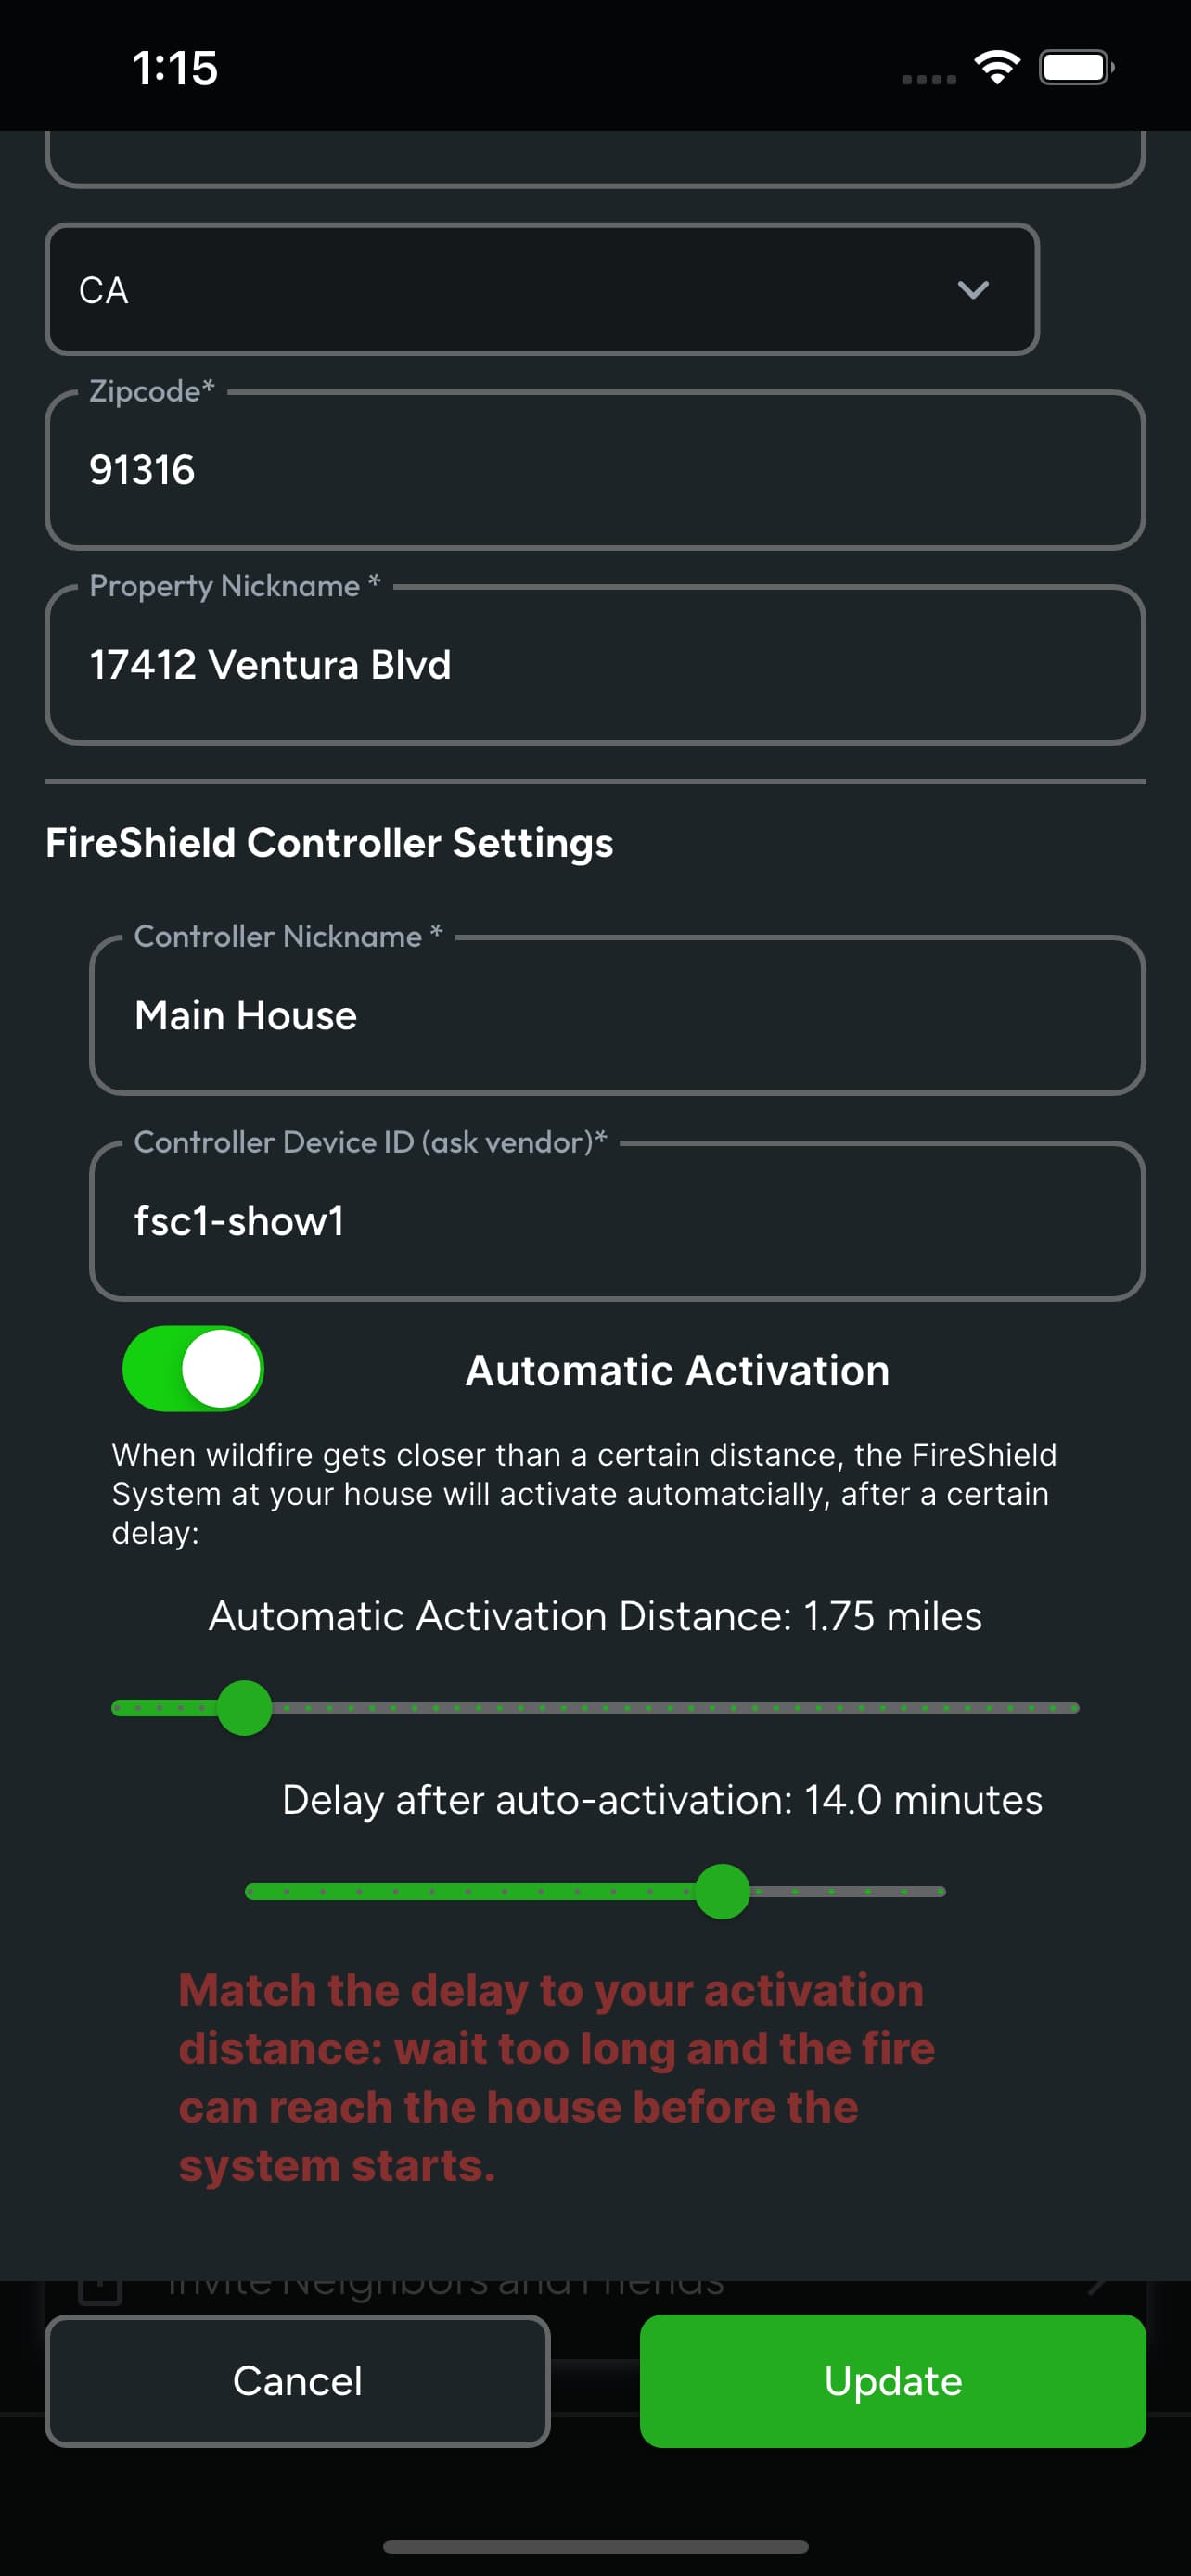
The delay is the gap between the fire crossing your line and the water starting. It exists so you get a chance to look at your phone and decide. Set it too short and you cannot stop a false alarm; set it too long and the fire can reach the house before the system starts. The app states this on the settings screen in red, because it is the one setting people get wrong.
- A short distance needs a short delay. A wide distance can carry a longer one.
- The same screen sets which zones an automatic start will water.
- You can disarm automatic activation entirely. Manual start still works.
When it starts by itself
When a fire crosses the activation distance you set in section 04, the system goes to PENDING and starts counting down the delay you set there too — and everything below is what you can do while it runs.
The countdown, and your two buttons
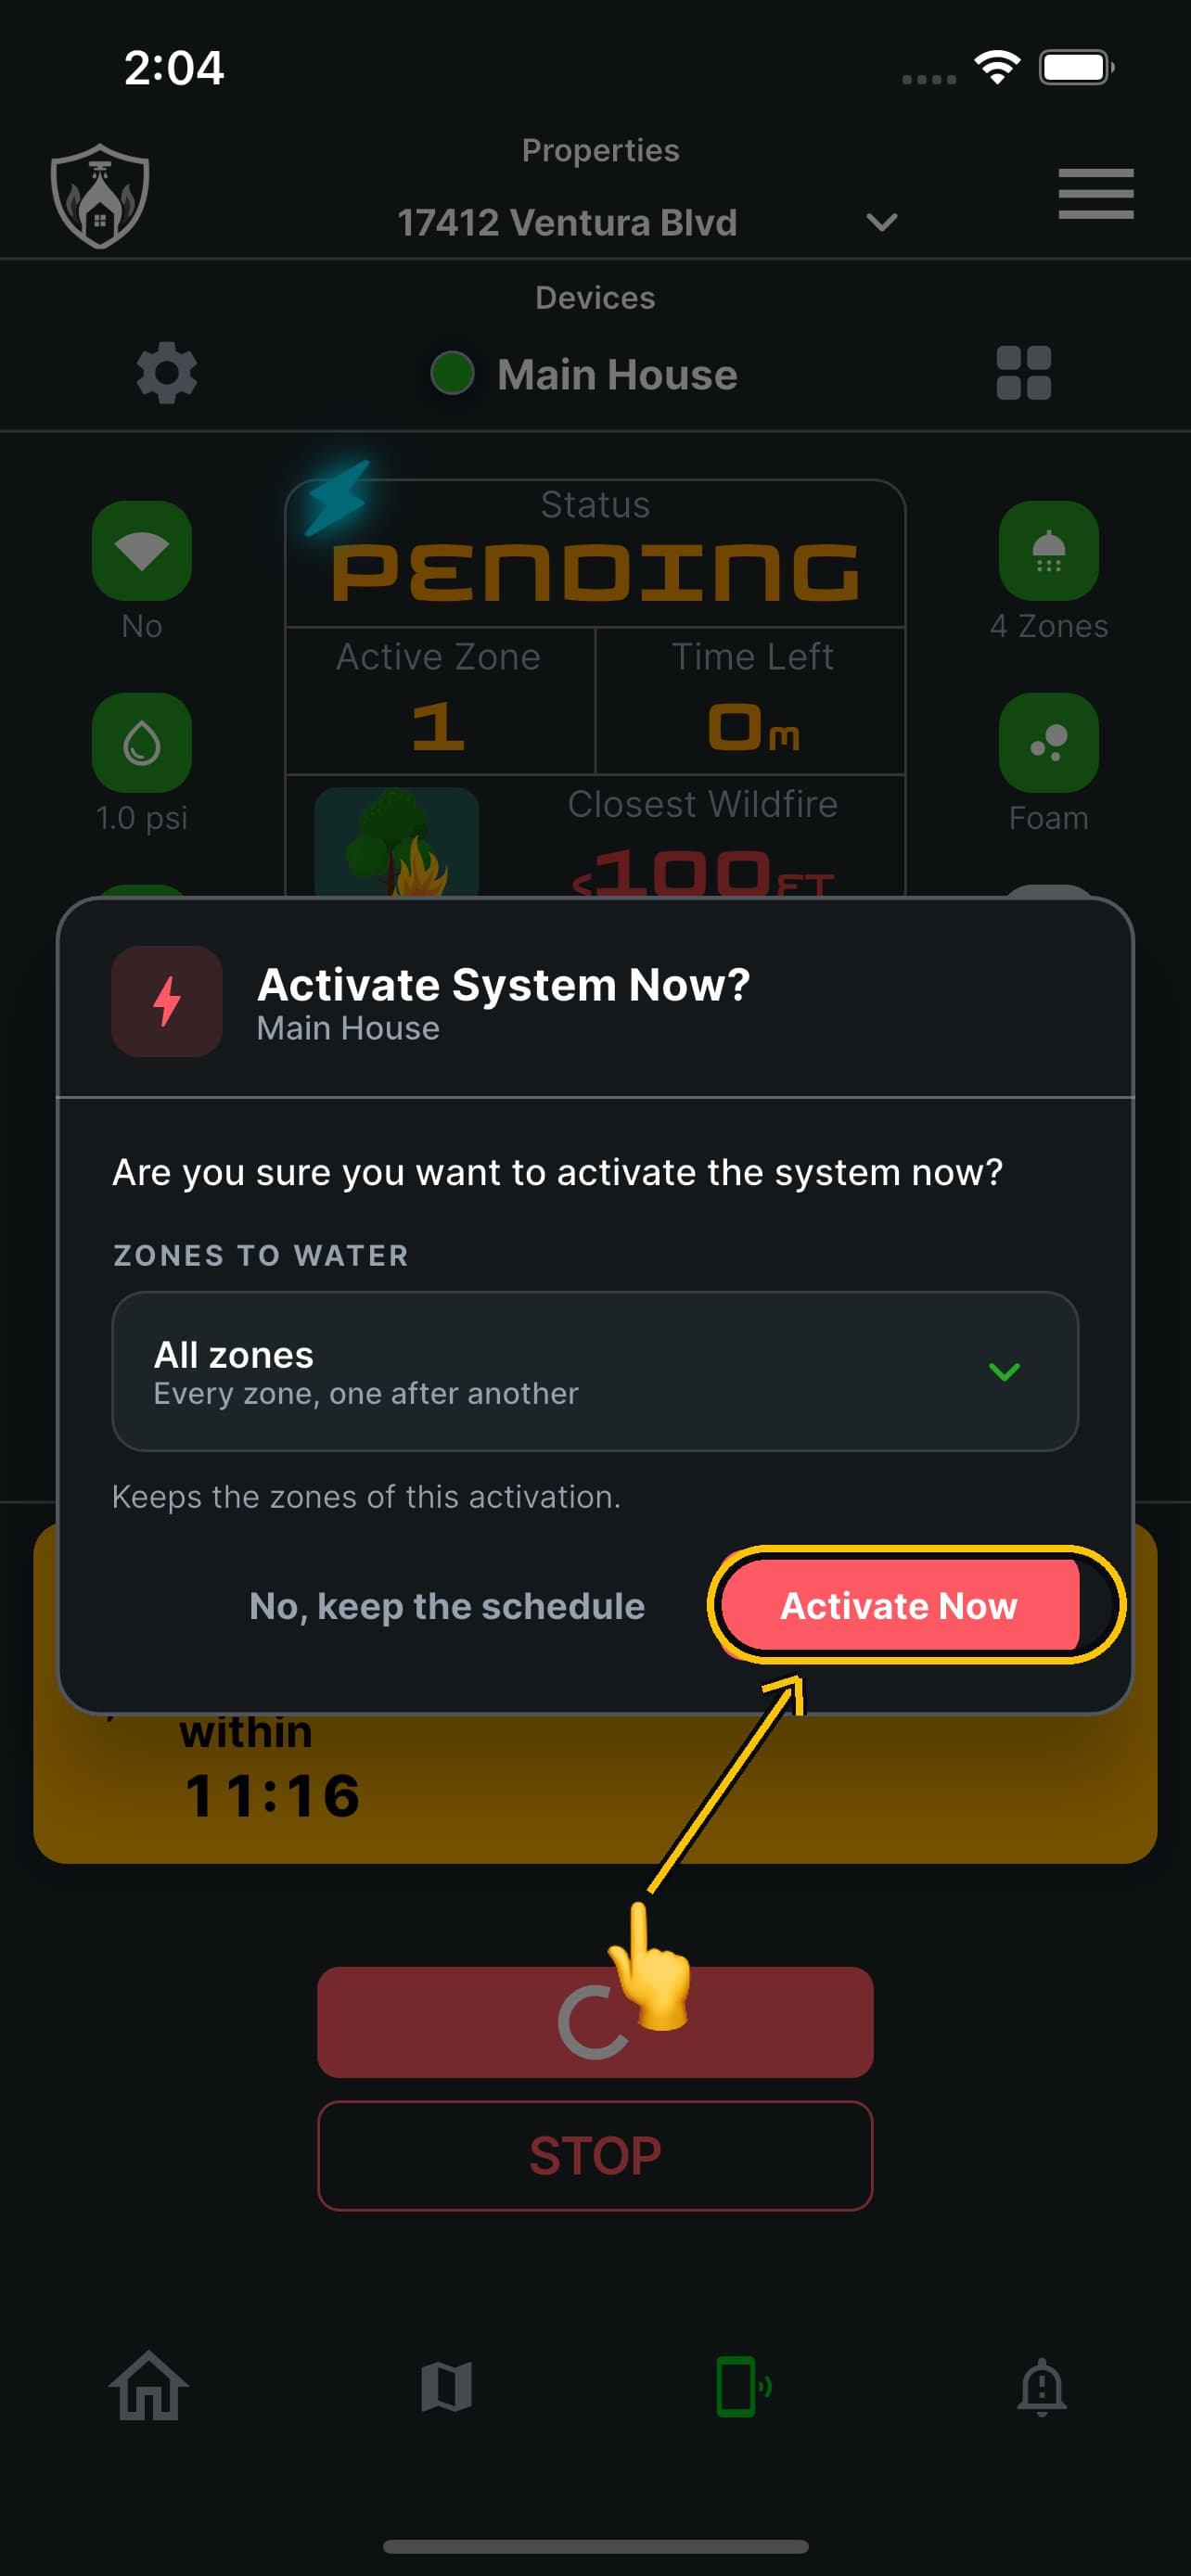
When a fire crosses your activation distance, the system does not start spraying. It goes to PENDING and shows you a countdown — your delay, running down in front of you. Until it reaches zero, nothing has moved and both choices are still open. This is the screen the whole design is built around: the system has decided, and it is giving you the chance to disagree.
- 1The countdown — which fire, how far away, and how long until the water starts
- 2Activate Now — do not wait out the delay, start immediately
- 3STOP — cancel this activation before anything runs
Actions you can take
ACTIVATE NOW
Stop waiting out the delay and start the run this second.
If you can see the fire and you have no intention of sitting through your own delay, Activate Now starts the run immediately. The app asks once and shows you which zones the run will water — the same zones your default scenario would have used — and then the system is ACTIVE with a STOP on screen for as long as it runs.
- It does not change your saved delay. It skips this one countdown only.
- The zones shown on the confirmation are the ones this run will water. Nothing is being changed for next time.
STOP
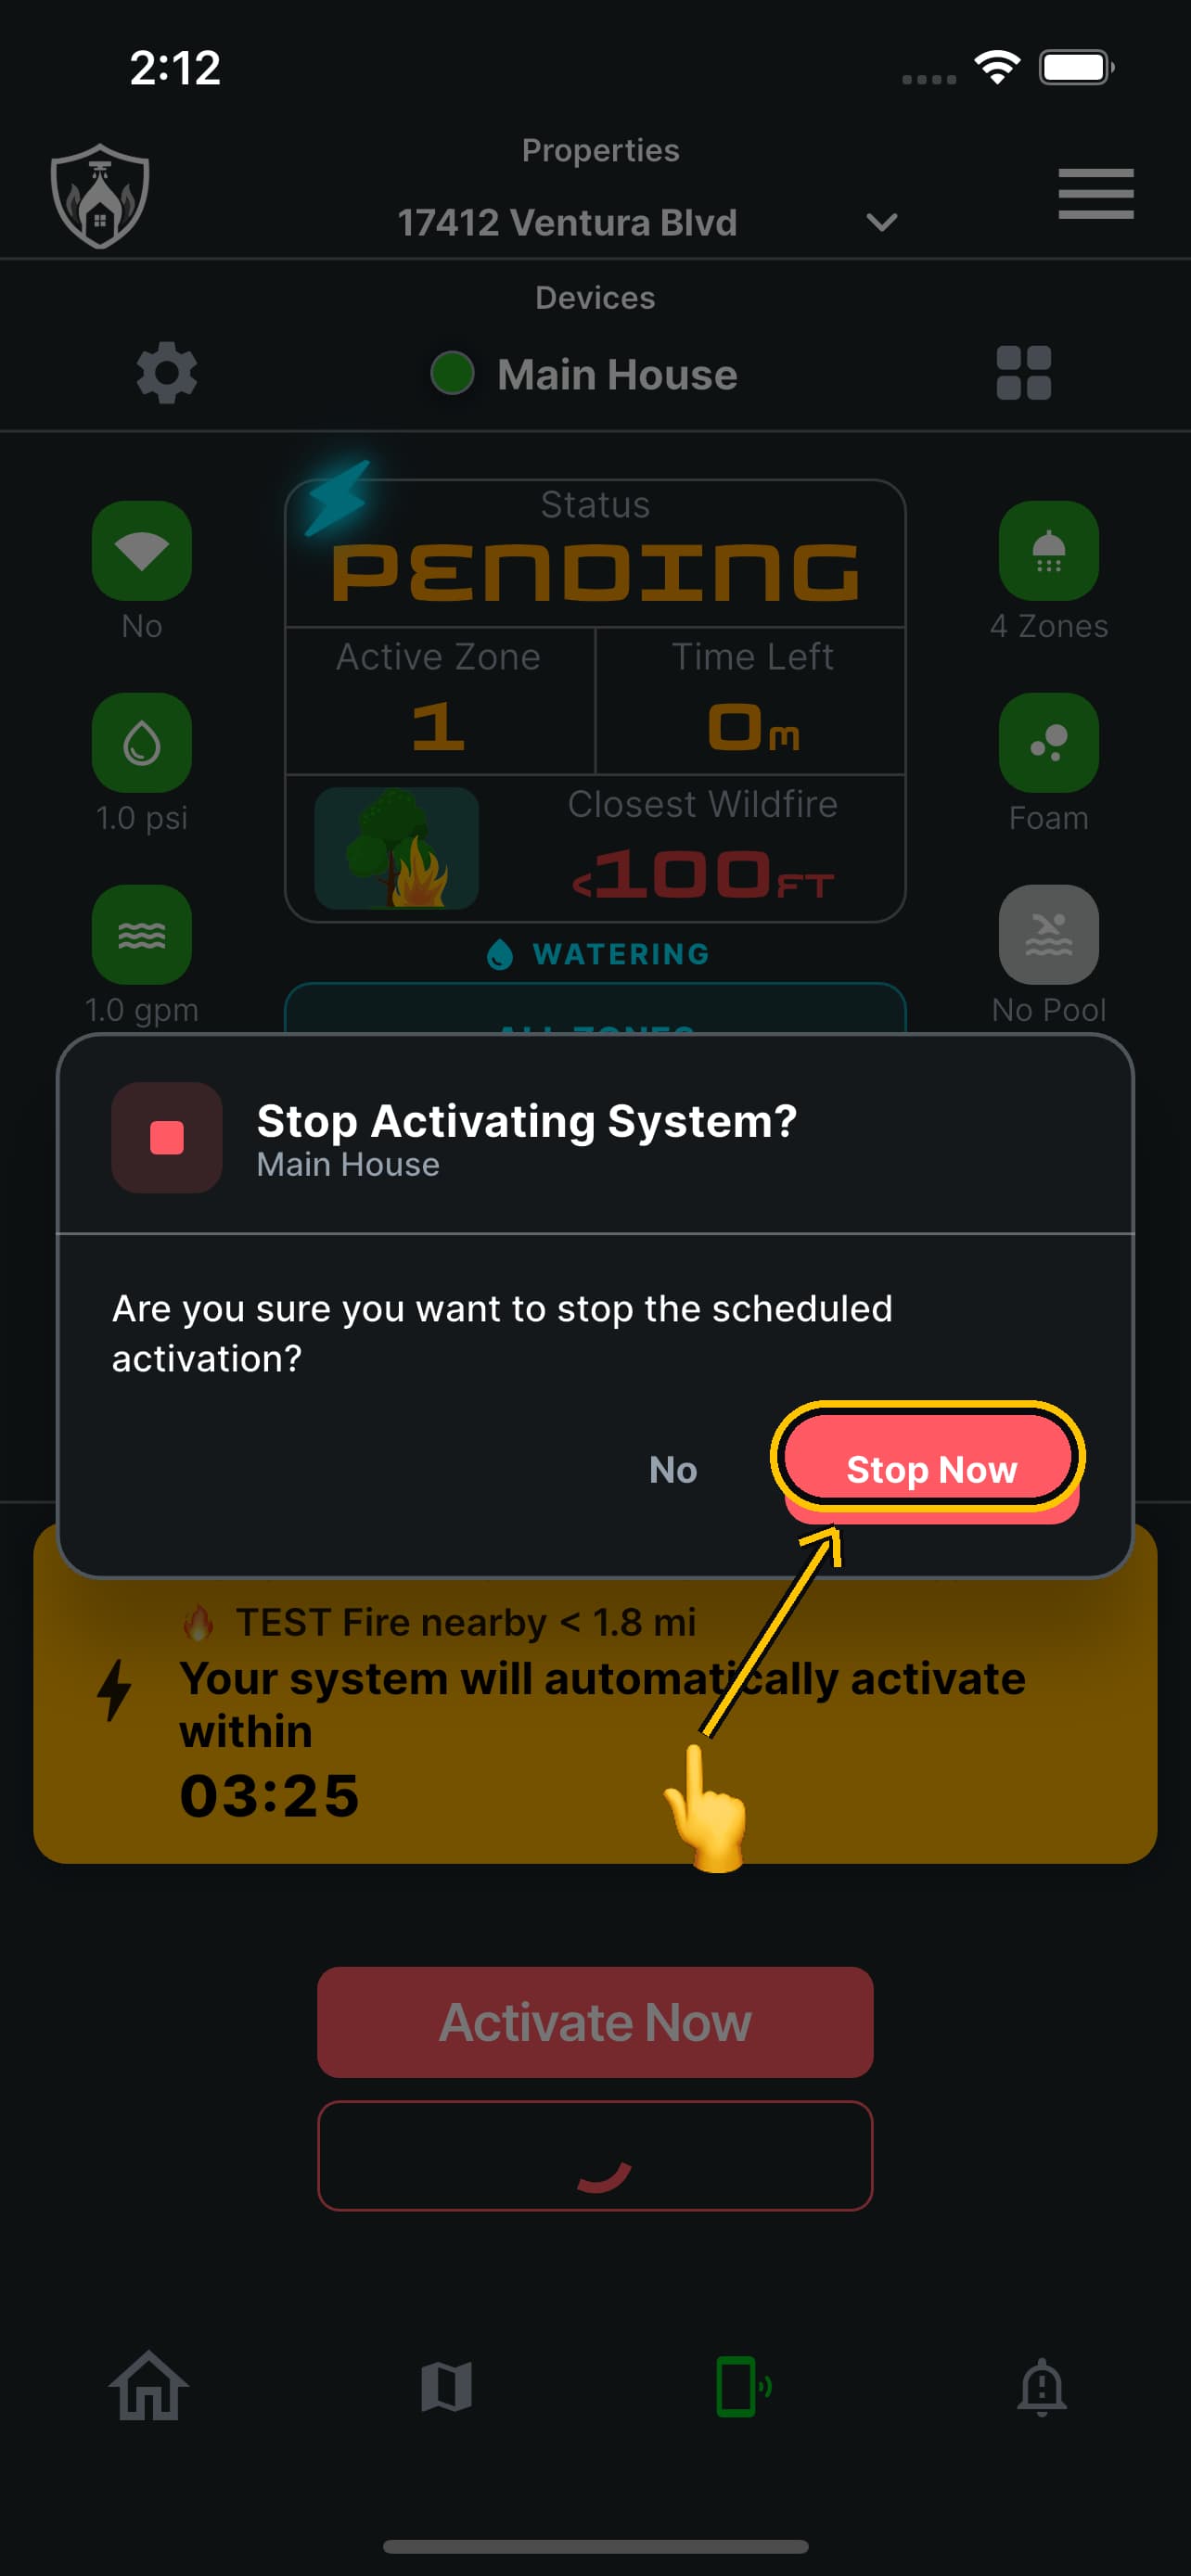
Cancel this activation before any water moves — and hold automatic activation for this one fire.
STOP cancels the pending activation. Nothing has run, so nothing is wasted. What matters is what it leaves behind: the system records which fire you declined, when, and how far away it was, and then holds automatic activation for that fire alone. A red badge appears on the device screen so you are never holding without knowing it.
- It records the fire by the fire agency’s own id, so the hold follows that fire as it grows and is renamed.
- The system is not disarmed. Any other fire is treated completely normally.
- Manual start is untouched: START, START with FOAM, Test Run and your schedule all still work.
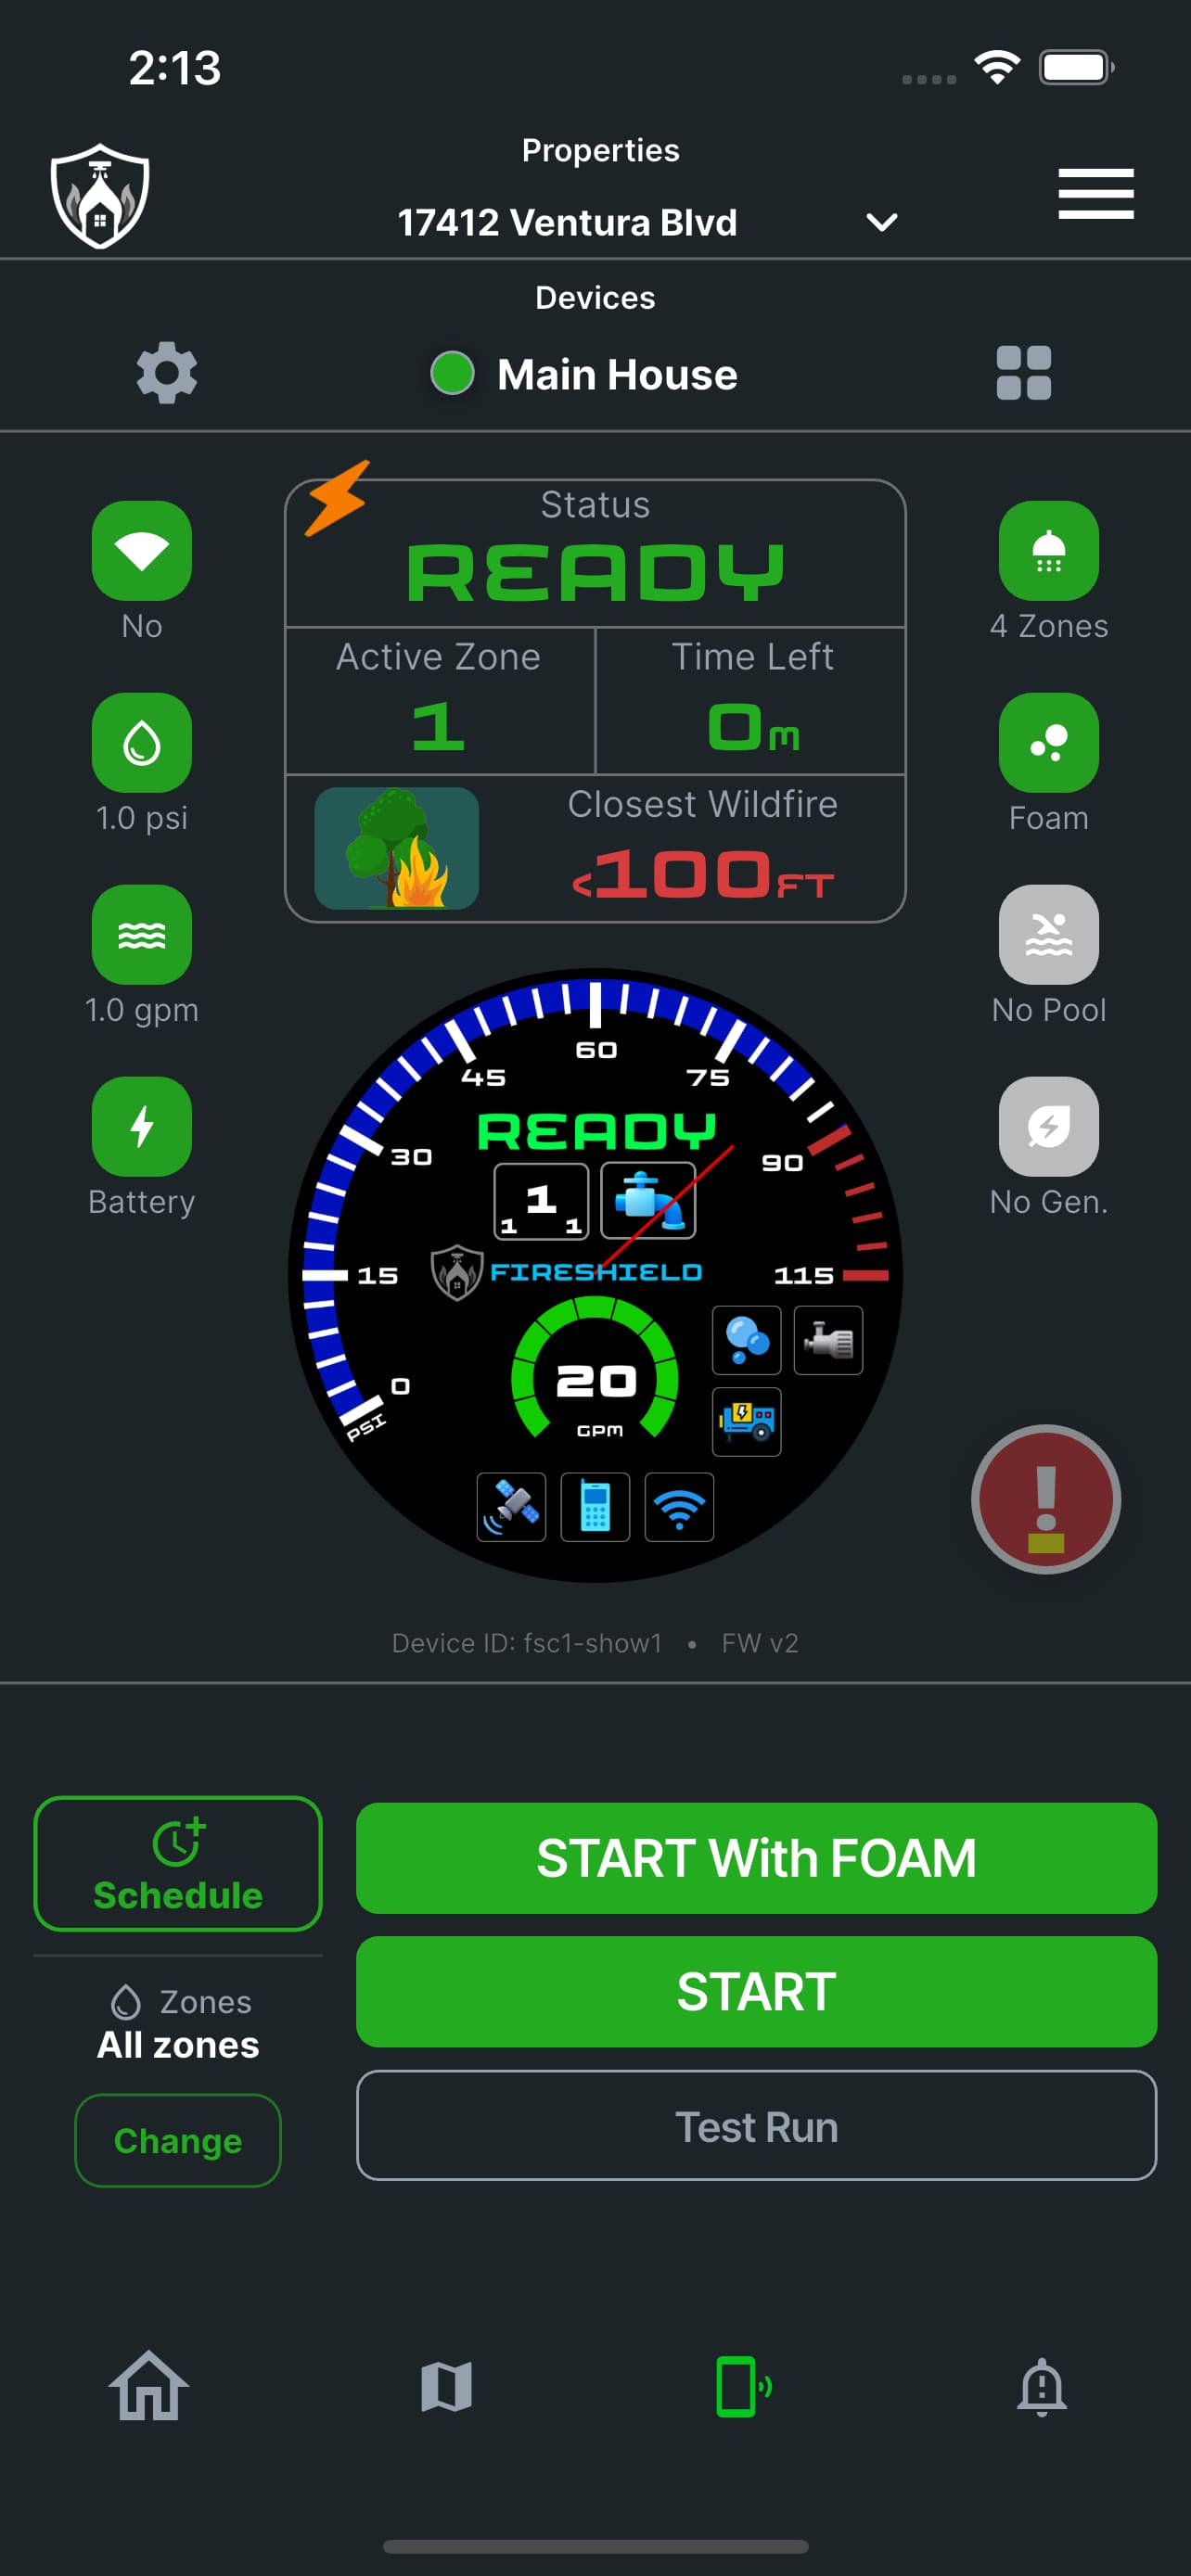
Reading the hold
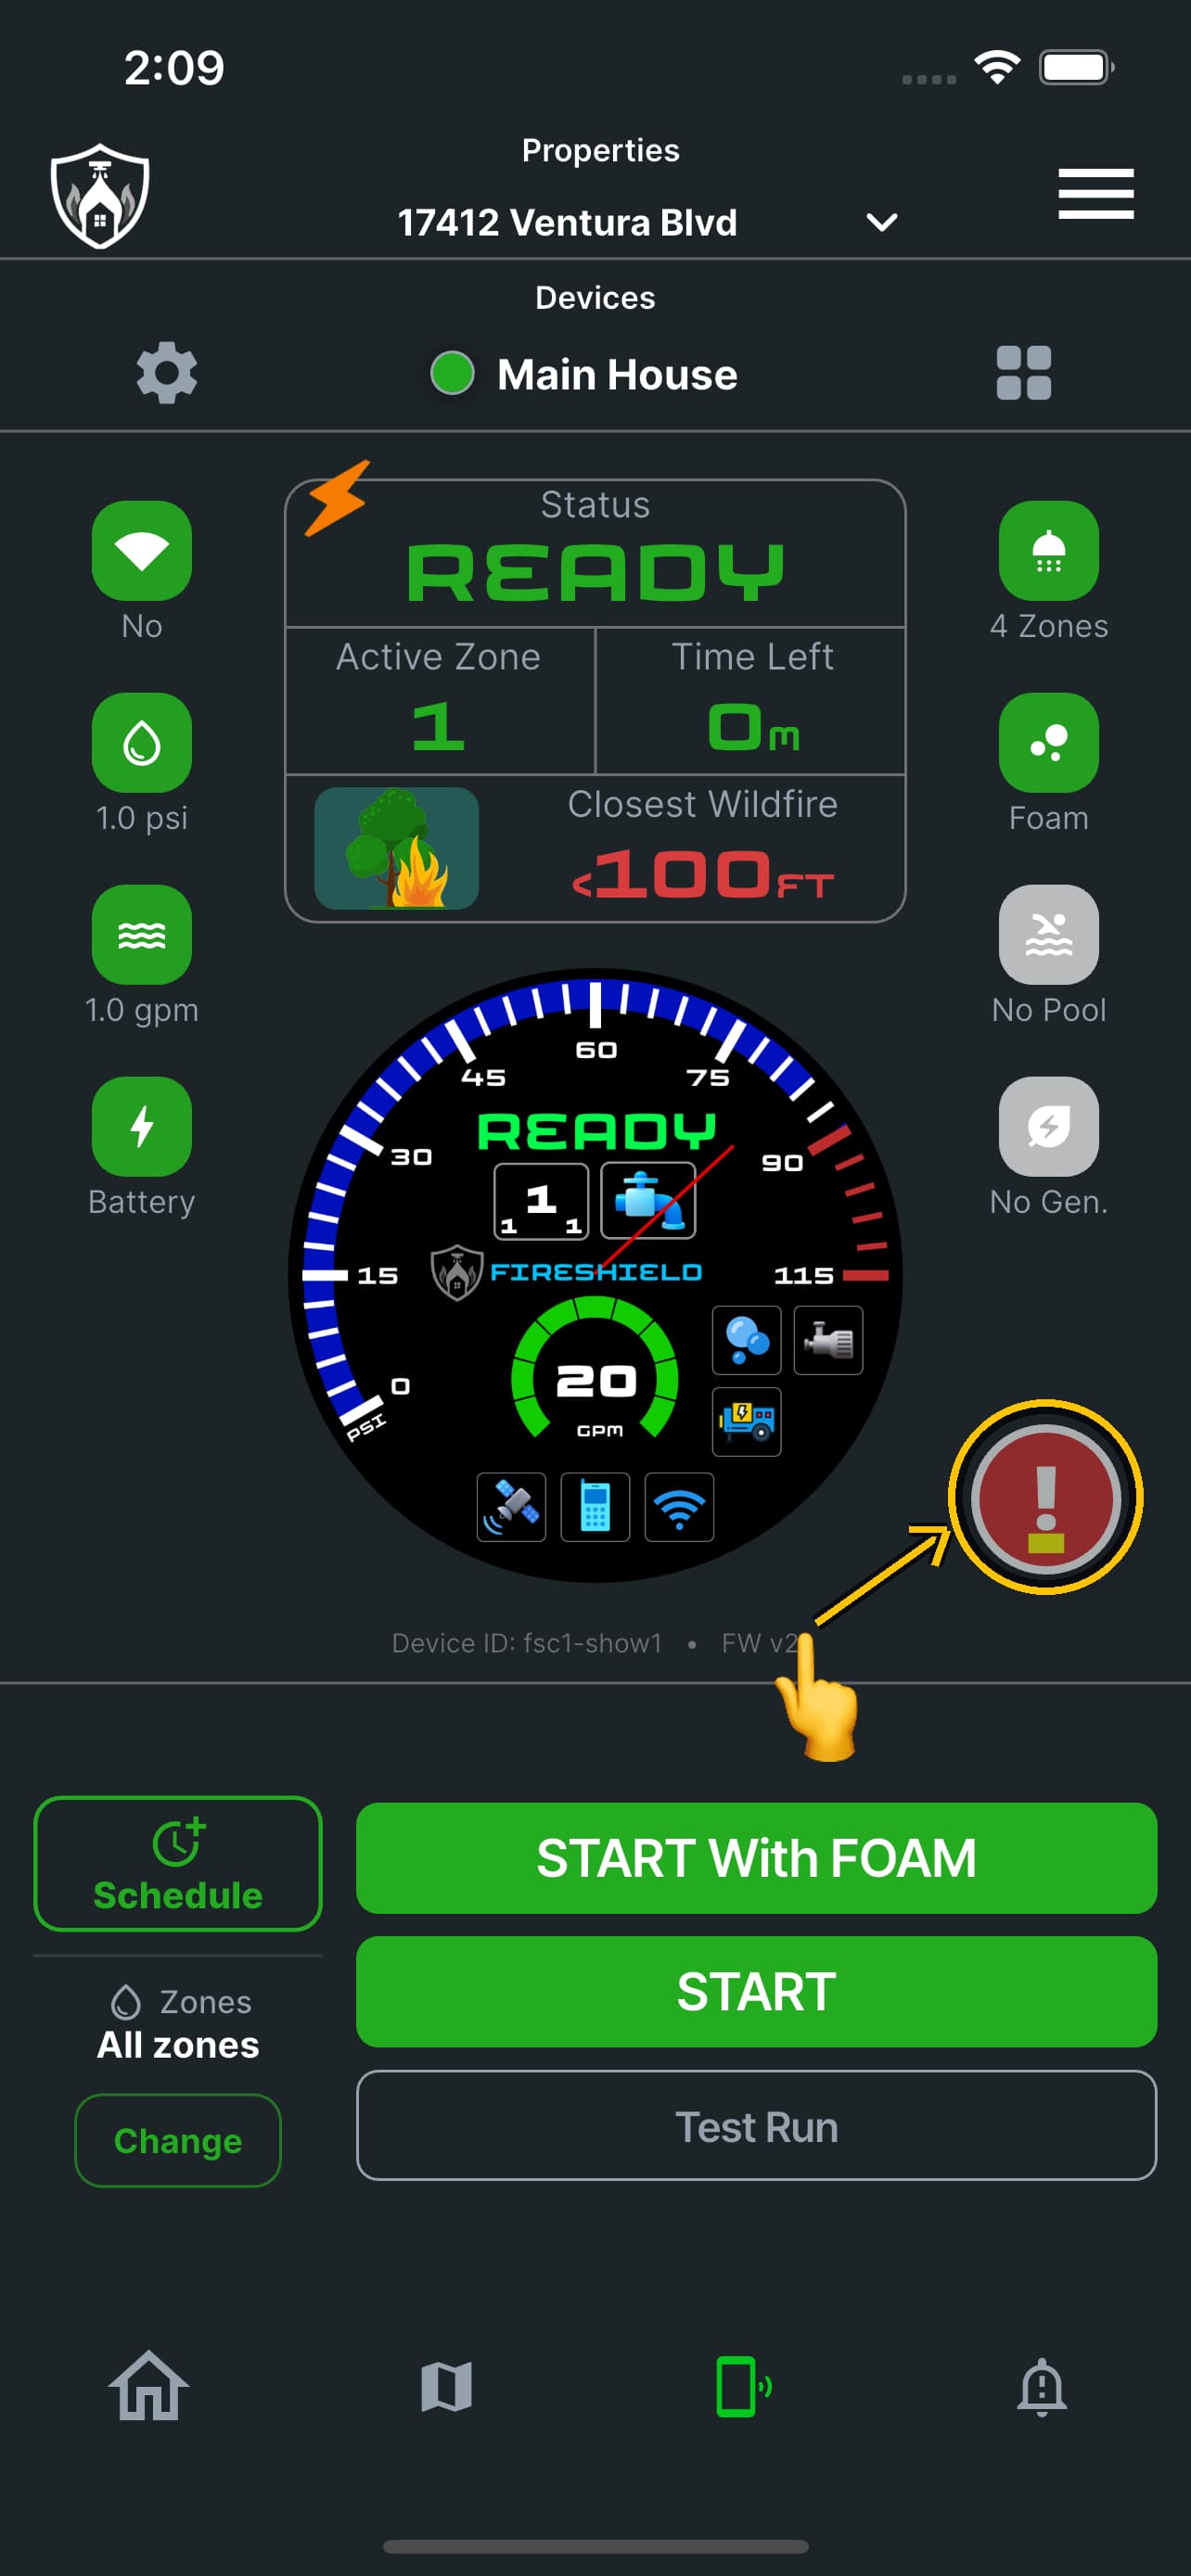
Tap the red badge to see exactly what is being held, and for how long.
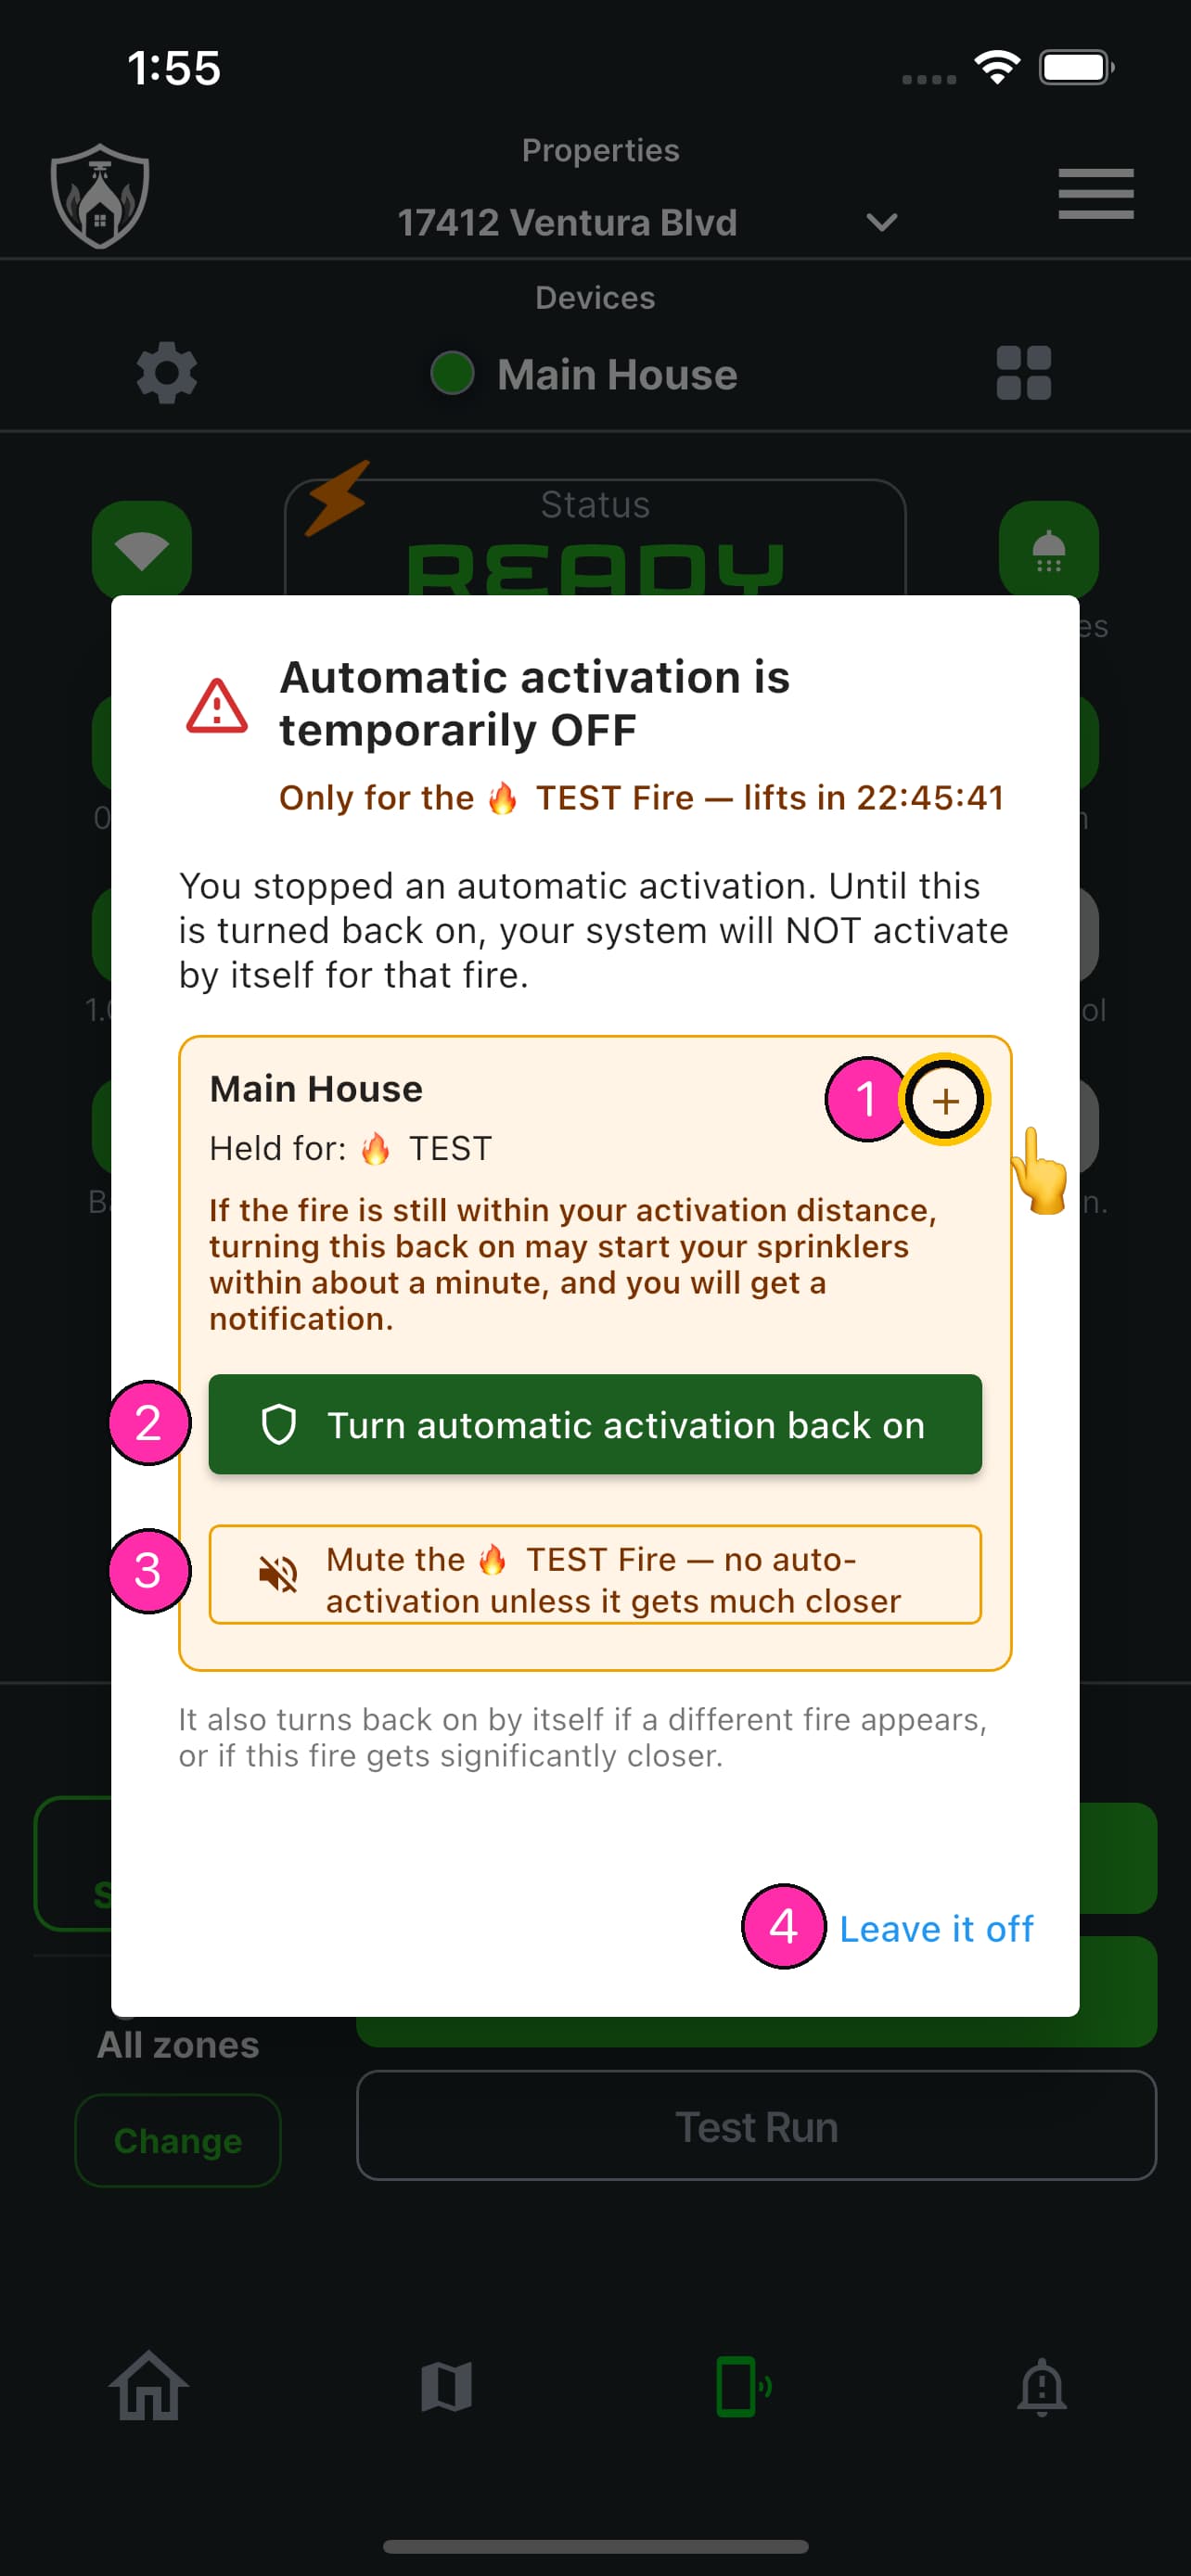
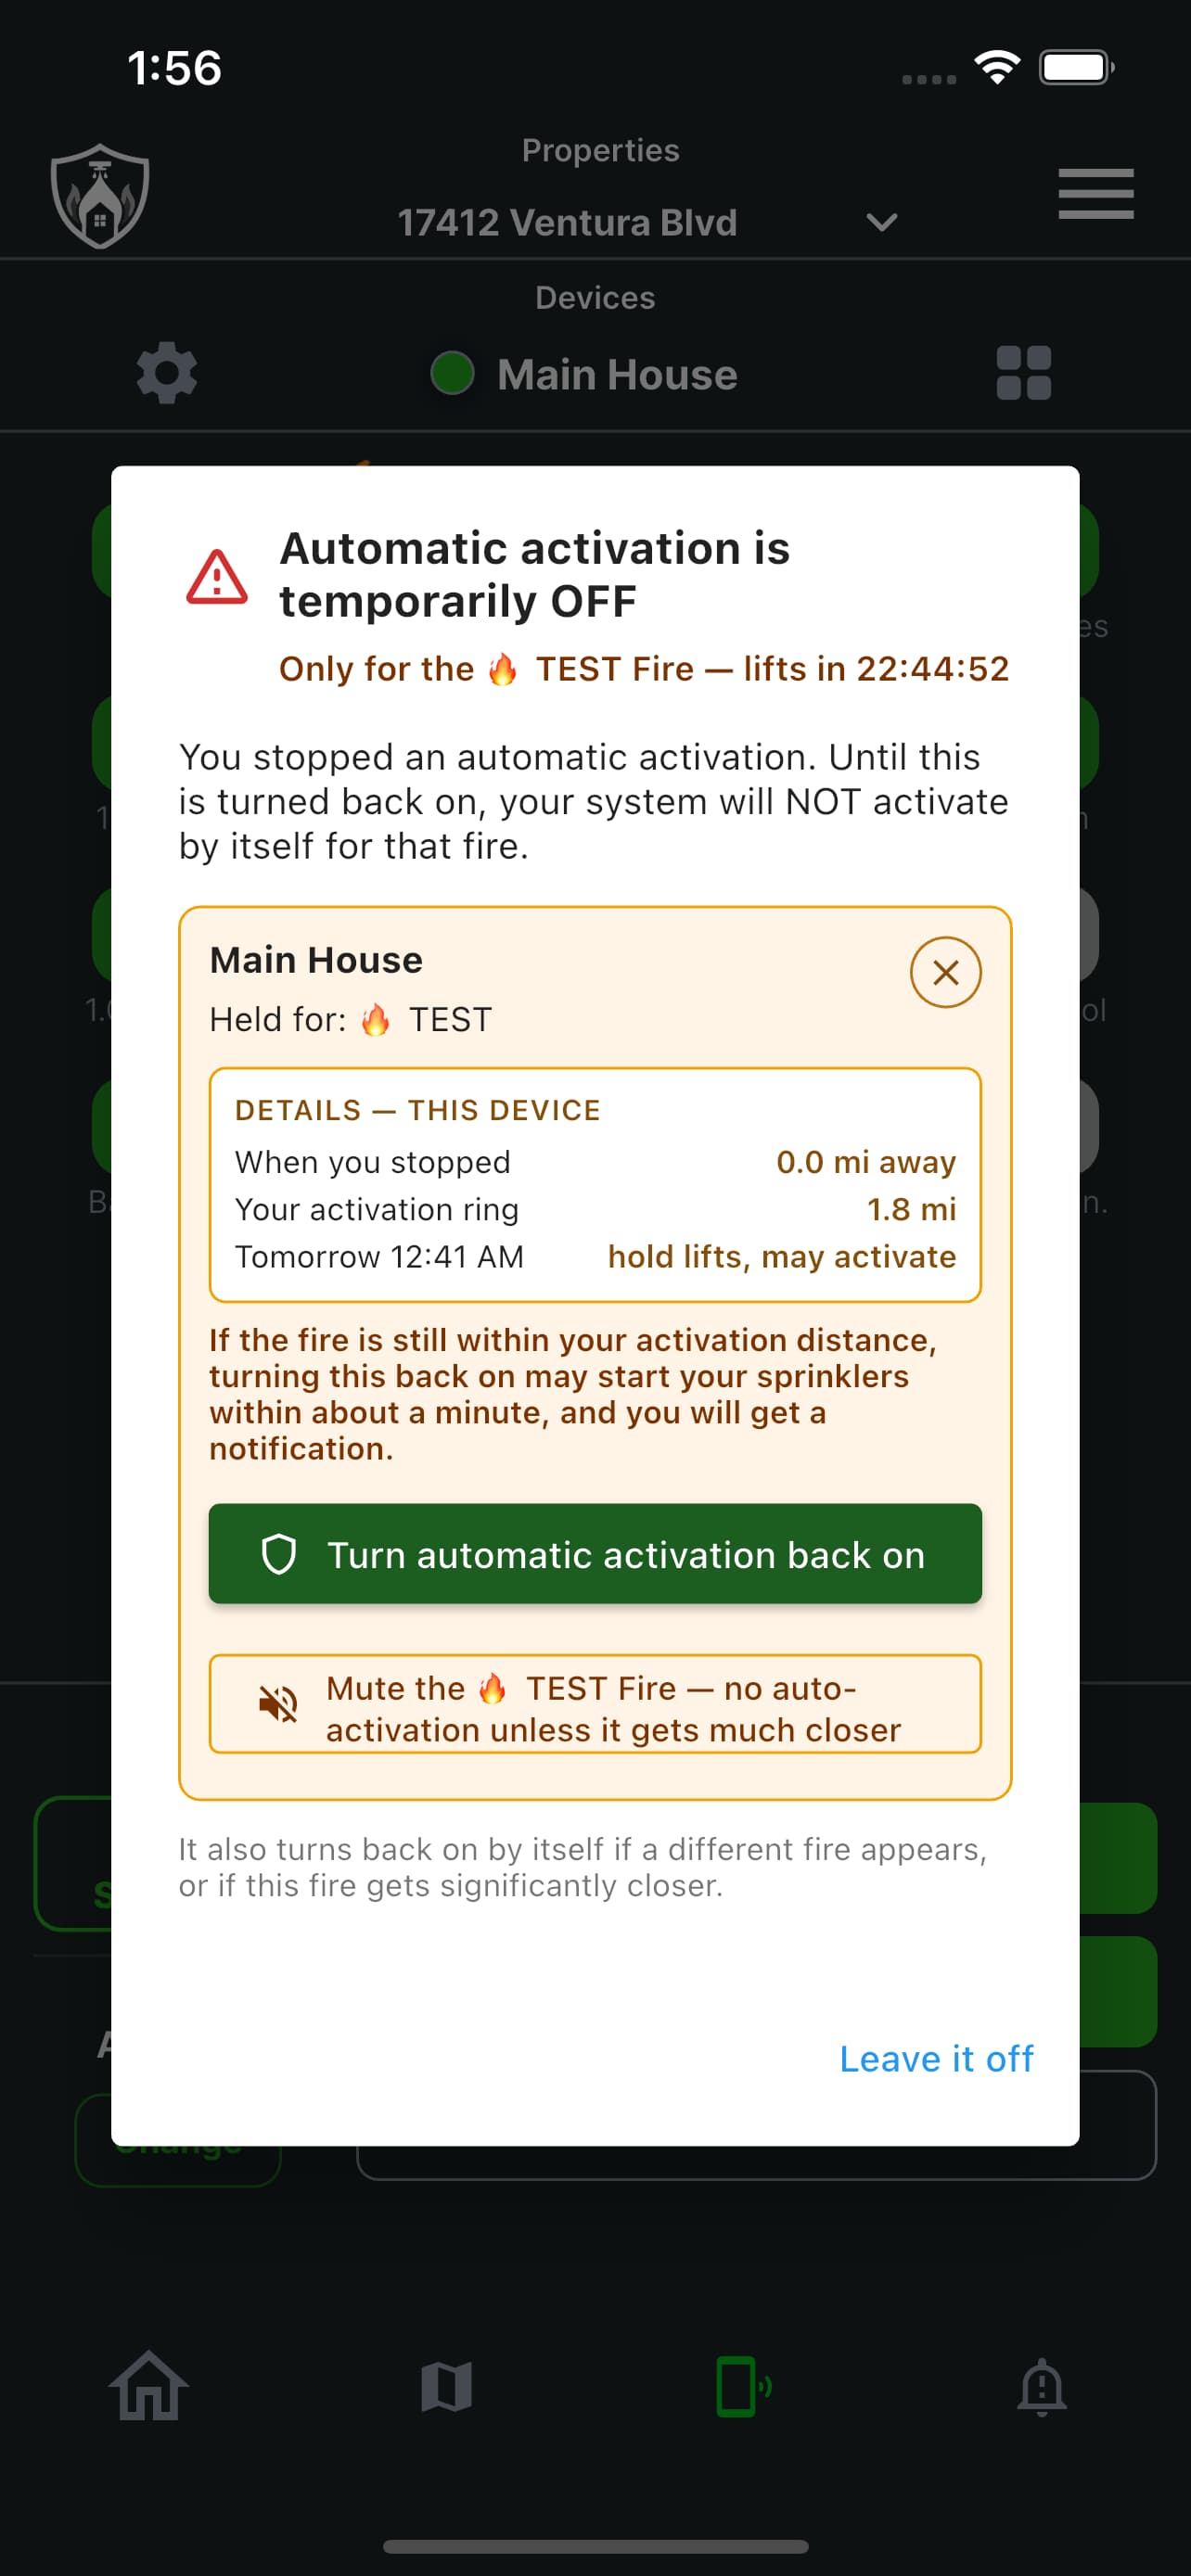
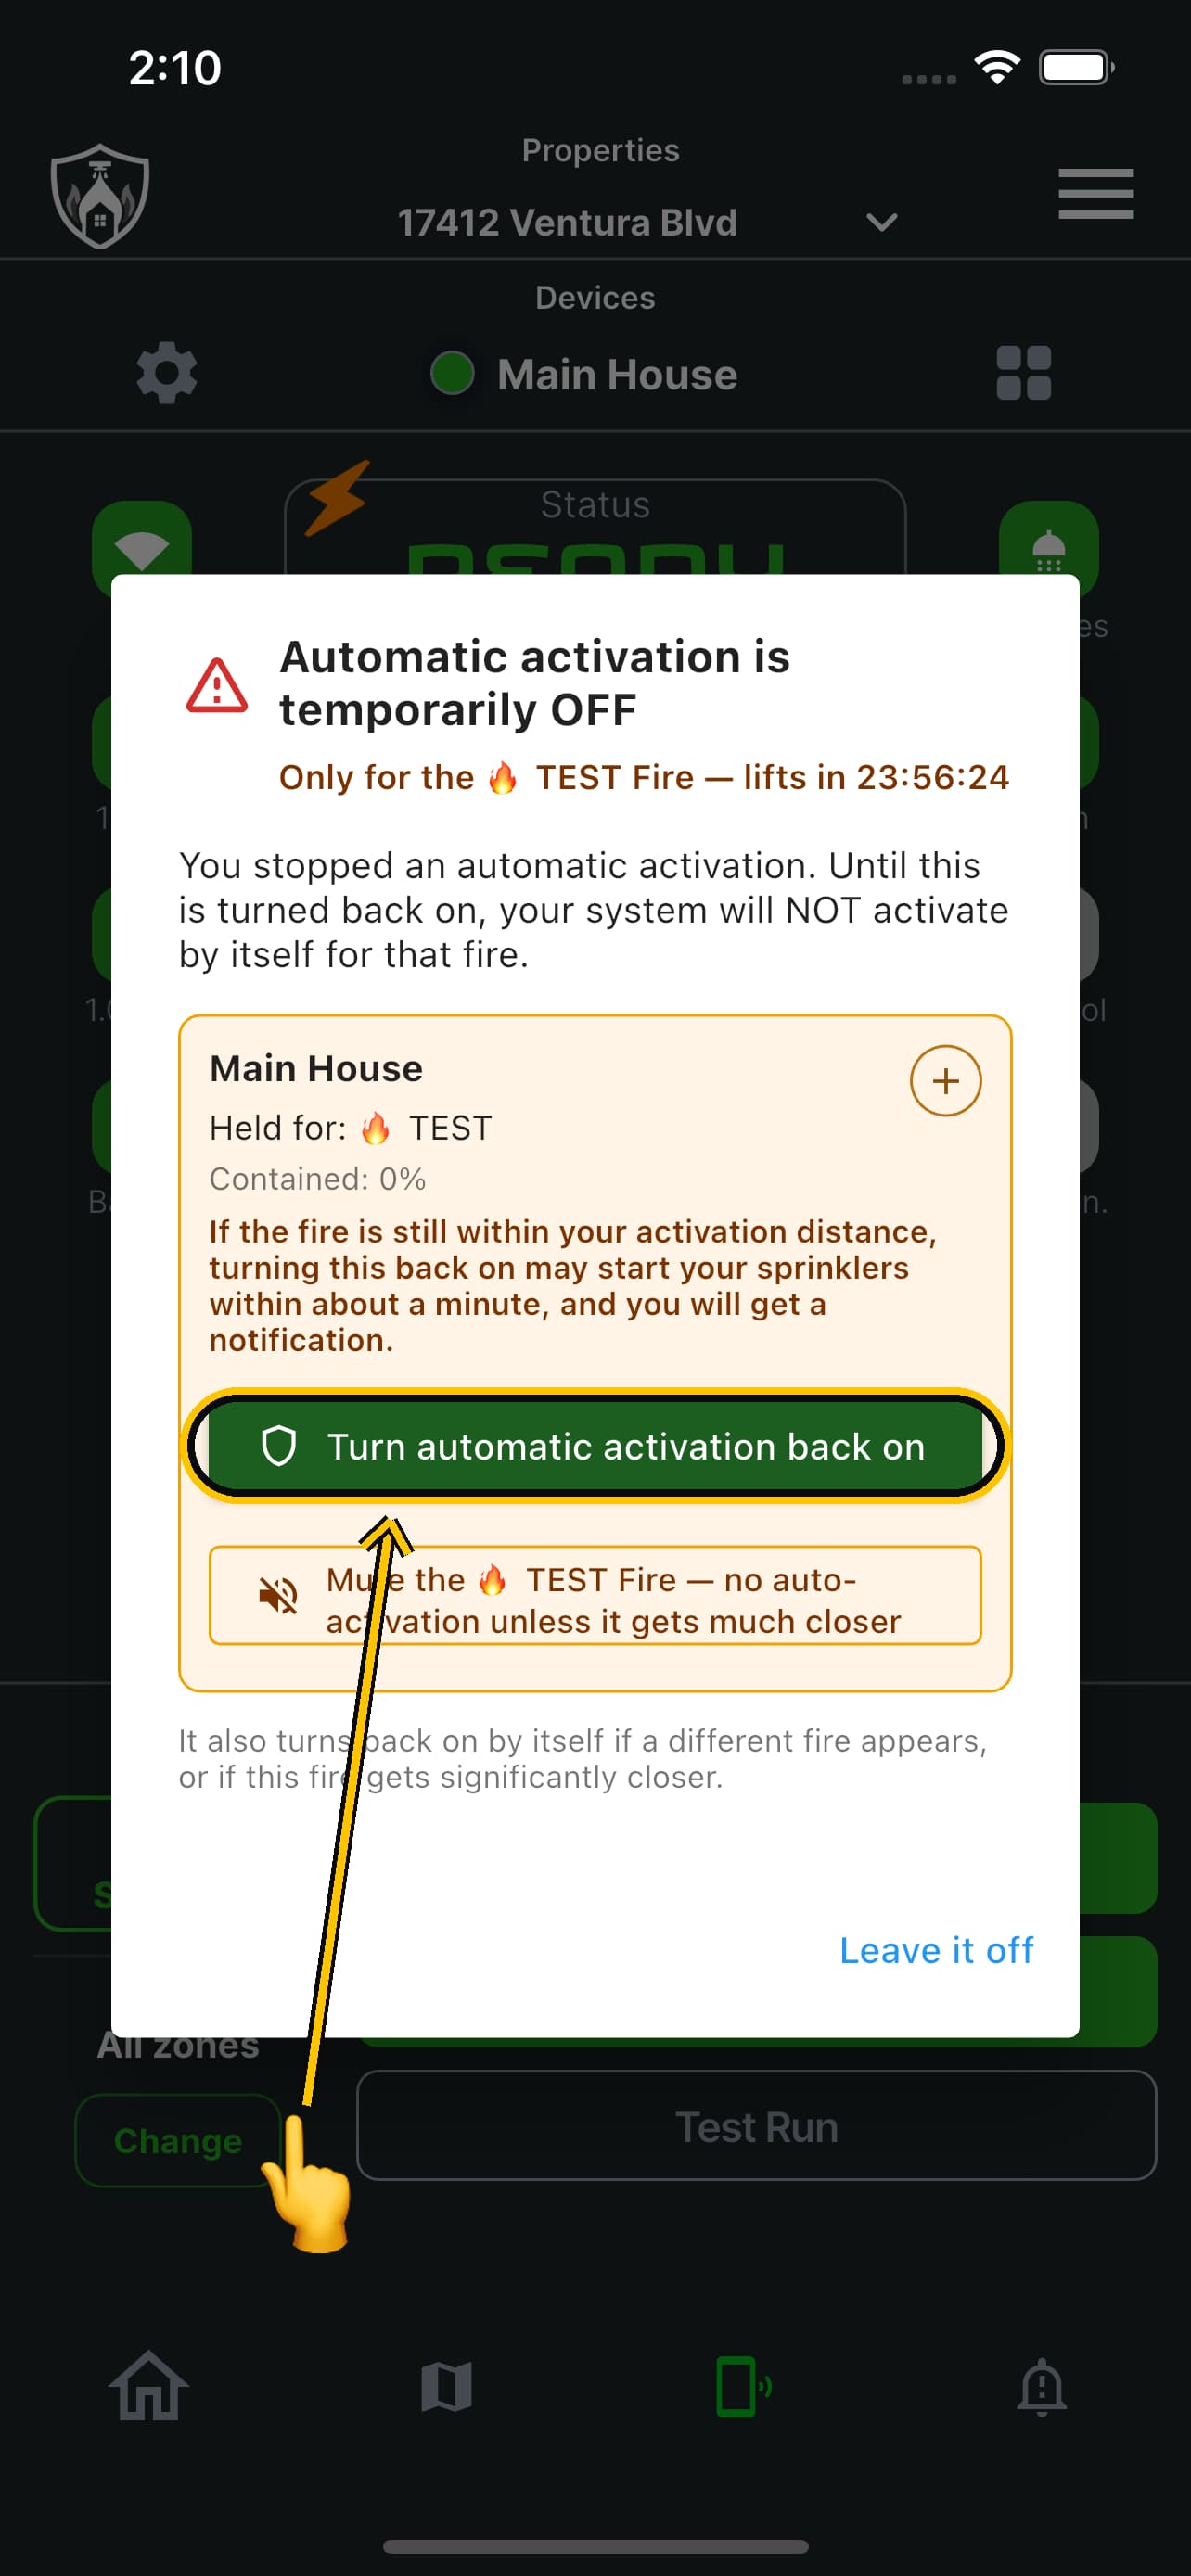
The red badge is not a fault light. Tap it and the app tells you which fire is held, how long until the hold lifts on its own, and what each way out of it will do. The plus opens the detail: how far away the fire was at the moment you stopped it, where your activation ring sits, and the time the hold expires.
- 1Details — the distance when you stopped it, your activation ring, and when the hold lifts
- 2Turn automatic activation back on — lift the hold now
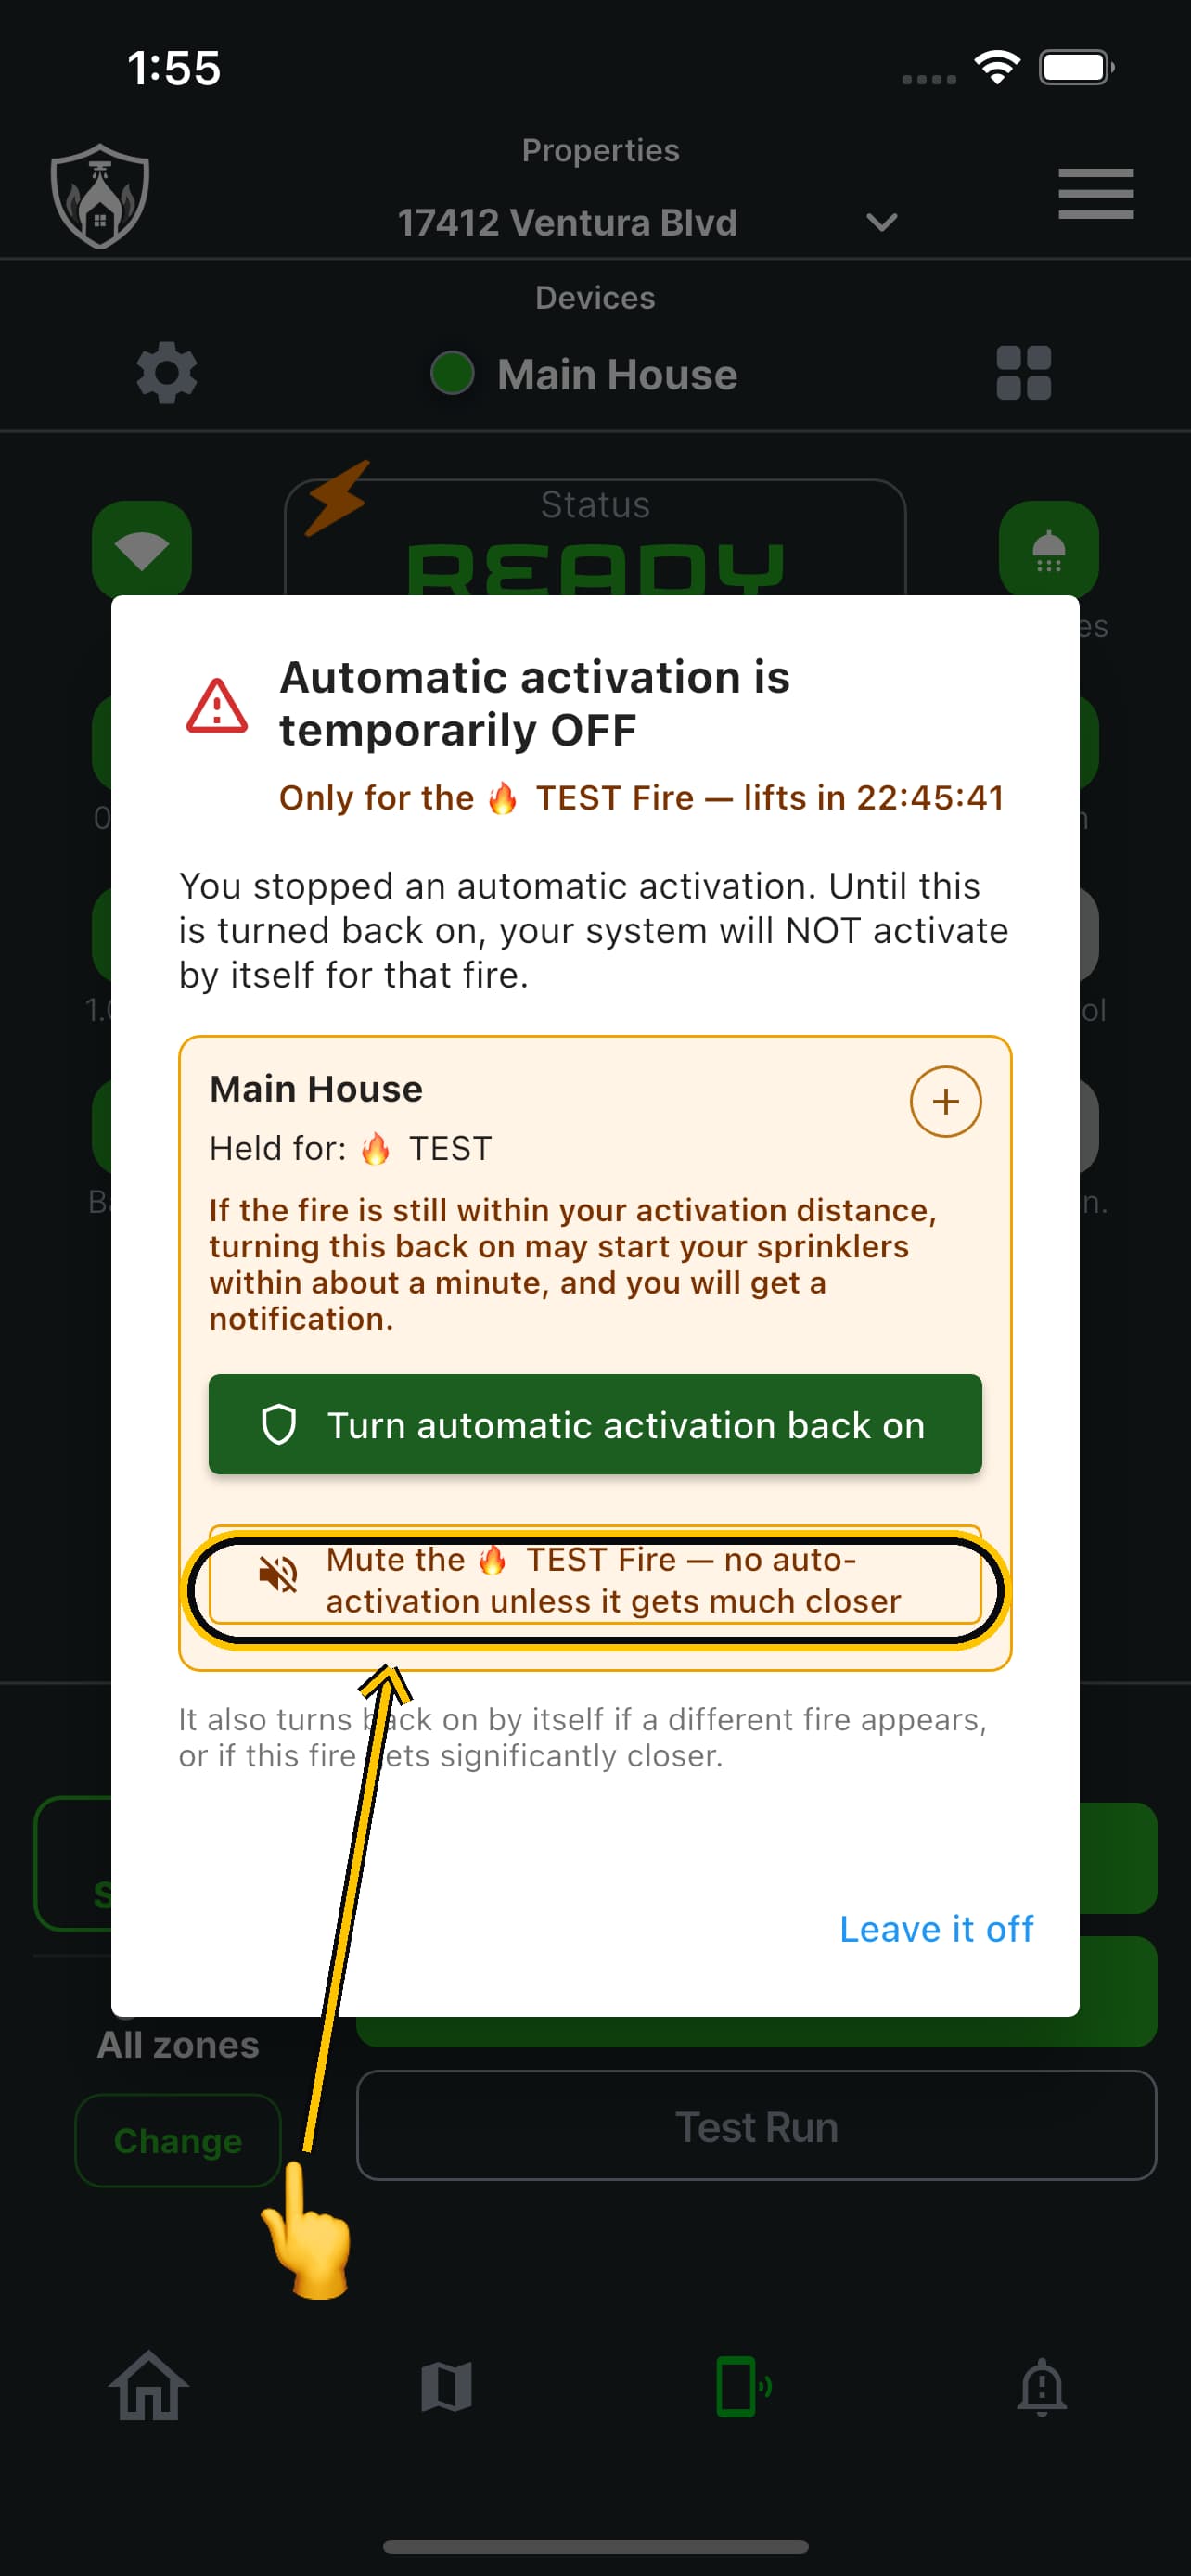
- 3MUTE this fire — keep automatic activation armed, and silence this one fire instead
- 4Leave it off — close the notice and keep the hold
TURN IT BACK ON
Lift the hold now, and let this fire activate the system again.
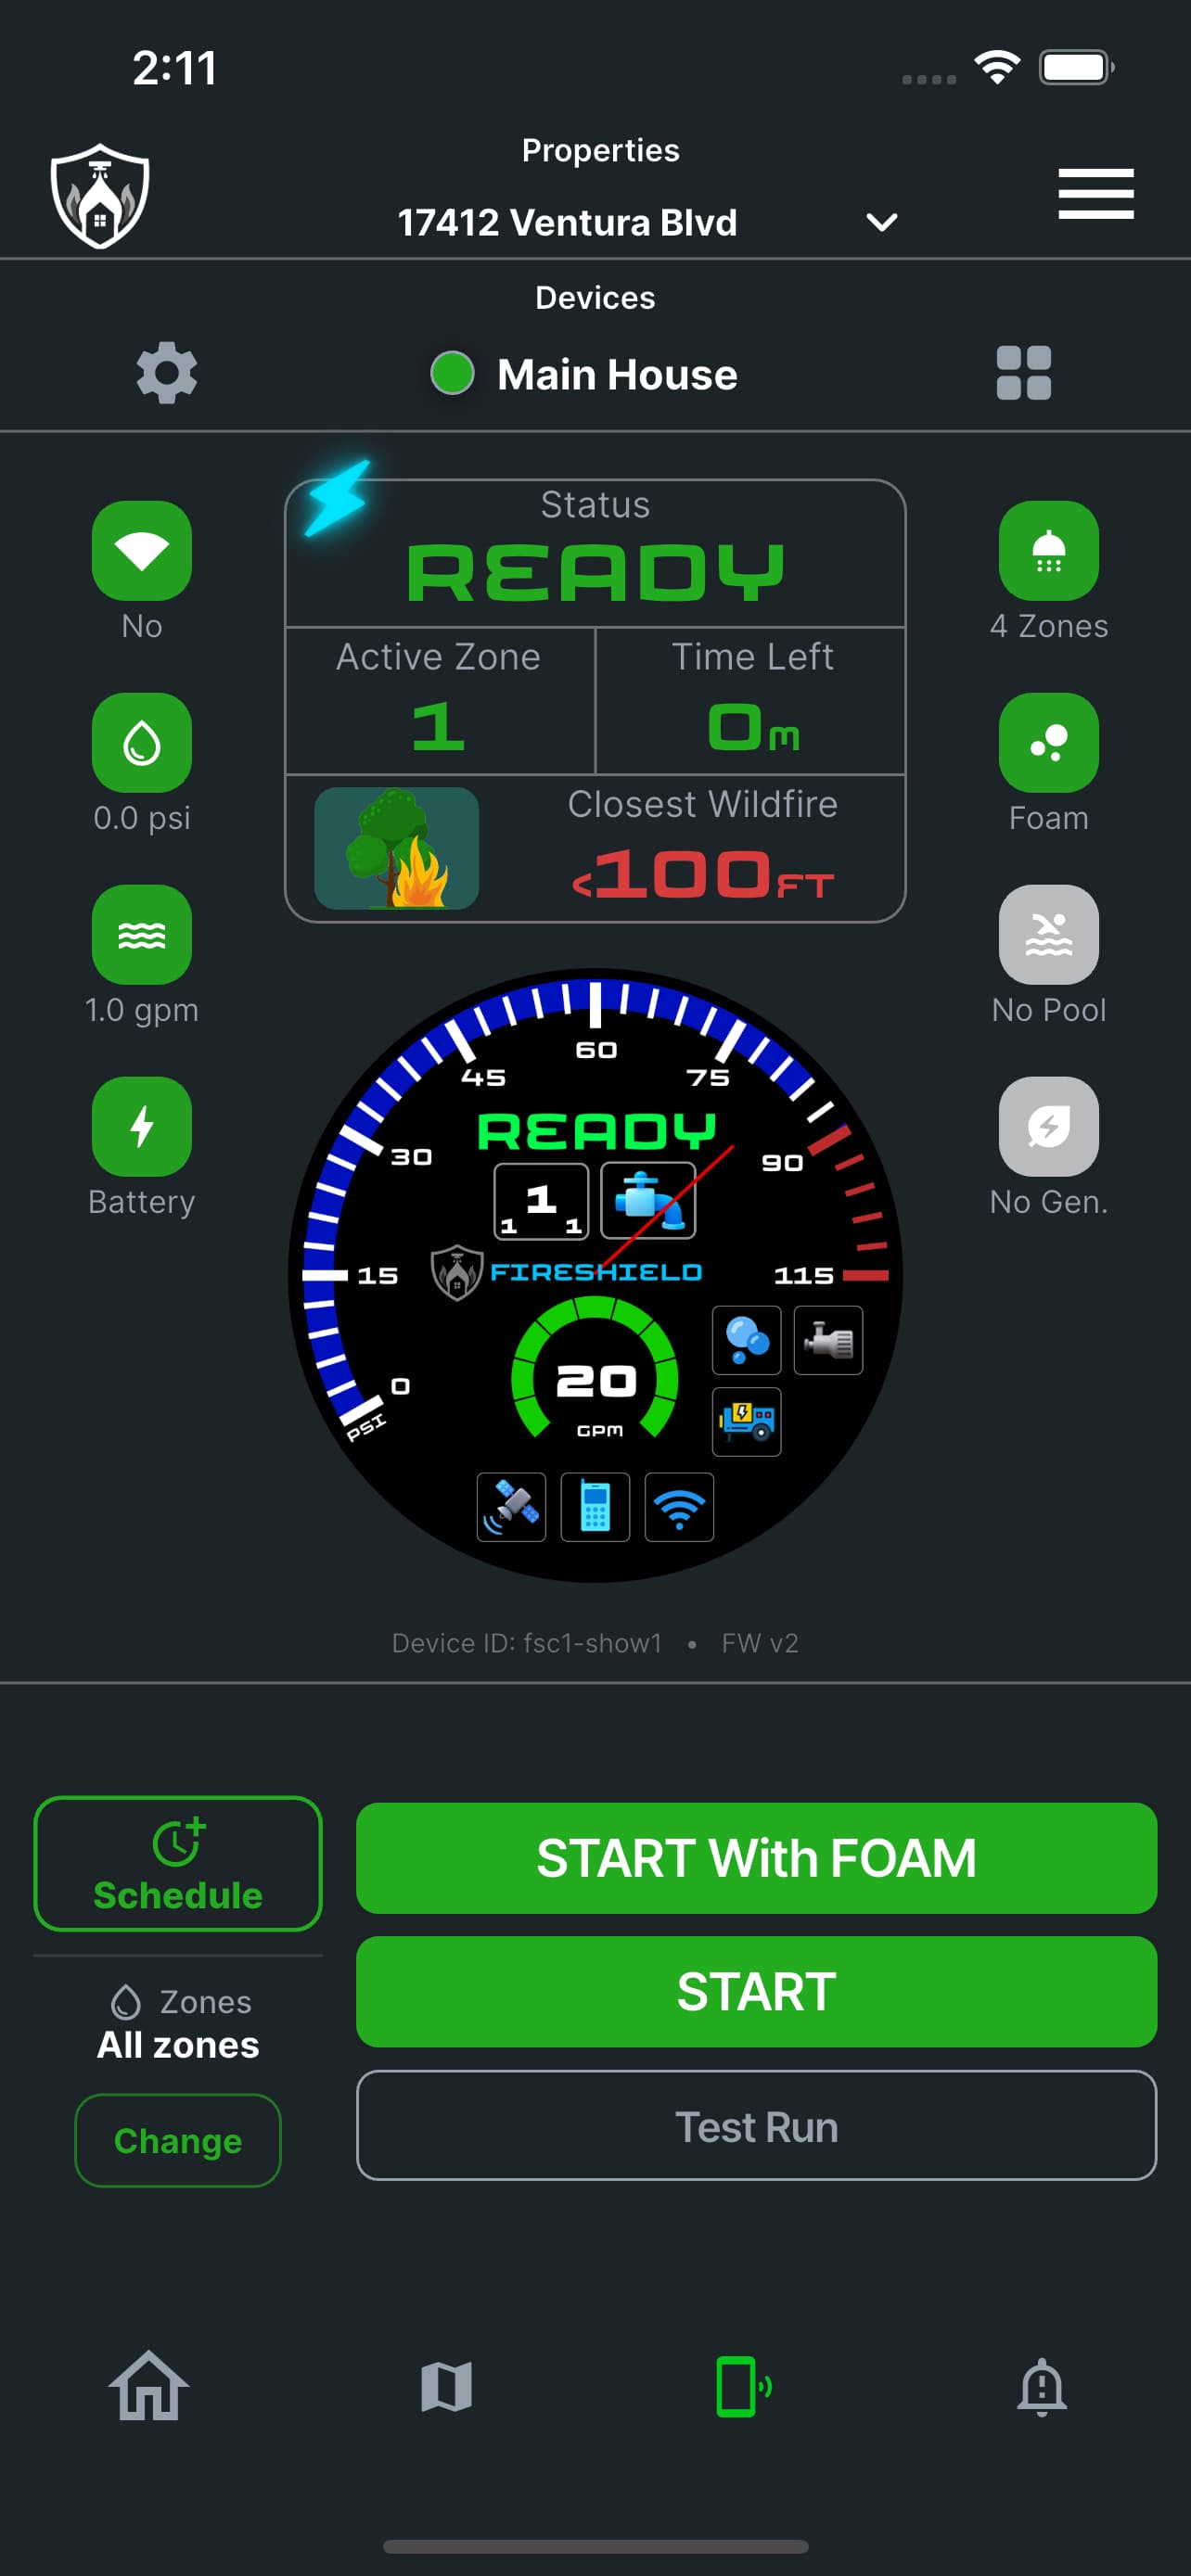
Turn automatic activation back on lifts the hold immediately. The app warns you plainly before it does: if the fire is still inside your activation distance, the system may start within about a minute and you will get a notification. The badge disappears, the device screen goes back to its ordinary READY — and, if the fire really is still close, PENDING comes straight back with a fresh countdown.
MUTE
Keep automatic activation armed for everything else, and silence one fire you have judged.
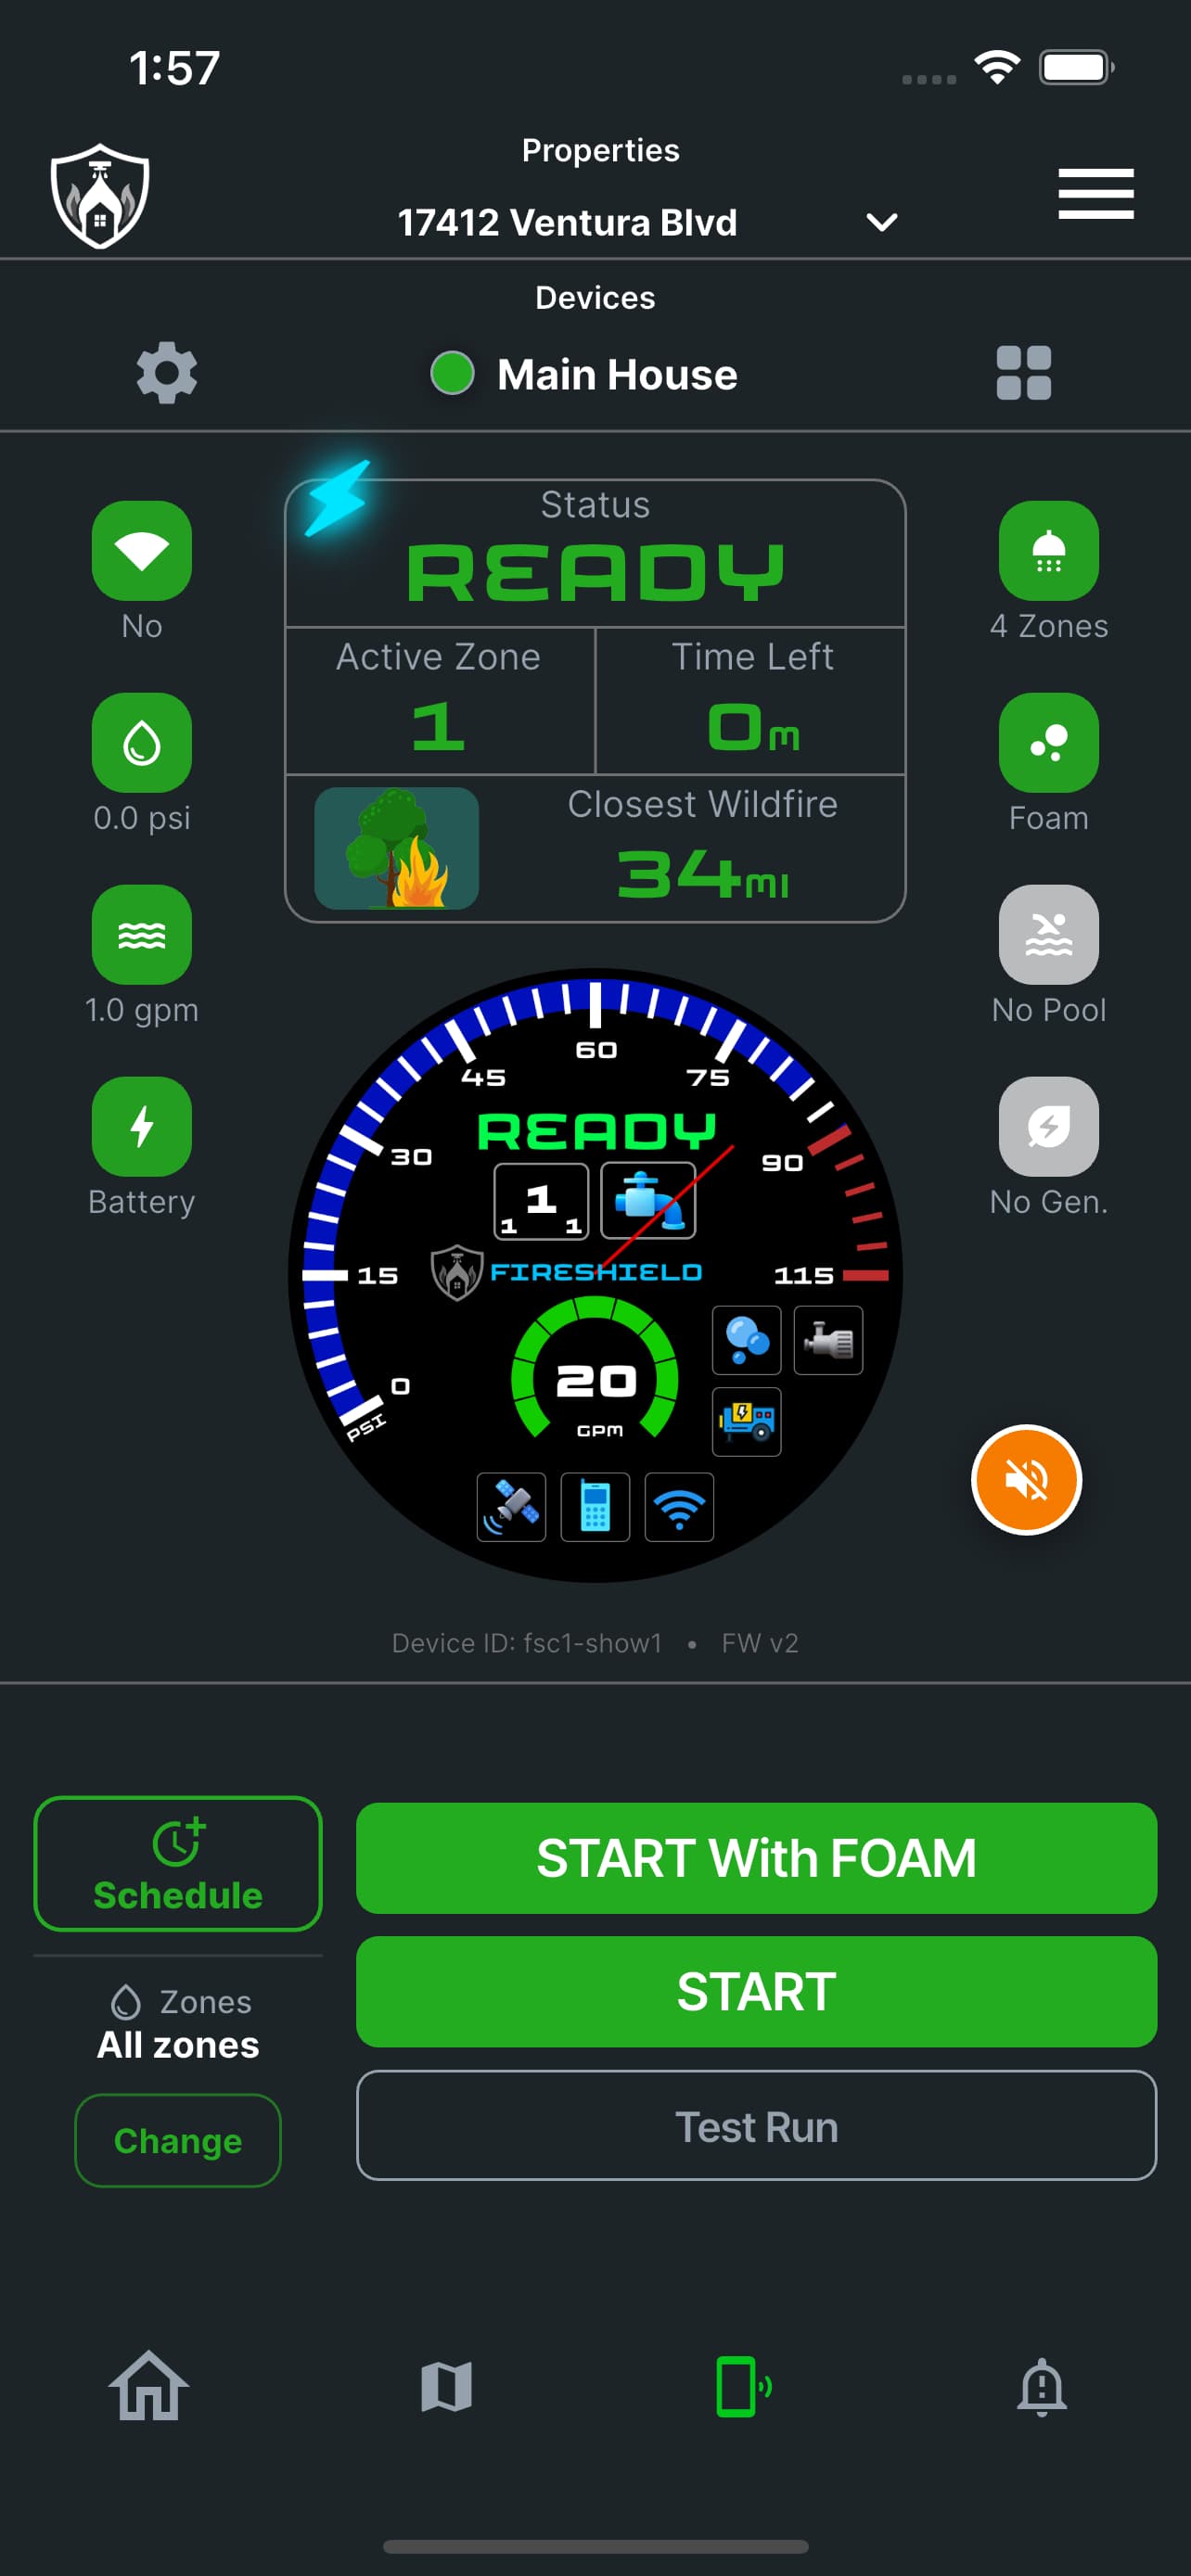
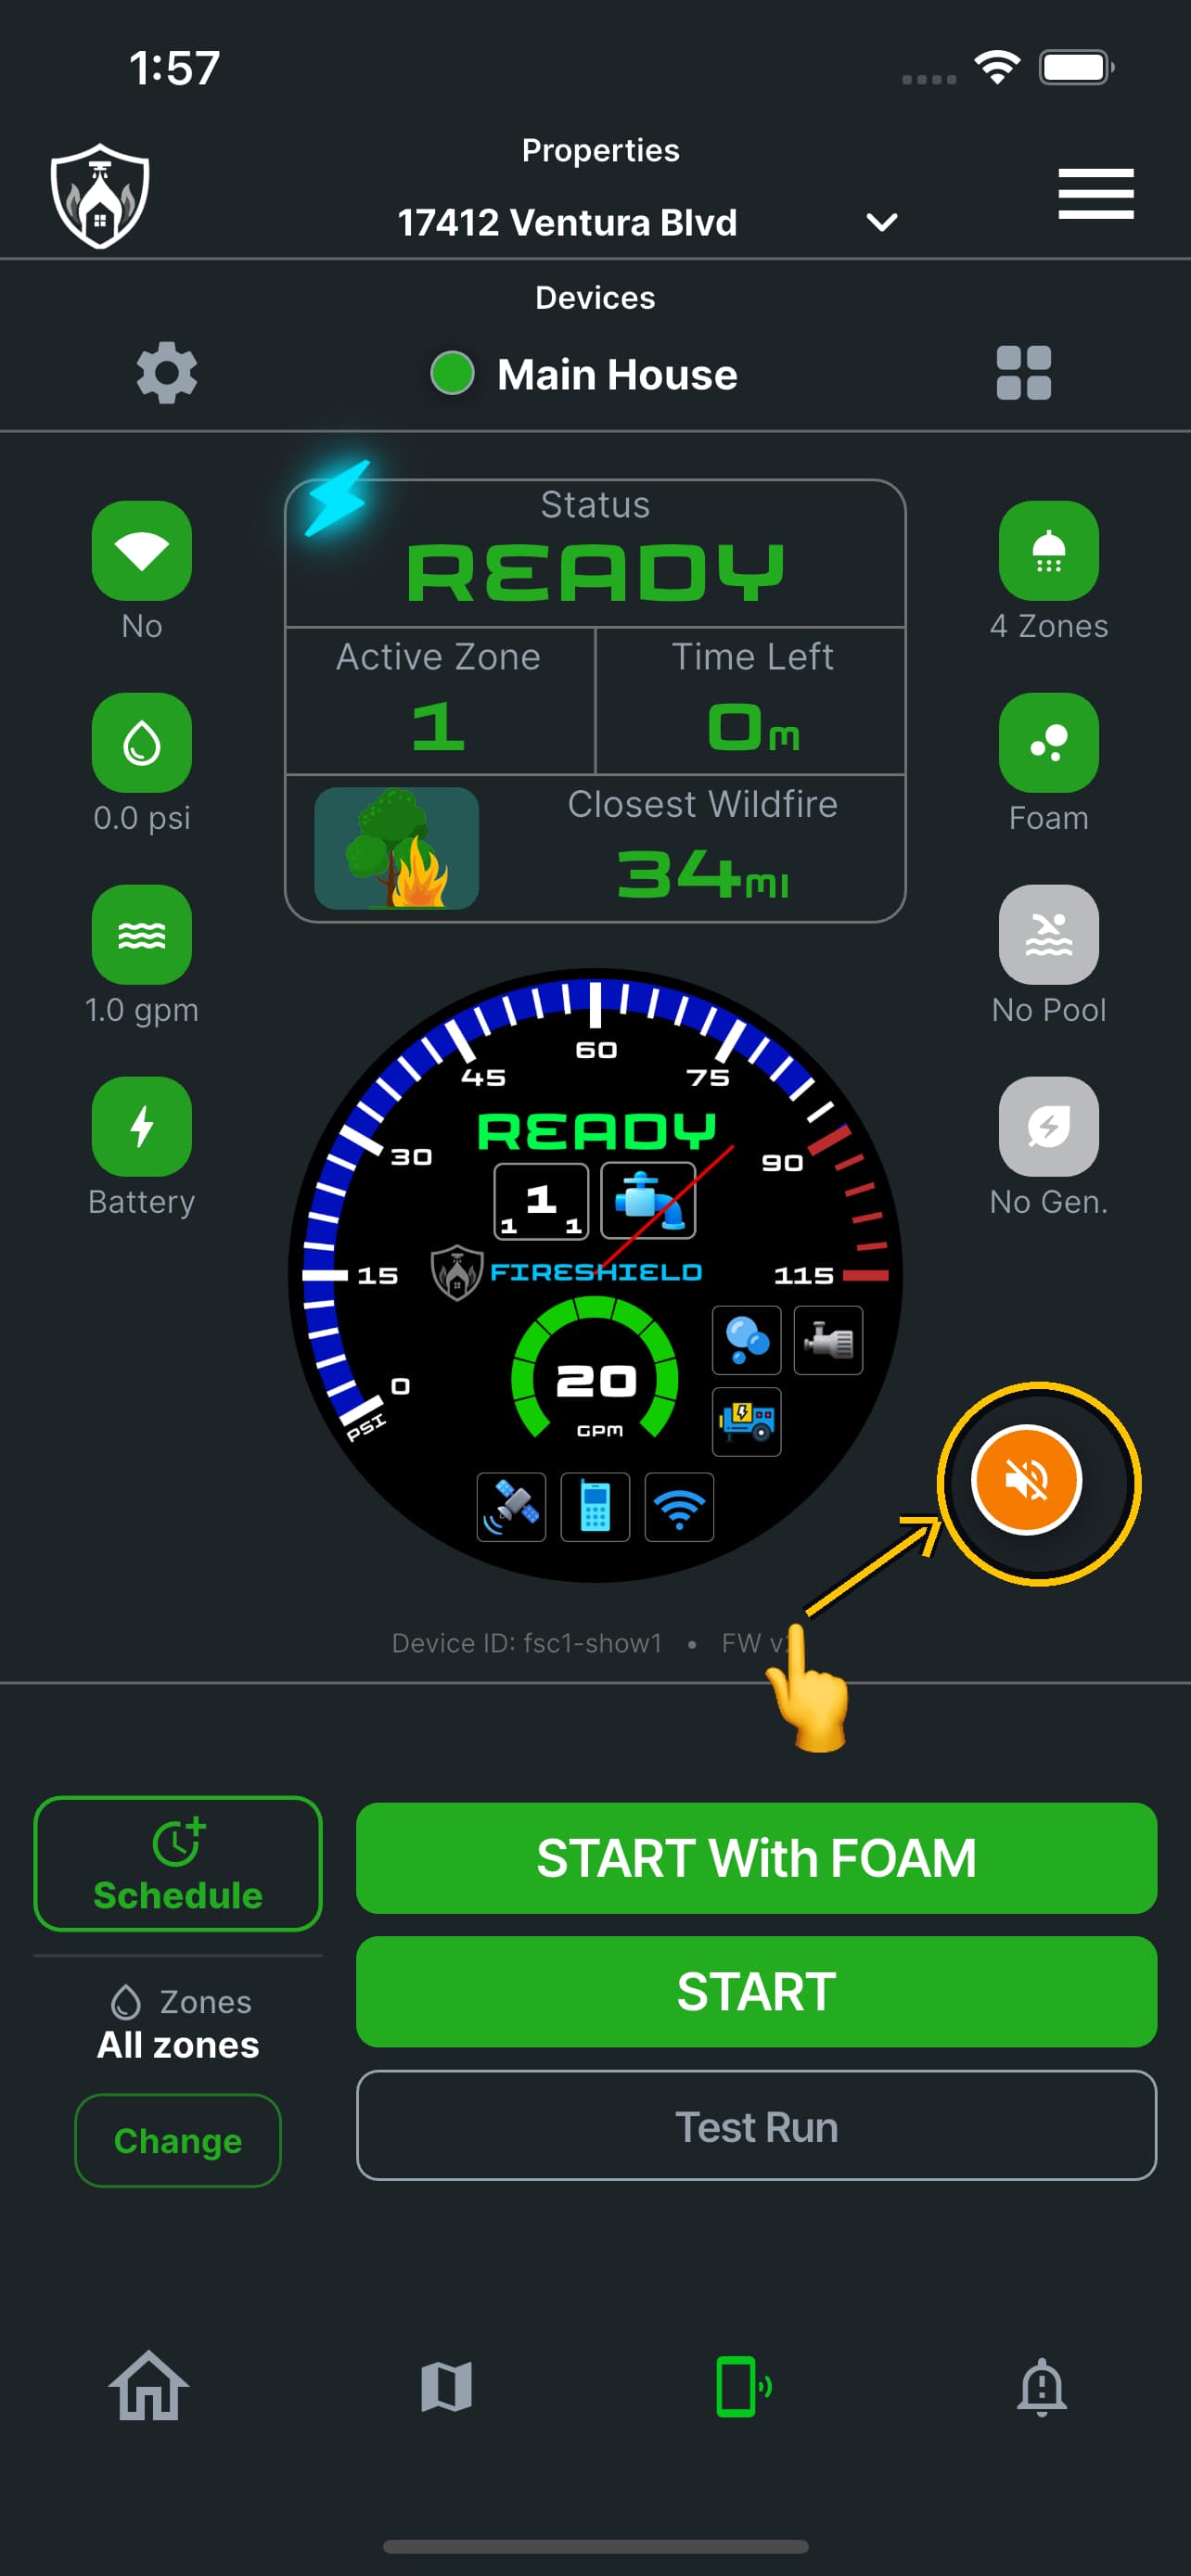
Mute is the middle option, and usually the right one. A hold is a blanket no for one fire with a one-day clock on it; a mute is a considered judgement about one fire that you want to last. Automatic activation stays fully armed for every other fire, and the red badge becomes an orange muted bell, so the device screen always tells you which of the two you chose.
- You can mute more than one fire. The app keeps them as a list.
- Unlike the hold, a mute has no 24-hour clock. It lasts until something below ends it.
UN-MUTE
Hand one fire back to automatic activation.
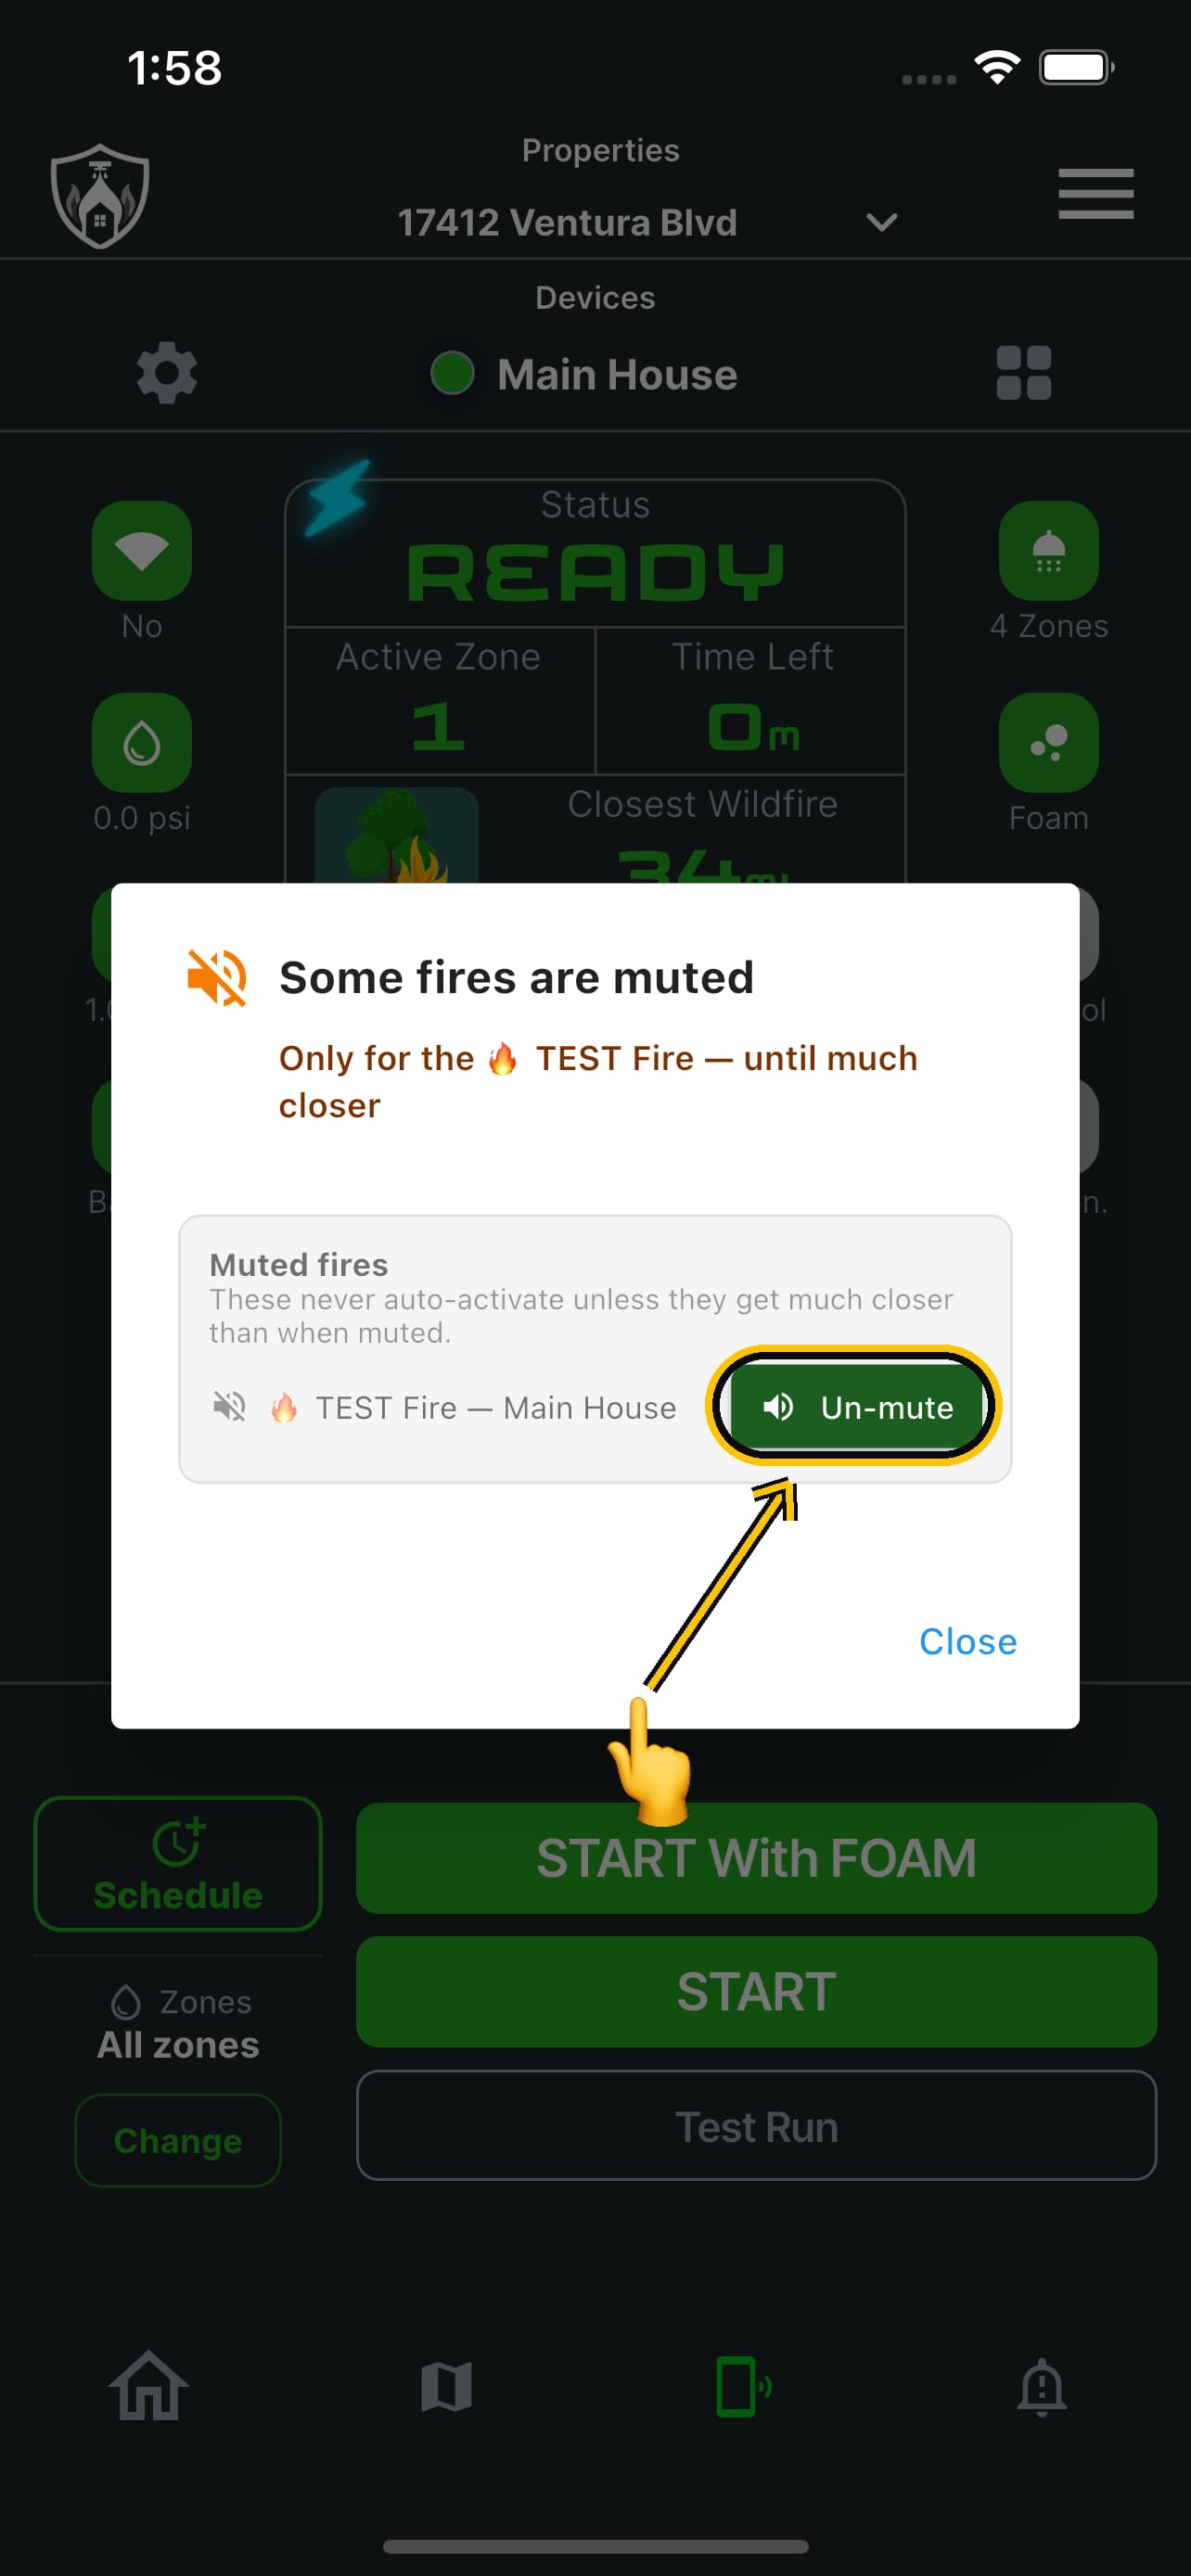
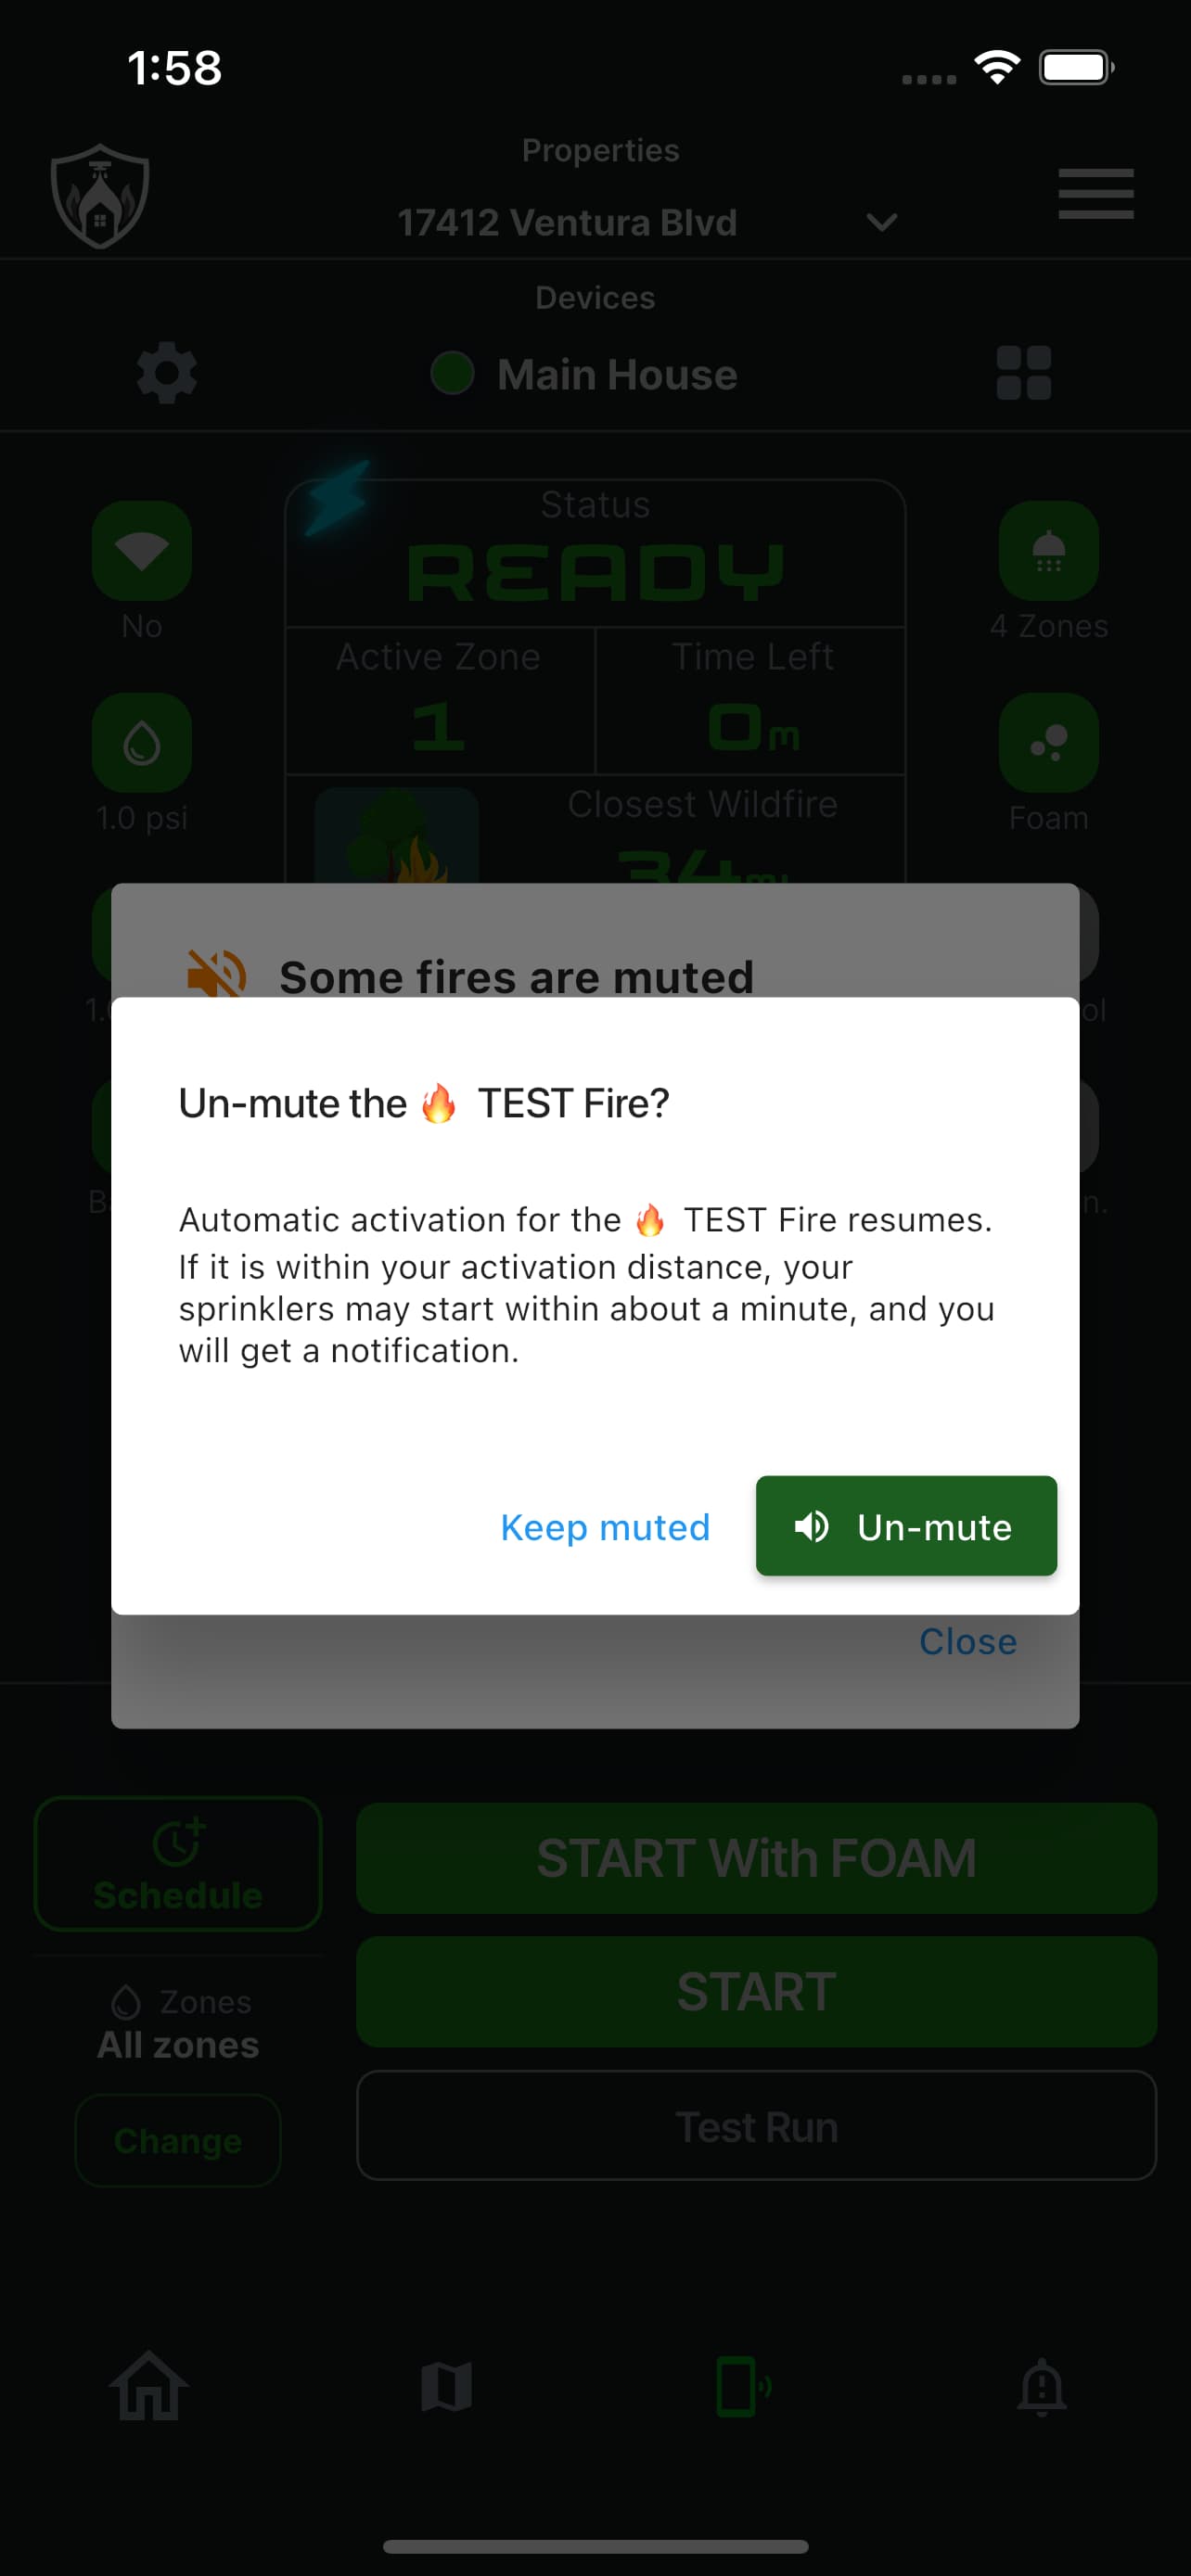
Tap the orange bell to see every fire you have muted and un-mute any of them. The app asks once more before it does, for the same reason as before: automatic activation for that fire resumes, and if it is inside your activation distance the sprinklers may start within about a minute. Un-mute the last one and the bell goes.
- 1Un-mute — automatic activation for that fire resumes
- 2Close — leave it muted
Starting the system yourself
Three buttons, and the difference between them matters.
START, START with FOAM, or Test Run
START runs water only. START with FOAM adds Class A firefighting foam, which breaks the surface tension of the water so it soaks into timber and roofing instead of running off. Test Run is a short proving cycle — use it at the start of the season to confirm every zone still throws where it should.
- Use foam when a fire is a real prospect. Use water alone for a precautionary soak.
- Test Run is the right way to check the system. It is not a shortened real activation.
- Anything you start manually can be stopped from the same screen.
The same three things, on the wall
No app or signal needed. Two buttons and a switch cover a test run, a full activation, and a way to stop everything. Zones and schedules stay in the app.
- A single press on either button only wakes the screen. It can never start the system.
- The two buttons do the test runs; the switch does the real one.
- Hold both buttons together for three seconds and everything stops, whatever it was doing.
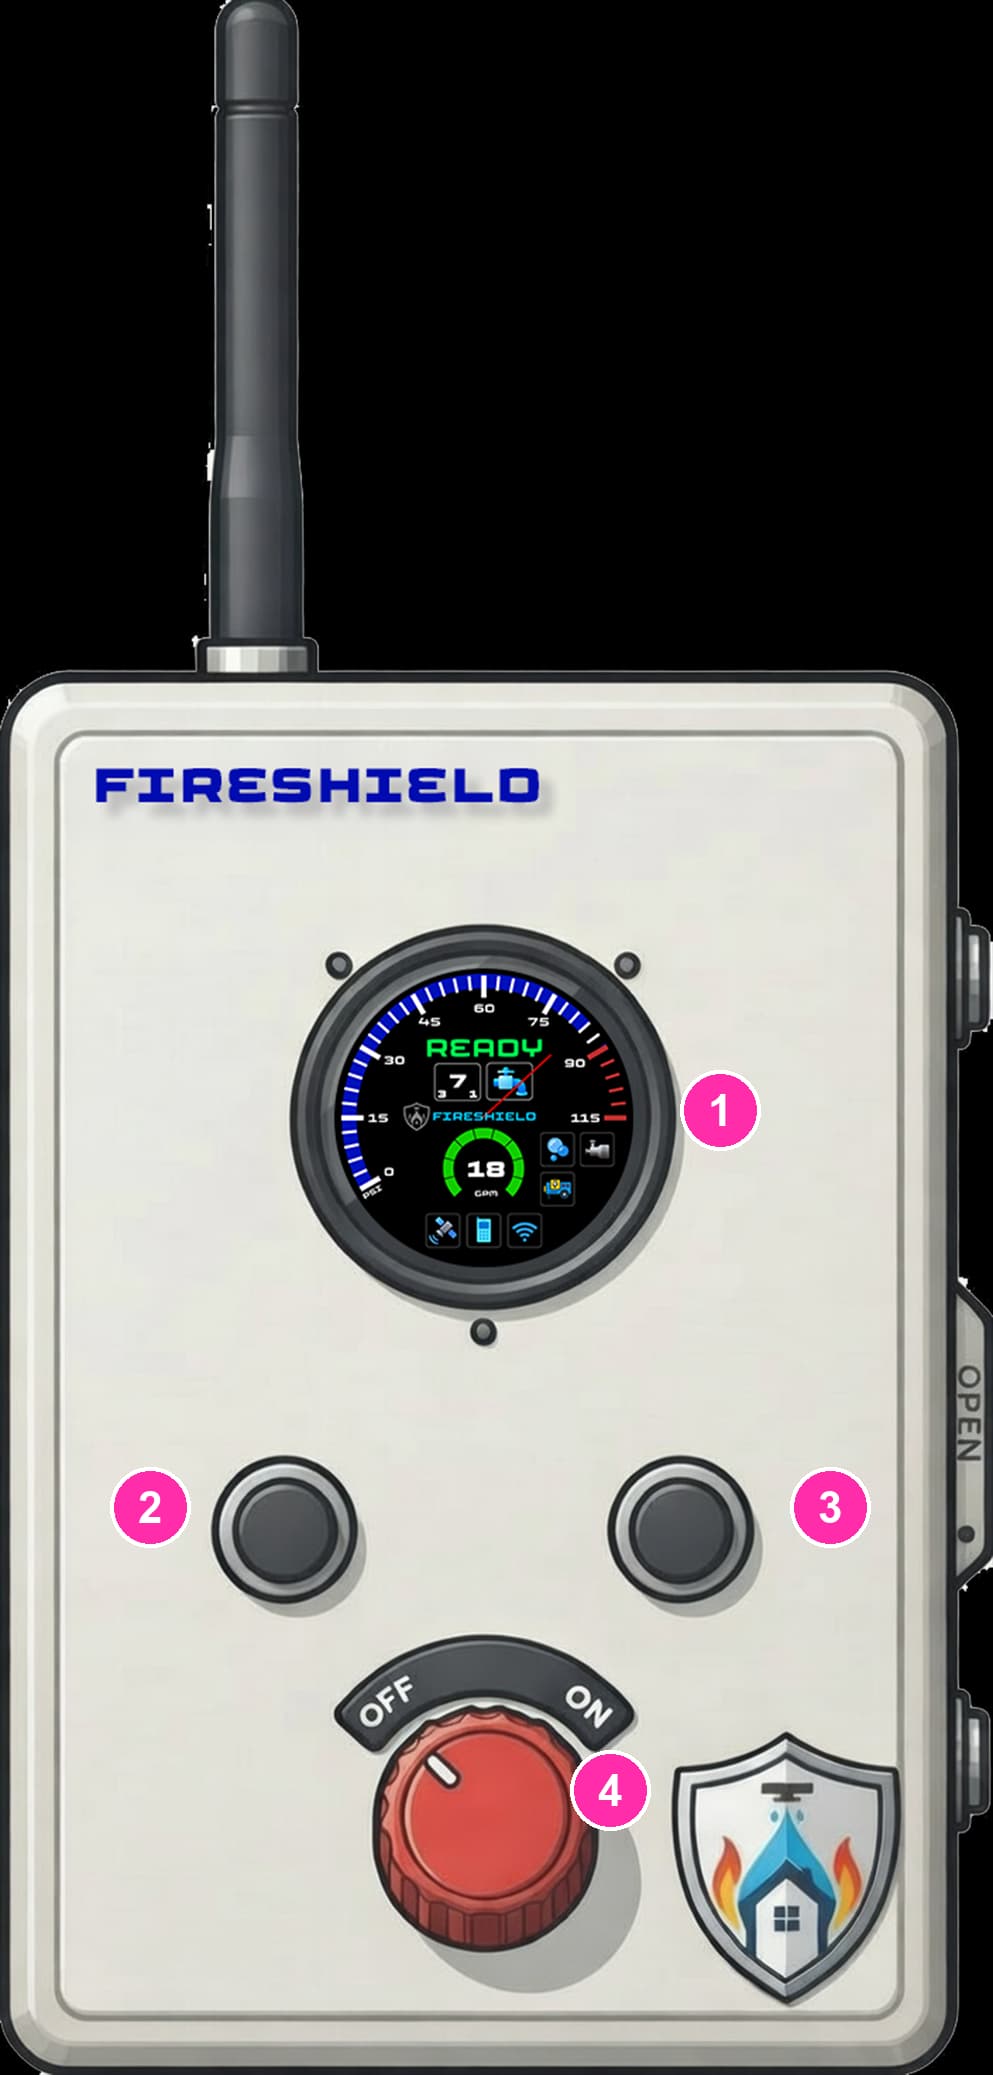
- 1Status screen — the same reading as the app
- 2Left button — wake, and the test run without foam
- 3Right button — wake, and the test run with foam
- 4OFF / ON switch — starts and stops a real activation
Every button and combination on the controller
| Control | What you do | What happens | When it works |
|---|---|---|---|
| Left button | One press | Wakes the screen. Nothing else — a single press can never start the system. | Any time |
| Left button | Two quick presses | Test run, water only. Steps through your zones so you can see every head throw, without using foam. | READY only |
| Right button | One press | Wakes the screen. | Any time |
| Right button | Two quick presses | Test run with foam. The same cycle as the left-button test, with foam proportioned in. | READY only |
| OFF / ON switch | Turn to ON | Starts a full activation, using whatever foam and zone settings you have saved in the app. | Any time |
| OFF / ON switch | Turn to OFF | Stops the system and closes the valves. | While running |
| Left button + switch | Hold the left button while turning the switch to ON | Starts without foam, for this run only. Your saved setting is untouched. | Any time |
| Right button + switch | Hold the right button while turning the switch to ON | Starts with foam and runs every zone, ignoring any zone scenario you have set. Use it when you want everything wet and you do not want to think about which zones are selected. | Any time |
| Both buttons | Hold the left and right buttons together for three seconds | Emergency stop. Whatever is running stops. This is the one to reach for when you want the water off and you do not want to think about which control does it. | Any time |
| Both buttons, again | Hold both together for three seconds a second time, within thirty seconds of the first | Emergency stop and restart. The controller closes the main valve, saves its log, and reboots itself. Use it only if the first hold did not settle the system — after the reboot it comes back up on its own and returns to READY. | Within 30 seconds of an emergency stop |
Taken from the controller firmware itself, not from a spec sheet. The full owner’s manual for the controller has the timings and the status words as well.
Open the controller manual →Choosing which zones run
Send the water where the fire actually is.
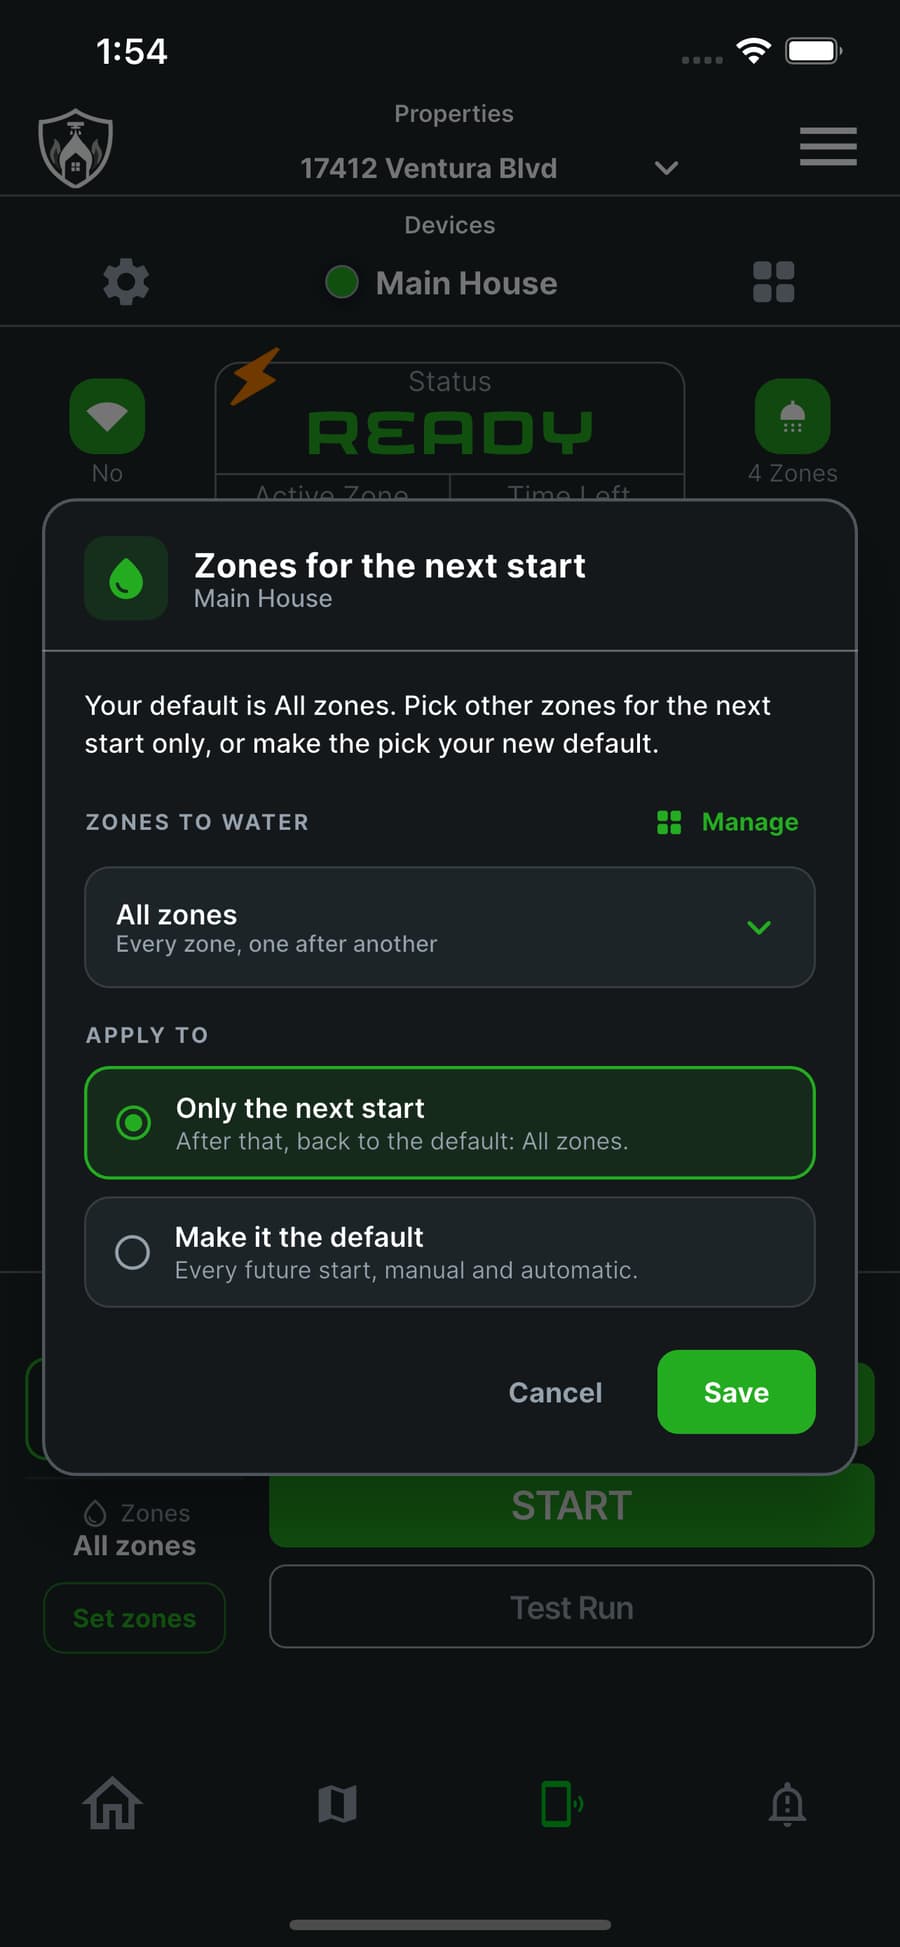
Set the zones for the next start
Your system waters every zone by default, one after another, because no household water supply can feed a whole property at once. When the threat is on one side — a neighbor alight, wind pushing embers over one fence line — you can put the entire supply on that side instead.
- Only the next start: the selection is used once, then reverts to your default.
- Make it the default: every future start, manual and automatic, uses the new selection.
- Fewer zones means more pressure and a longer soak on the zones you chose.
Scheduling a start
Set the house to wet itself down at an hour you choose.
Start on its own after a set time
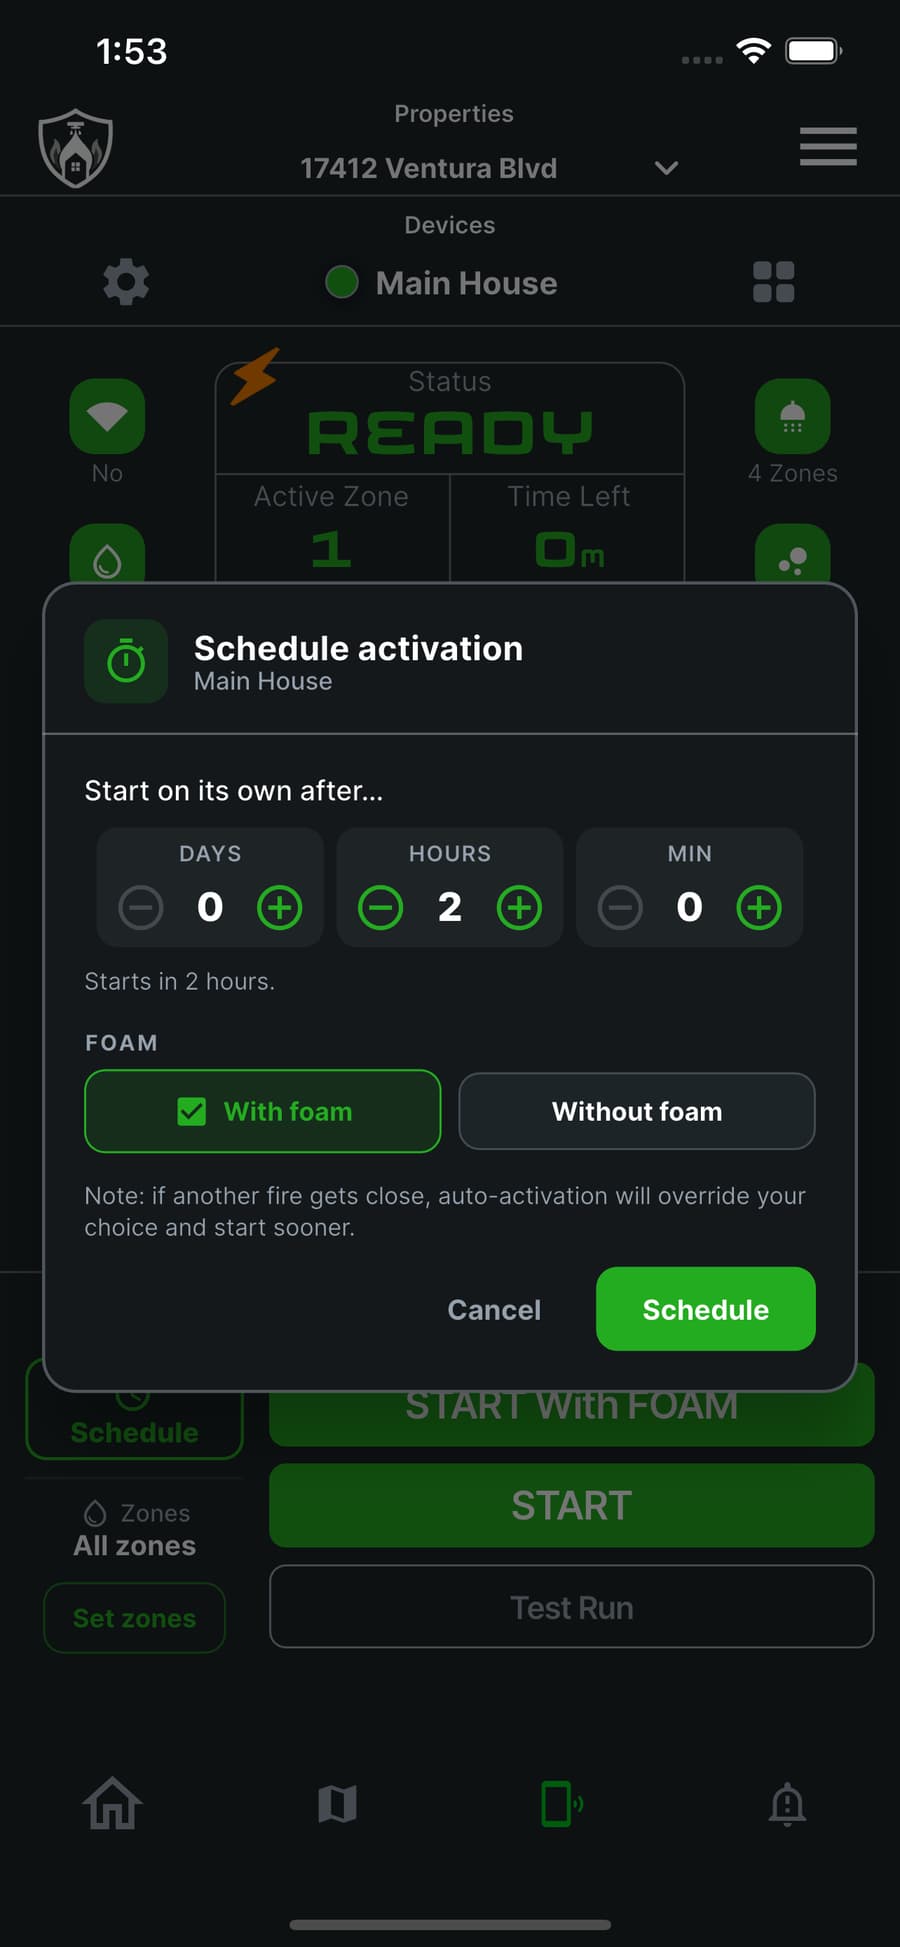
Tap Schedule and set days, hours and minutes. The system will start on its own when that countdown runs out, with or without foam, using whichever zones you have selected. This is what you use when you are evacuating tonight and want the property hydrated before the front is forecast to arrive.
- The app confirms in plain words — "Starts in 2 hours" — so a mis-set number is obvious.
- Choose foam at the same time as the schedule.
- A schedule can be canceled from the same screen at any point before it runs.
A closer fire always wins
A schedule is a floor, never a ceiling. If a wildfire crosses your activation distance before the scheduled time arrives, automatic activation takes over and starts the system sooner. Scheduling cannot make your house wait while a fire closes in.
The fire map
What the controller is watching, shown to you.
Fires, wind and your activation ring
The map tab shows active fires as flame markers, wind as directional streaks across the terrain, and your property as the FireShield badge. Zoom in and your activation distance appears as a dashed ring around the house — the line a fire has to cross for the system to start on its own.
- The layers button, top right, switches the base map and what is drawn over it.
- Pinch to zoom. The fire markers grow as you zoom in.
- This is the same fire data the automatic decision is made from. Nothing is hidden.
Alerts and messages
What the system tells you, and where to read it again.
Push notifications
The app sends a push notification when a fire crosses your activation distance and the countdown to spraying begins. That notification is your window to act — open the app to start the system immediately, or to stop it if you can see the alert is not a threat to your property.
- Allow notifications when the app asks. It is the only way the system can reach you before it acts.
- Alerts also cover system events such as a device losing connectivity.
Re-read anything in Messages
The bell icon in the bottom bar opens Messages, which keeps a history of what the system has told you. Nothing important is only ever shown once.
Settings, one screen at a time
Every option behind the menu button, in the order the app lists them.
Opening Settings
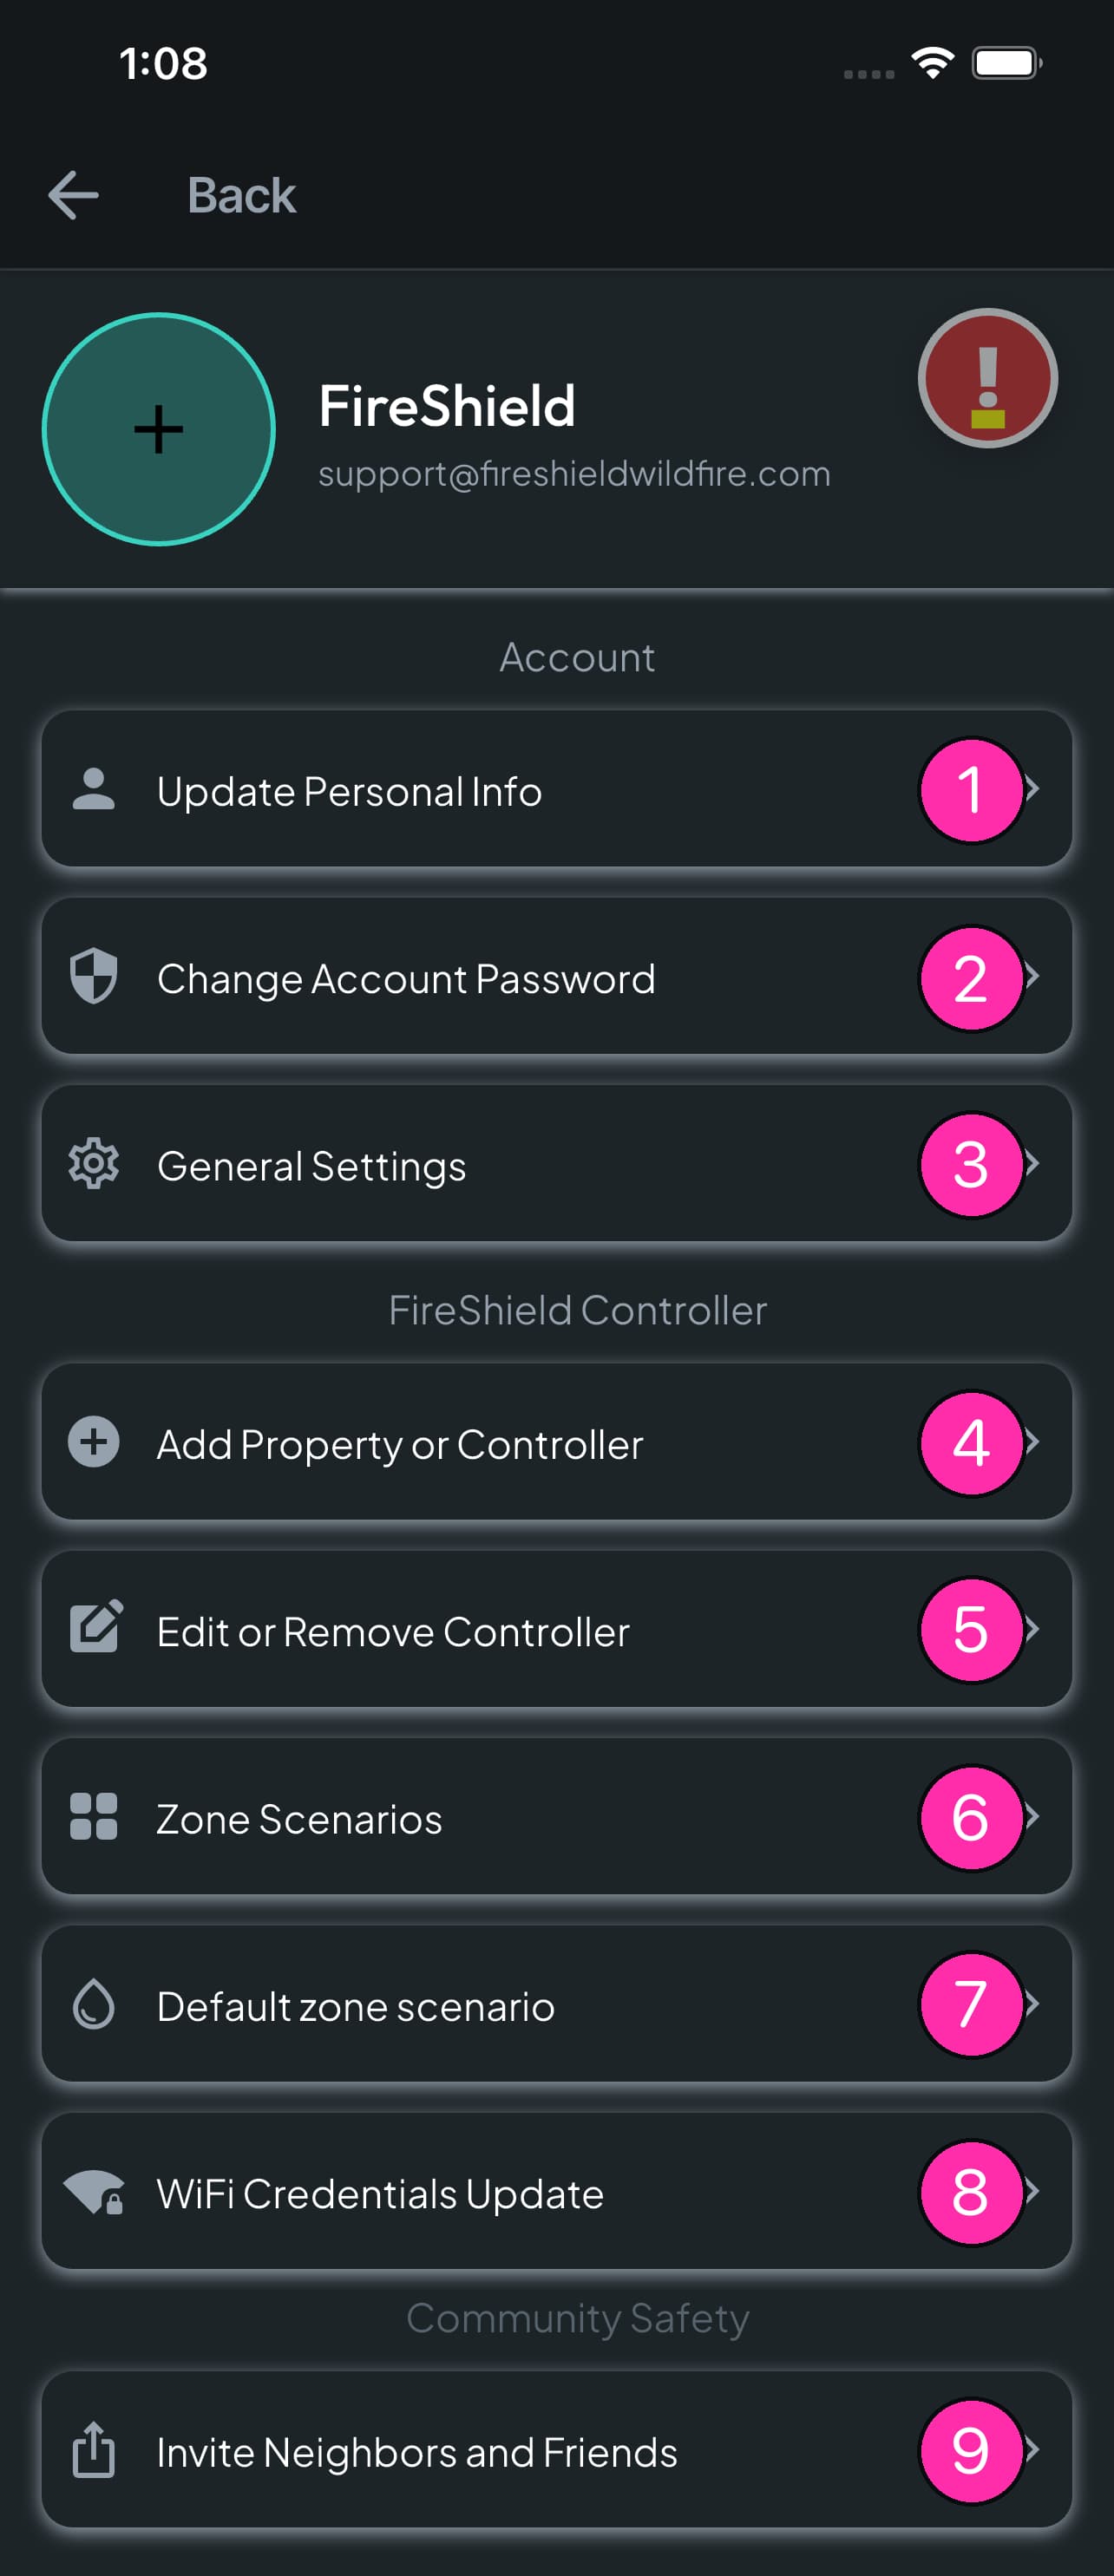
Tap the menu button — the three lines at the top right of the home screen — to open Settings. There are nine options, grouped under three headings: Account, FireShield Controller, and Community Safety. They are numbered below in the order the app lists them, and each one has its own section on this page.
Update Personal Info
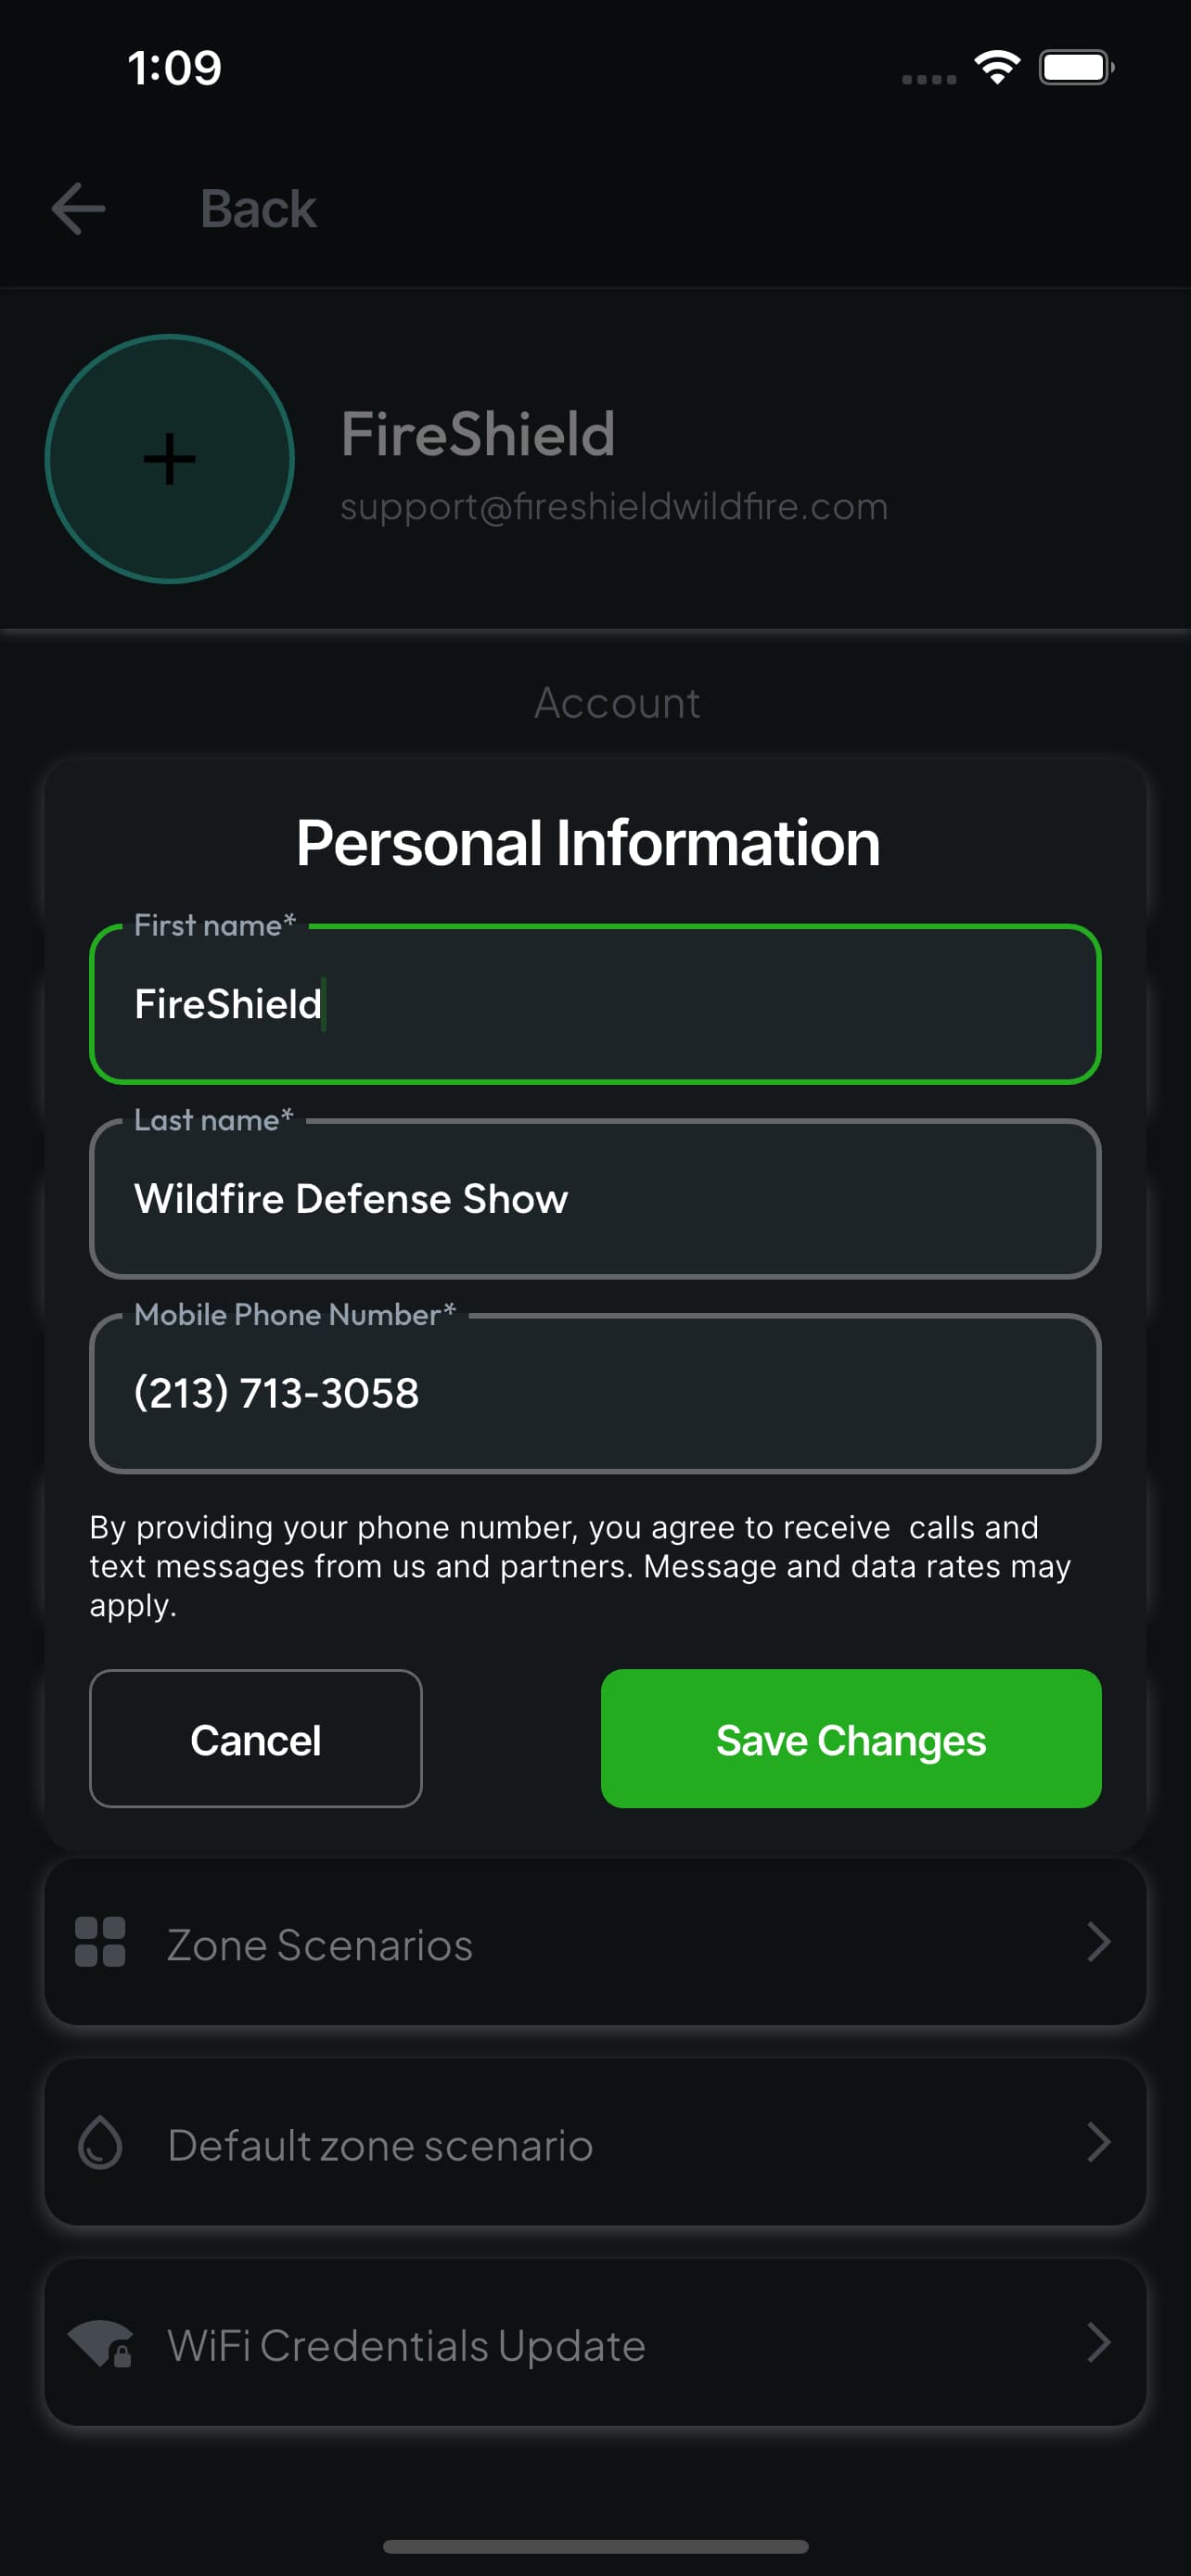
Your name and the mobile number the system calls and texts. This is the number a fire alert goes to, so it is worth checking once a year — a number that has changed is the quietest way to miss a warning. Change what you need and tap Save Changes; Cancel leaves everything as it was.
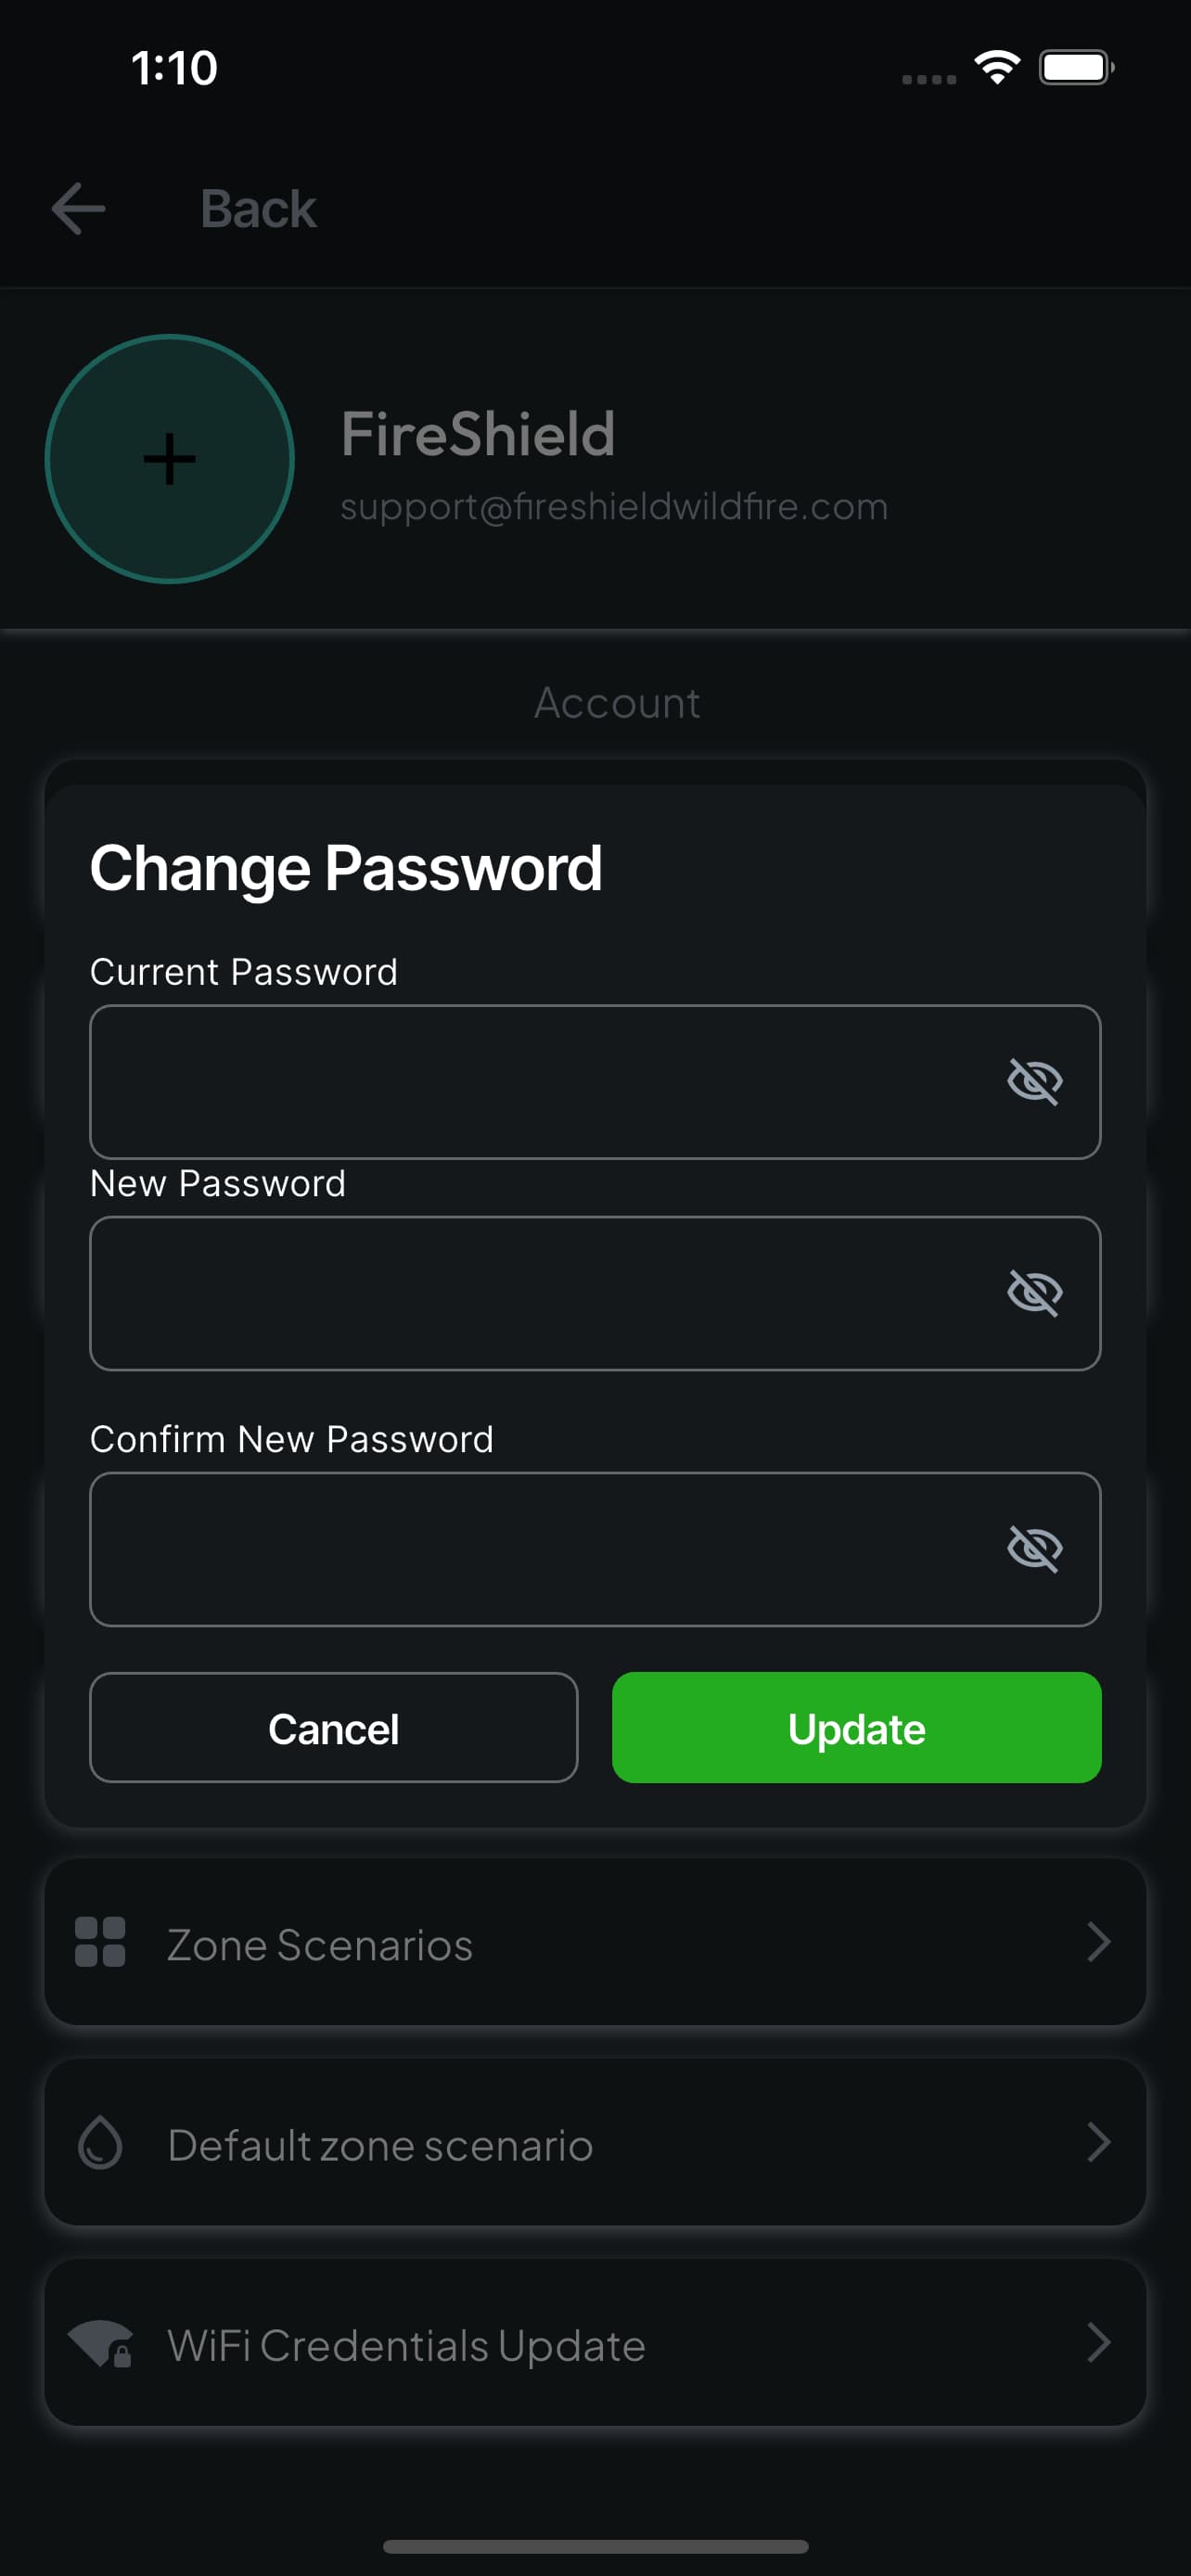
Change Account Password
Type your current password once and the new one twice. The eye icon at the end of each field shows what you have typed, which is the fastest way to find a typo. Nothing changes until you tap Update.
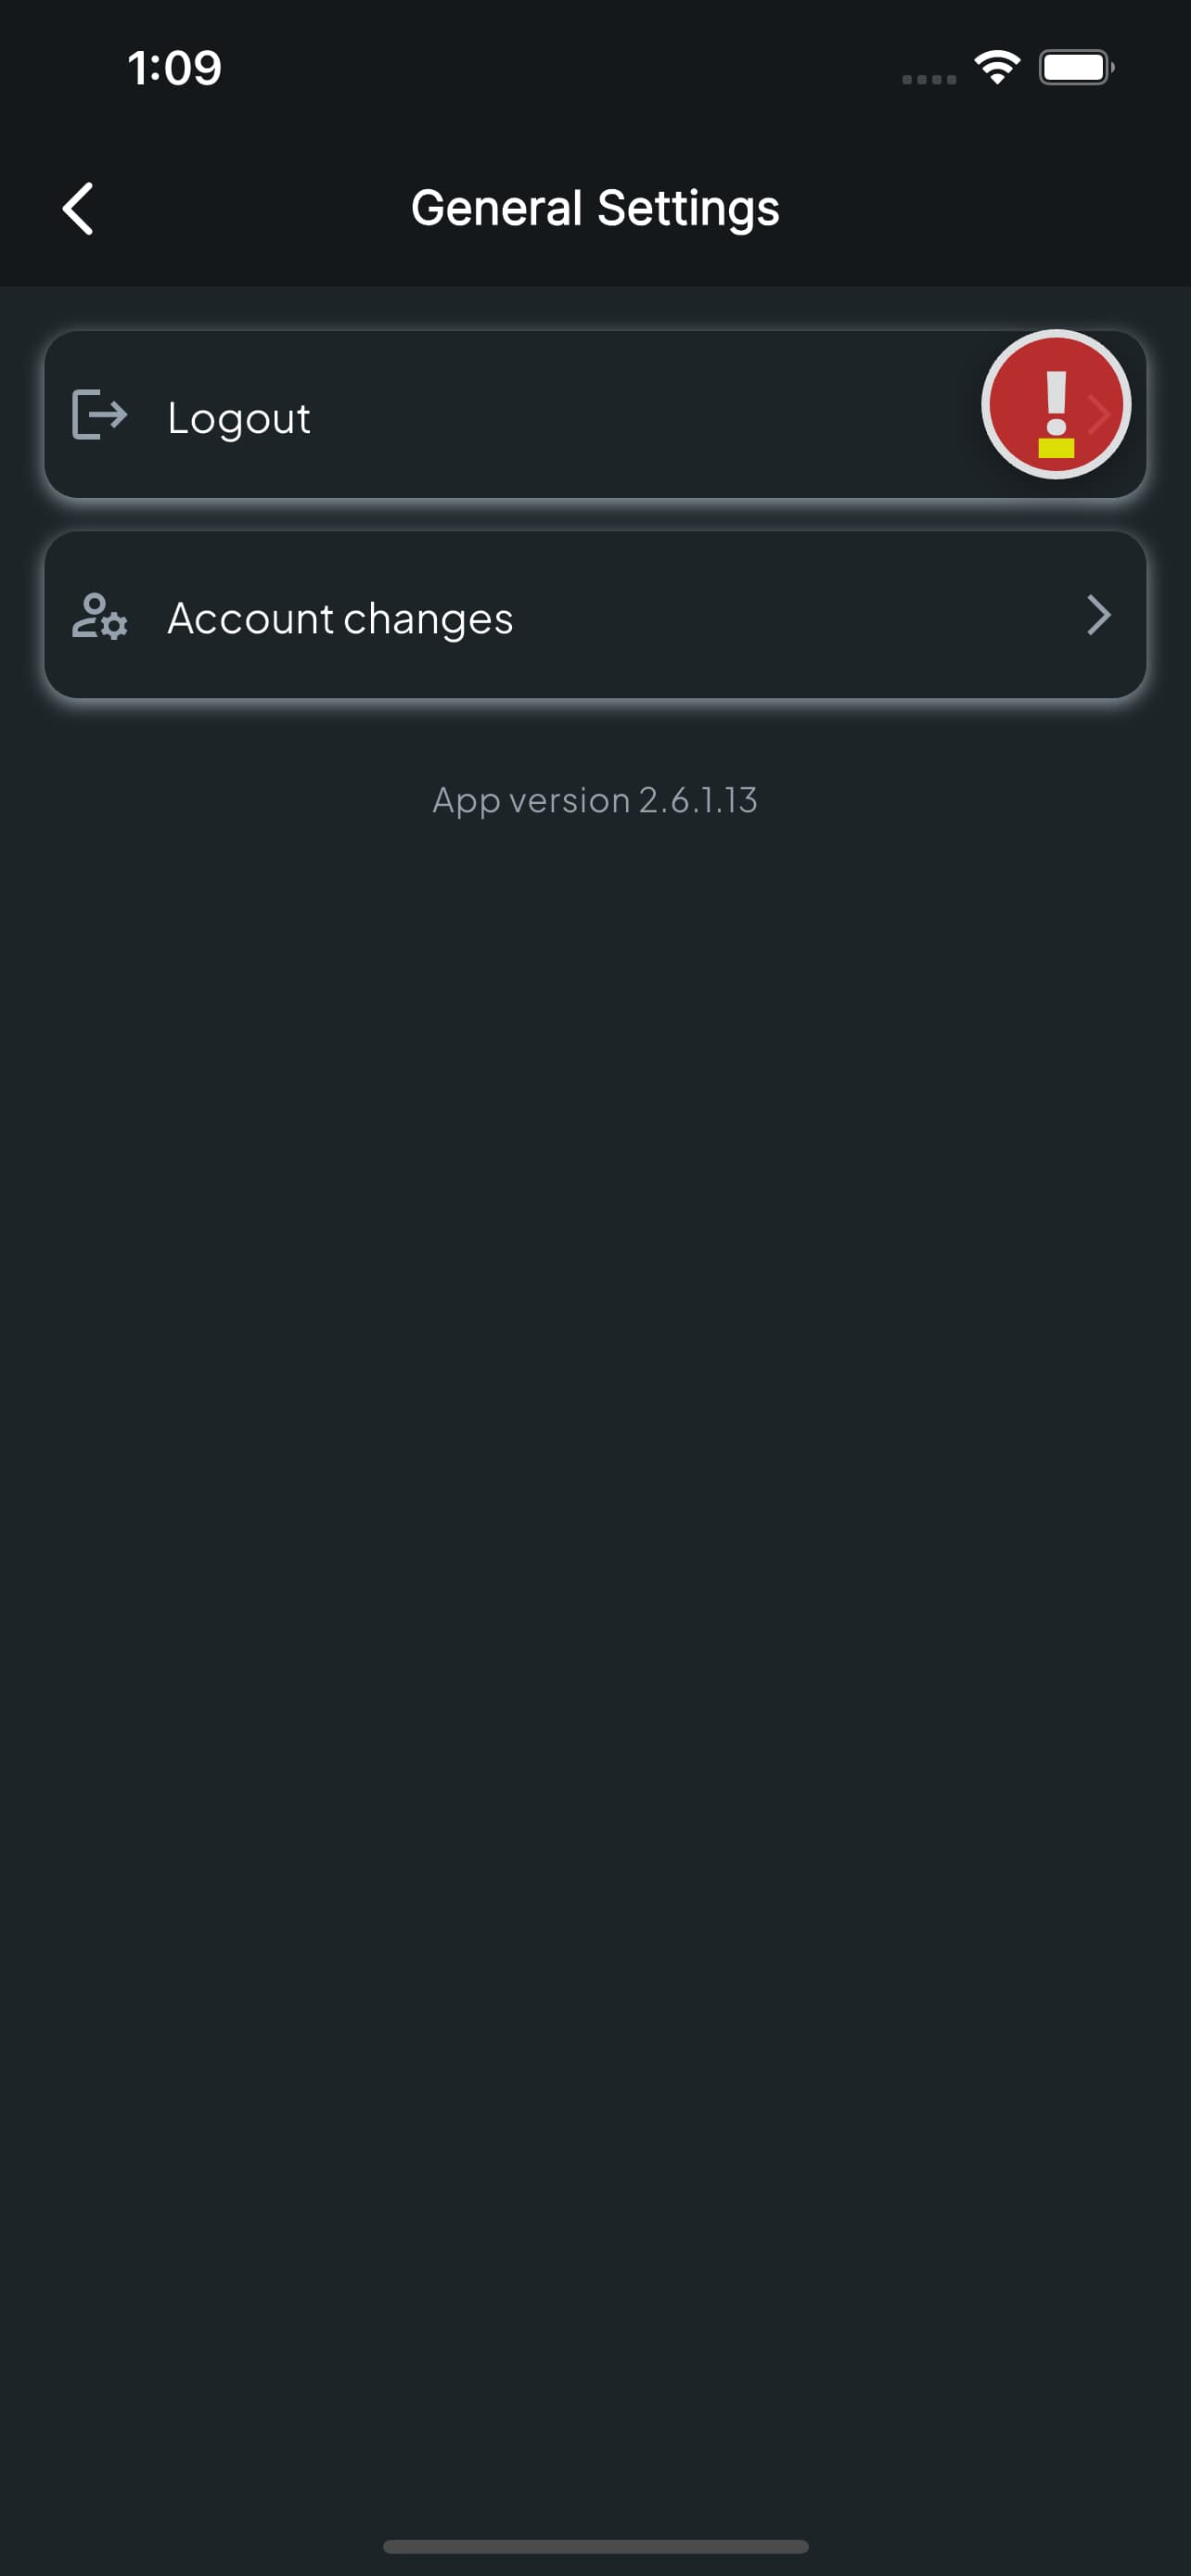
General Settings
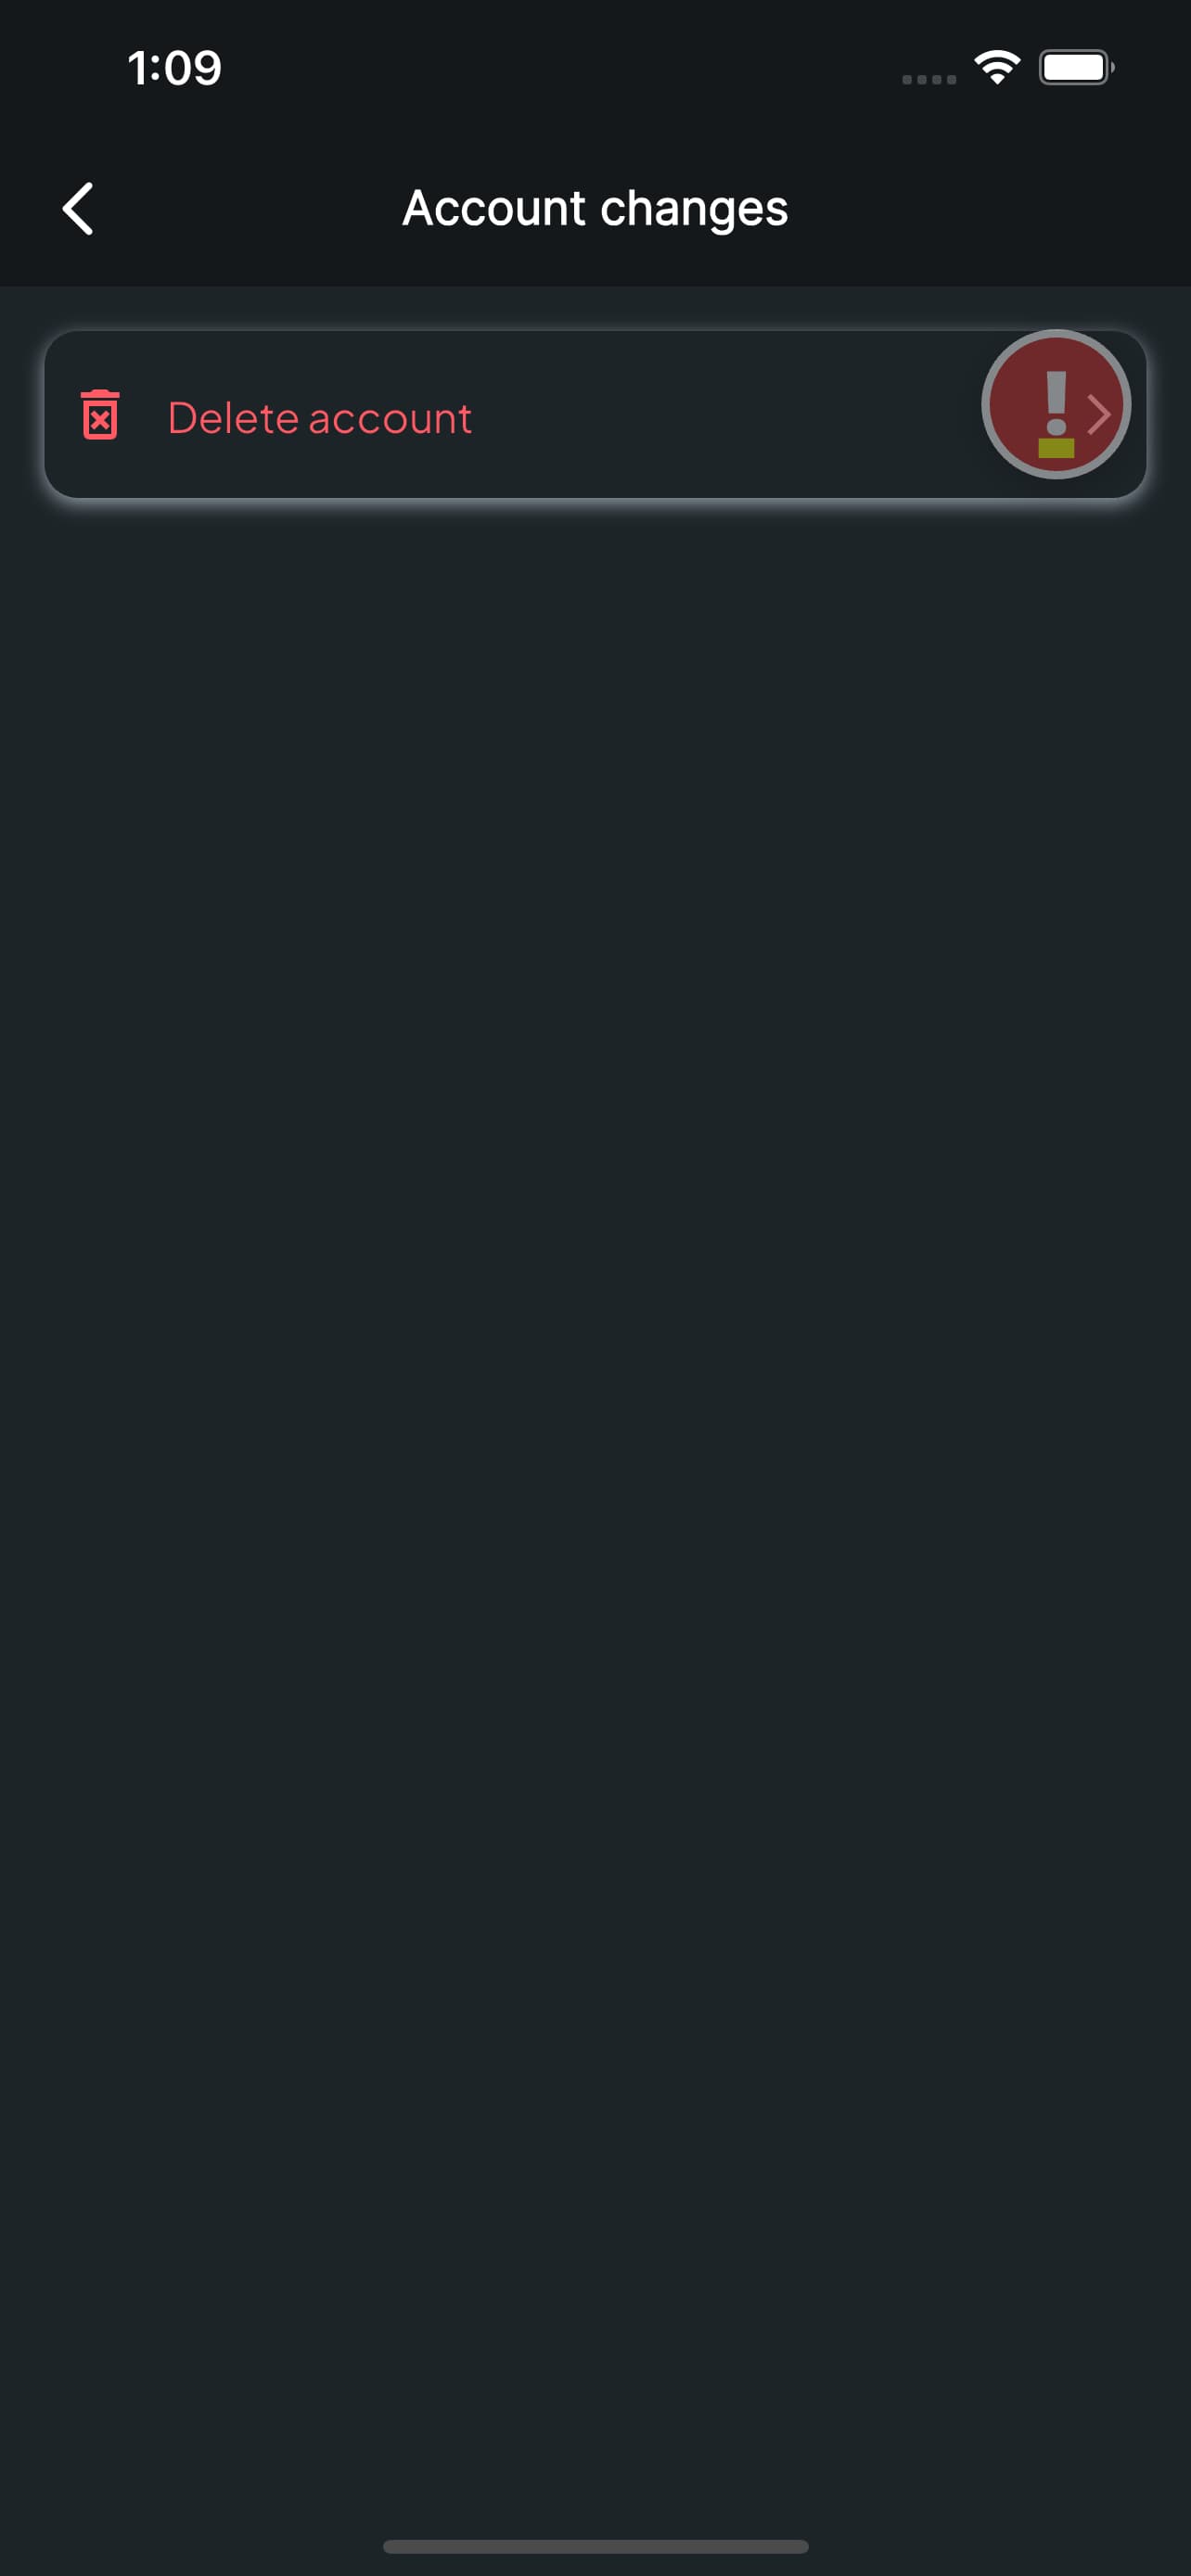
Two items and the app version. Logout signs you out of this phone — the system keeps running and keeps protecting the house either way. Account changes holds one option, Delete account, which removes your account and your access to the controllers on it. It is the one place in the app worth reading twice before you tap.
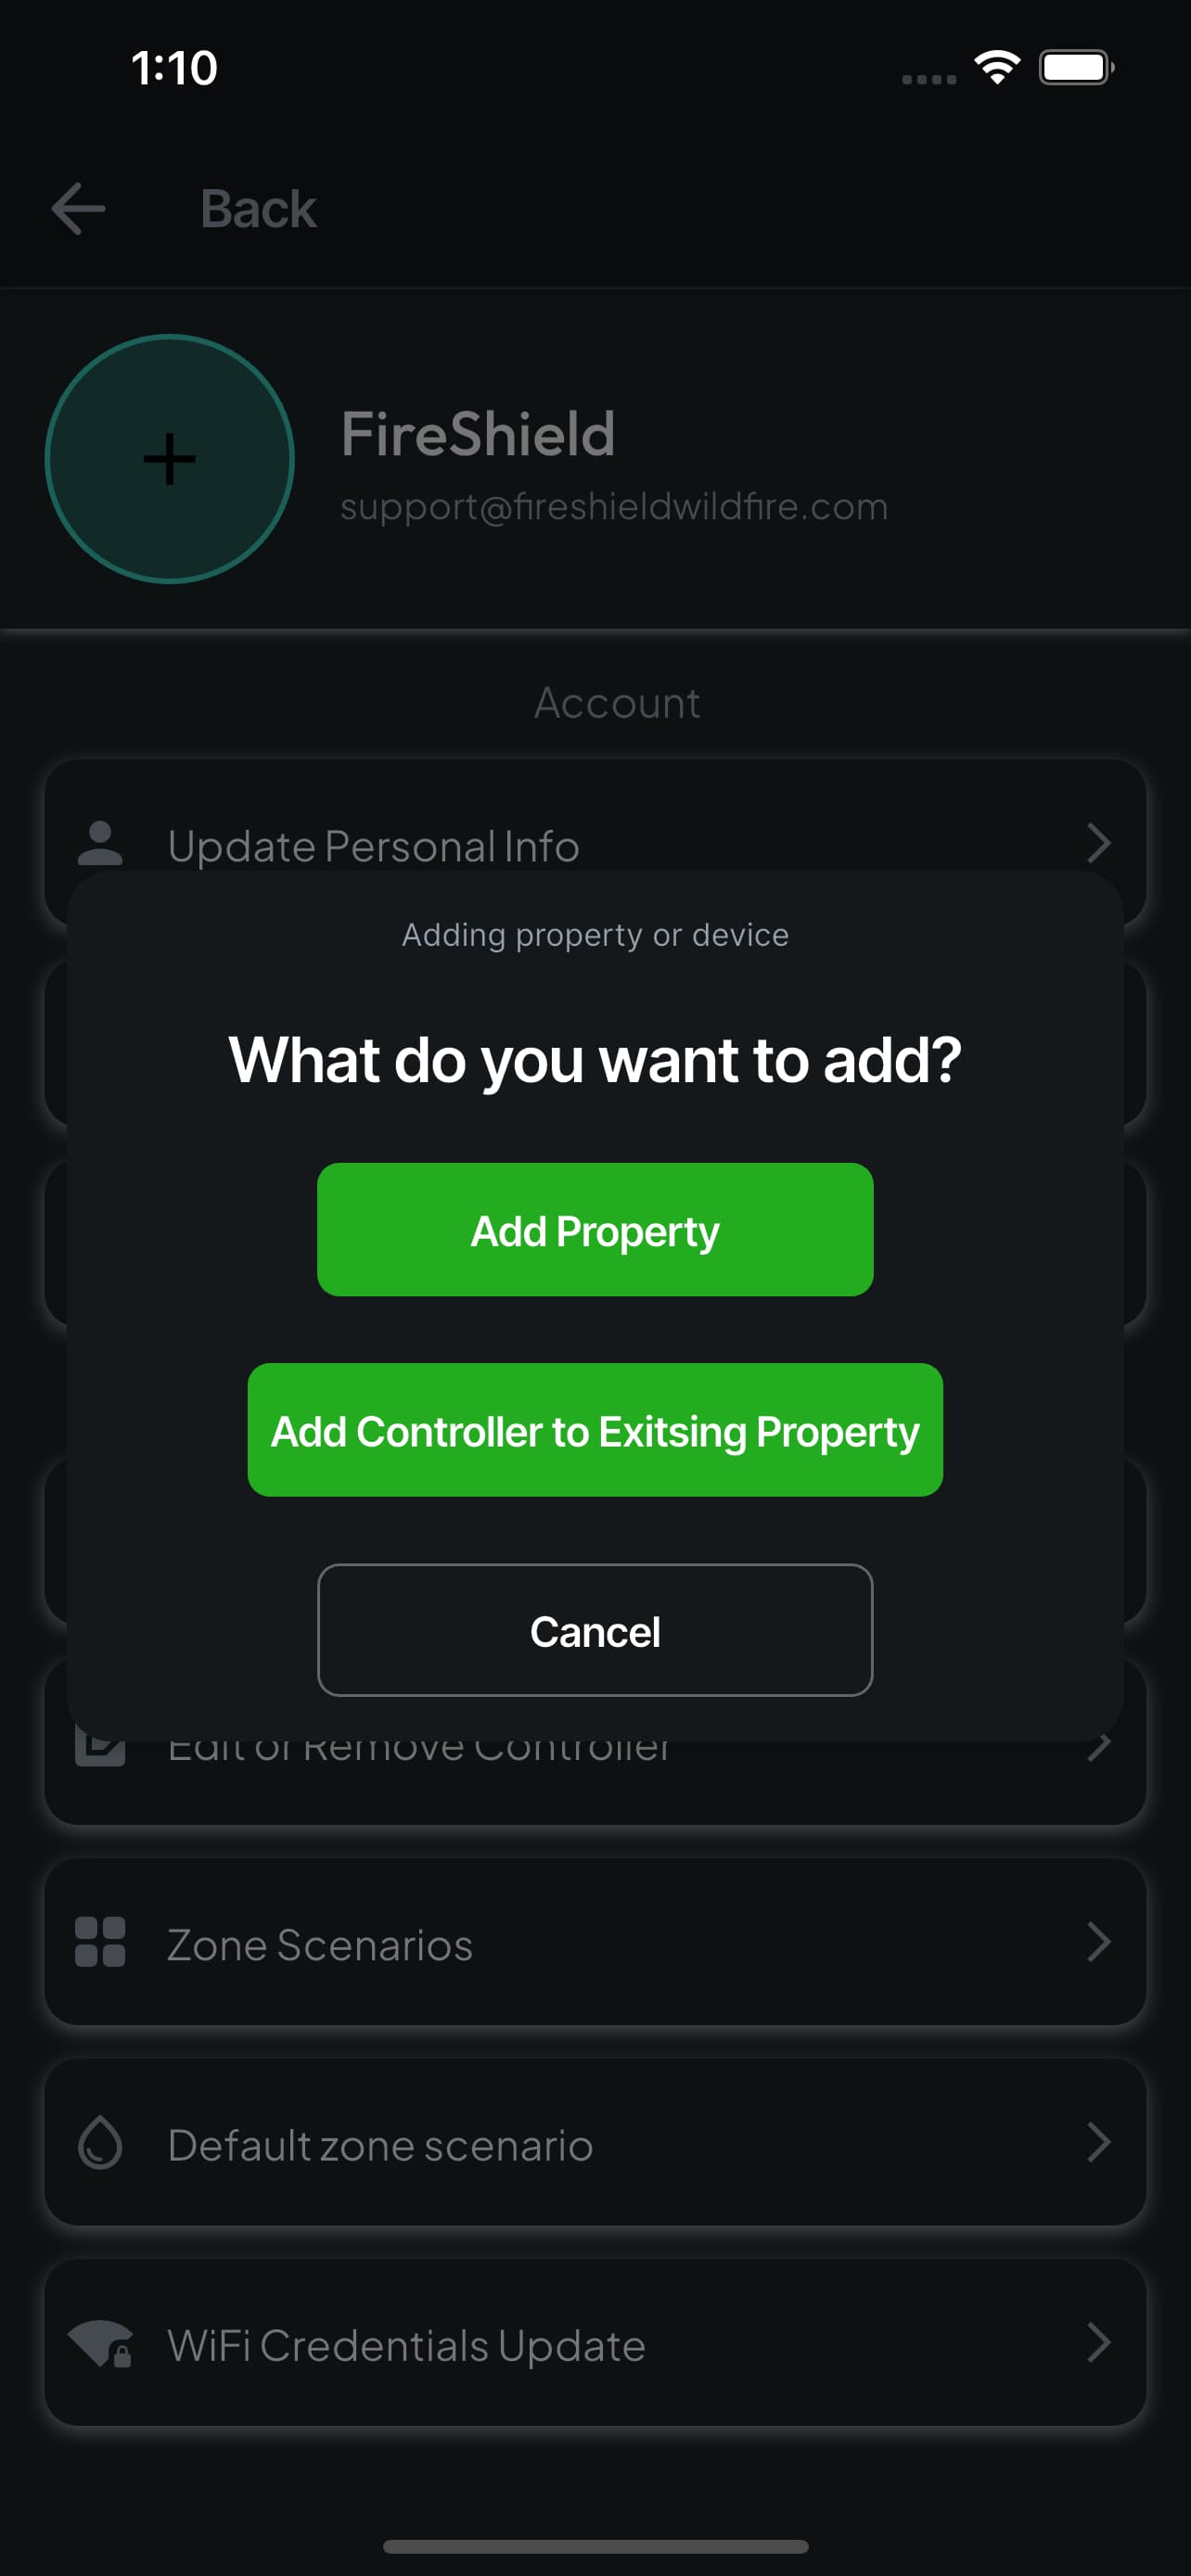
Add Property or Controller
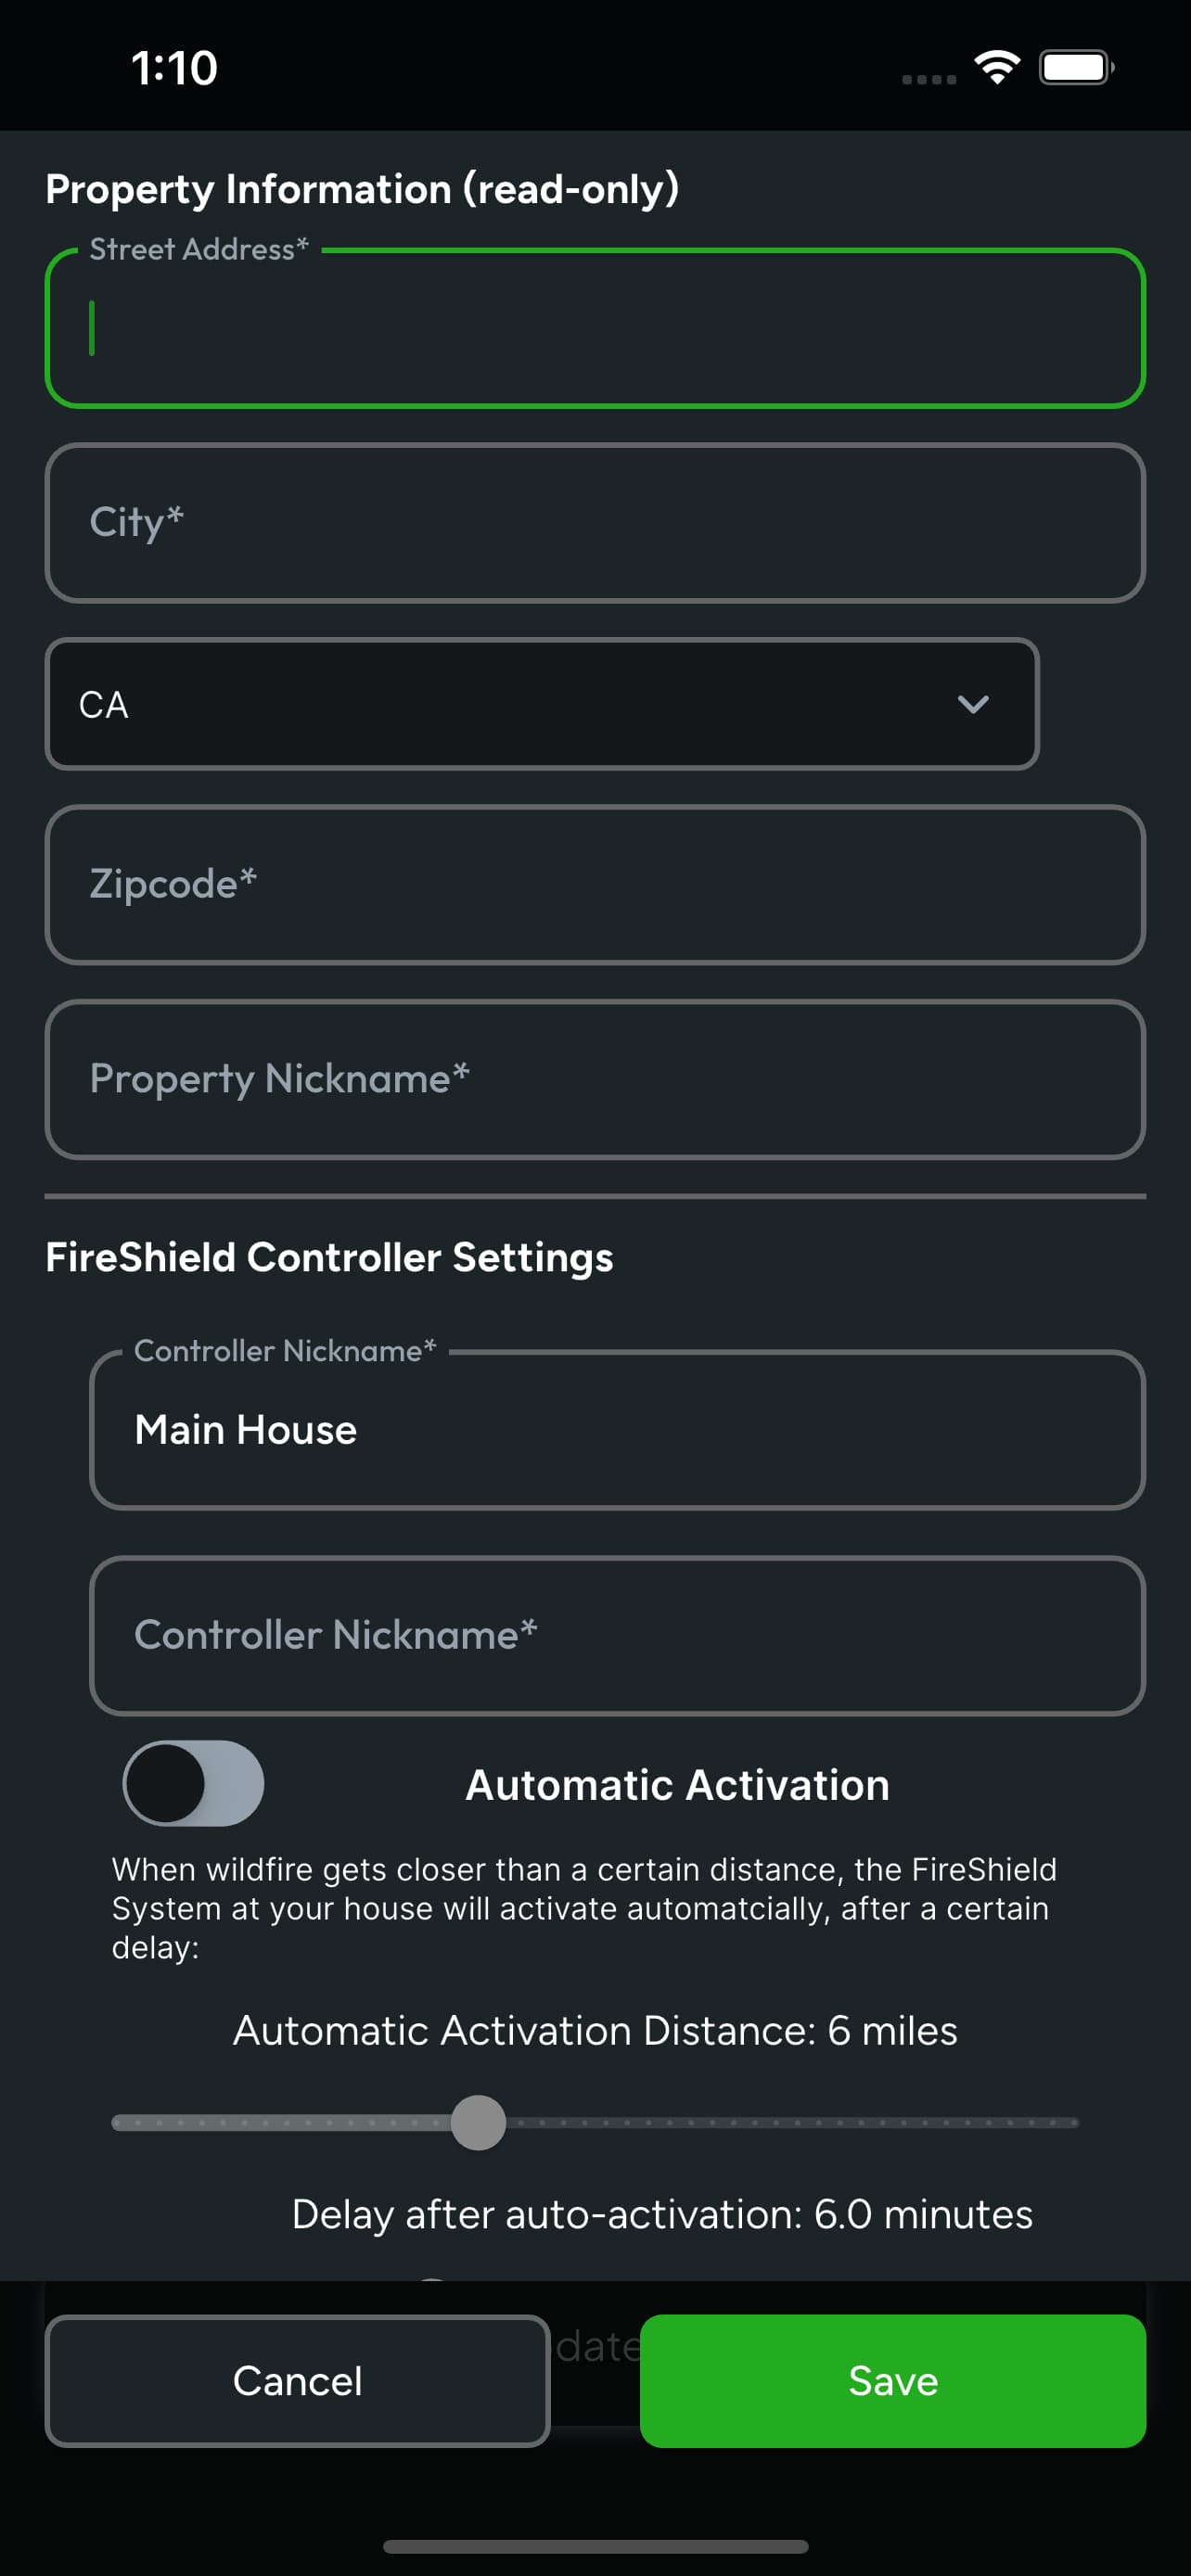
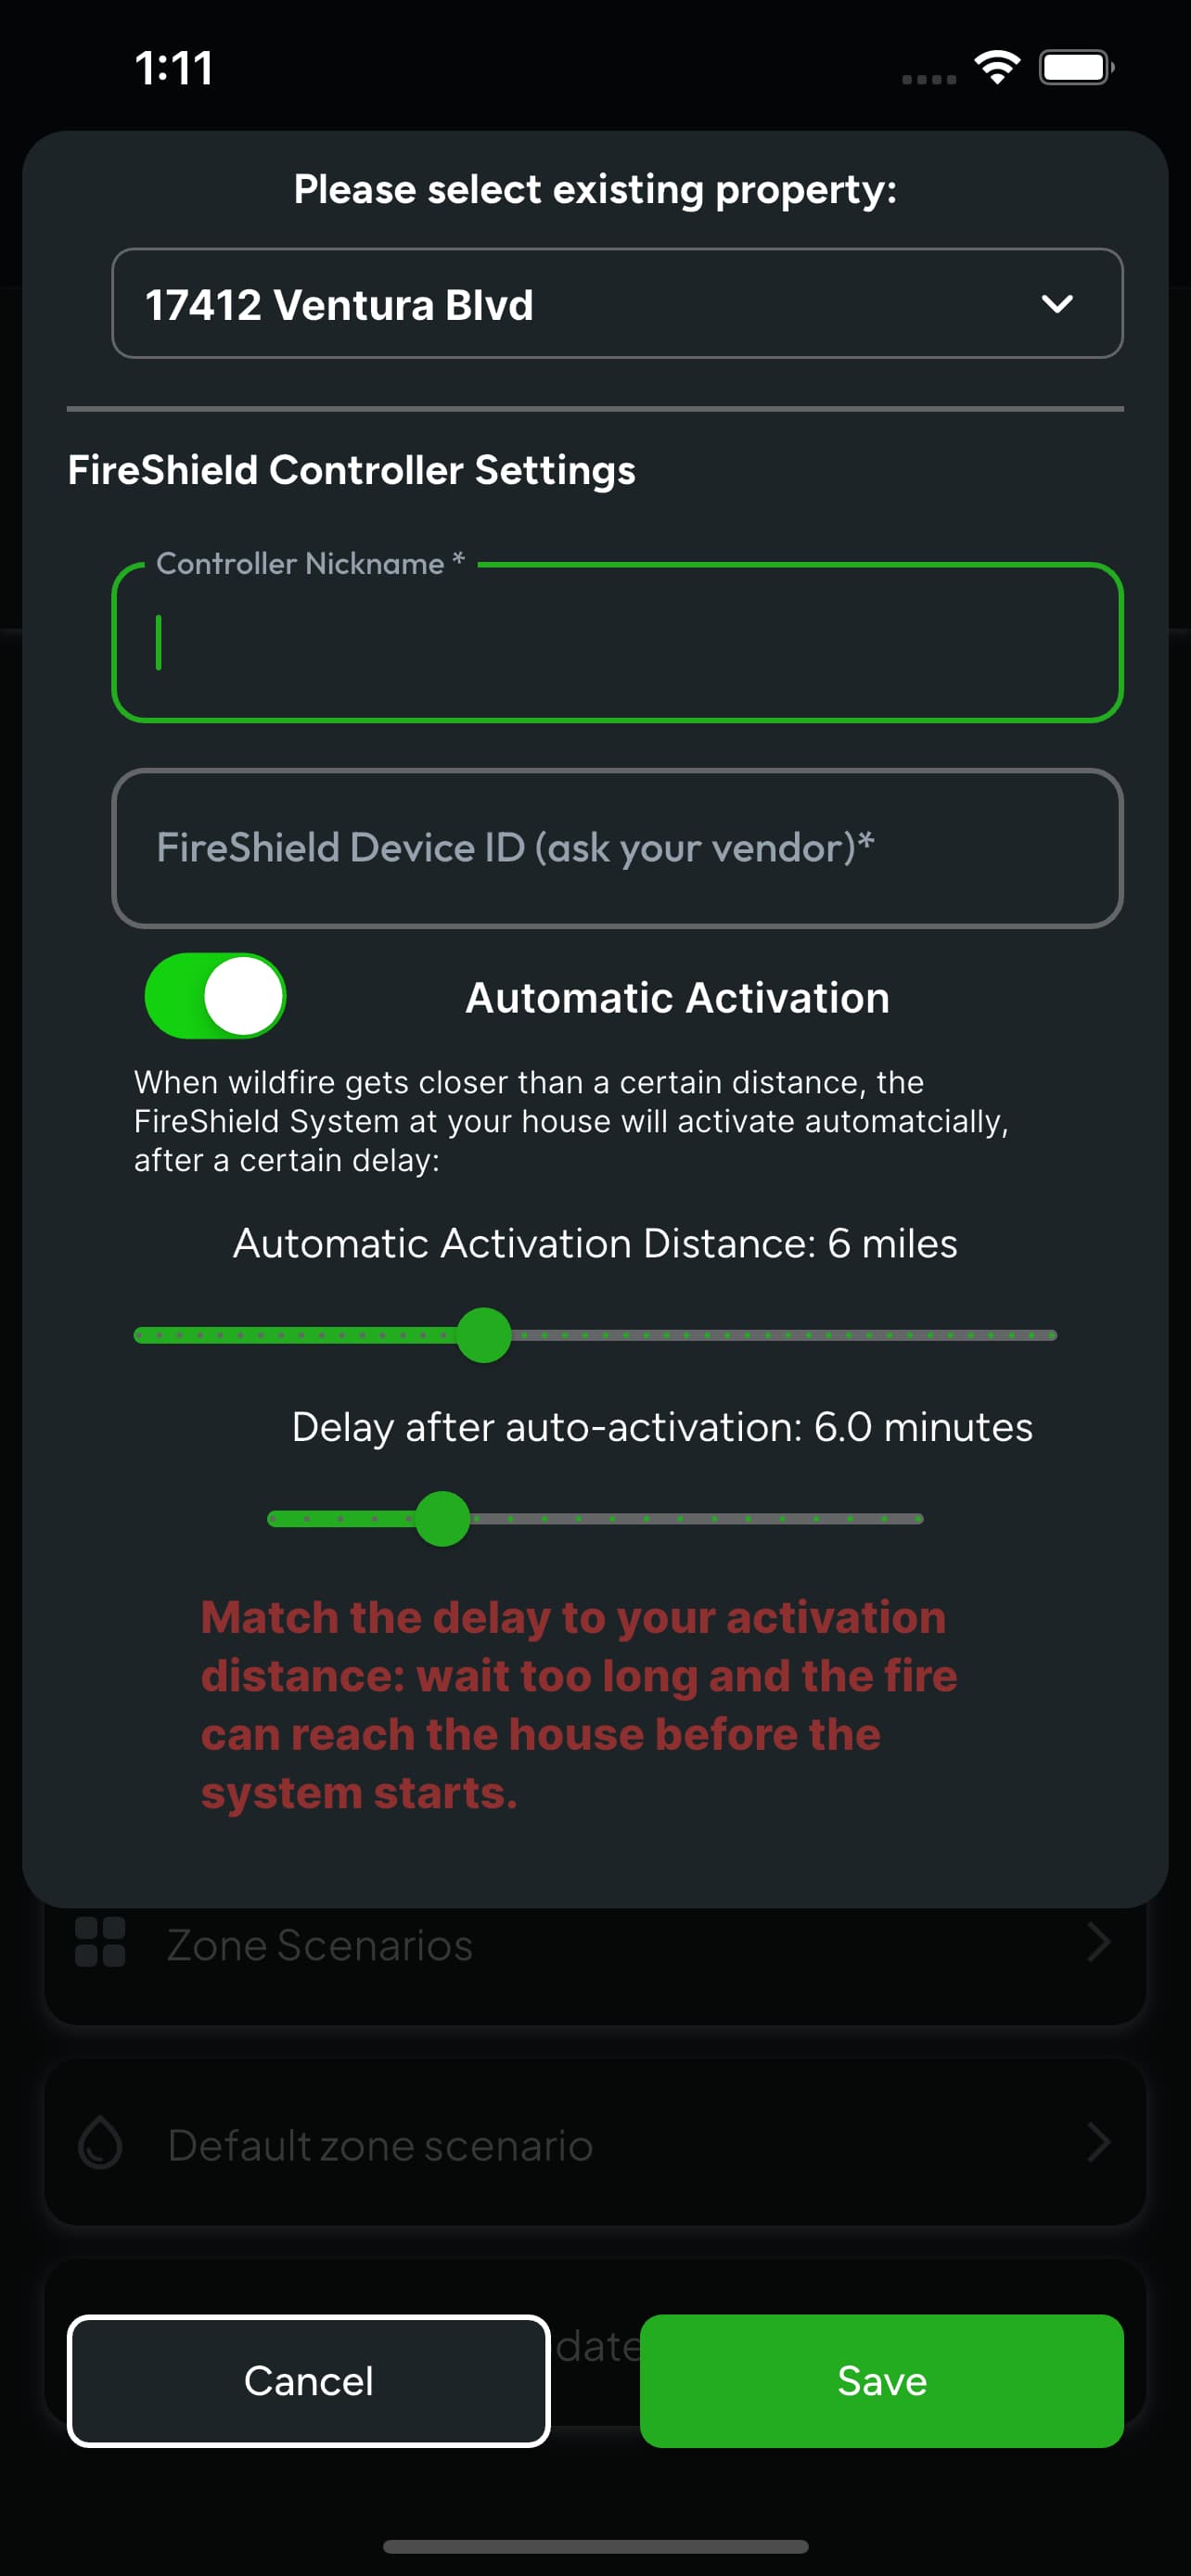
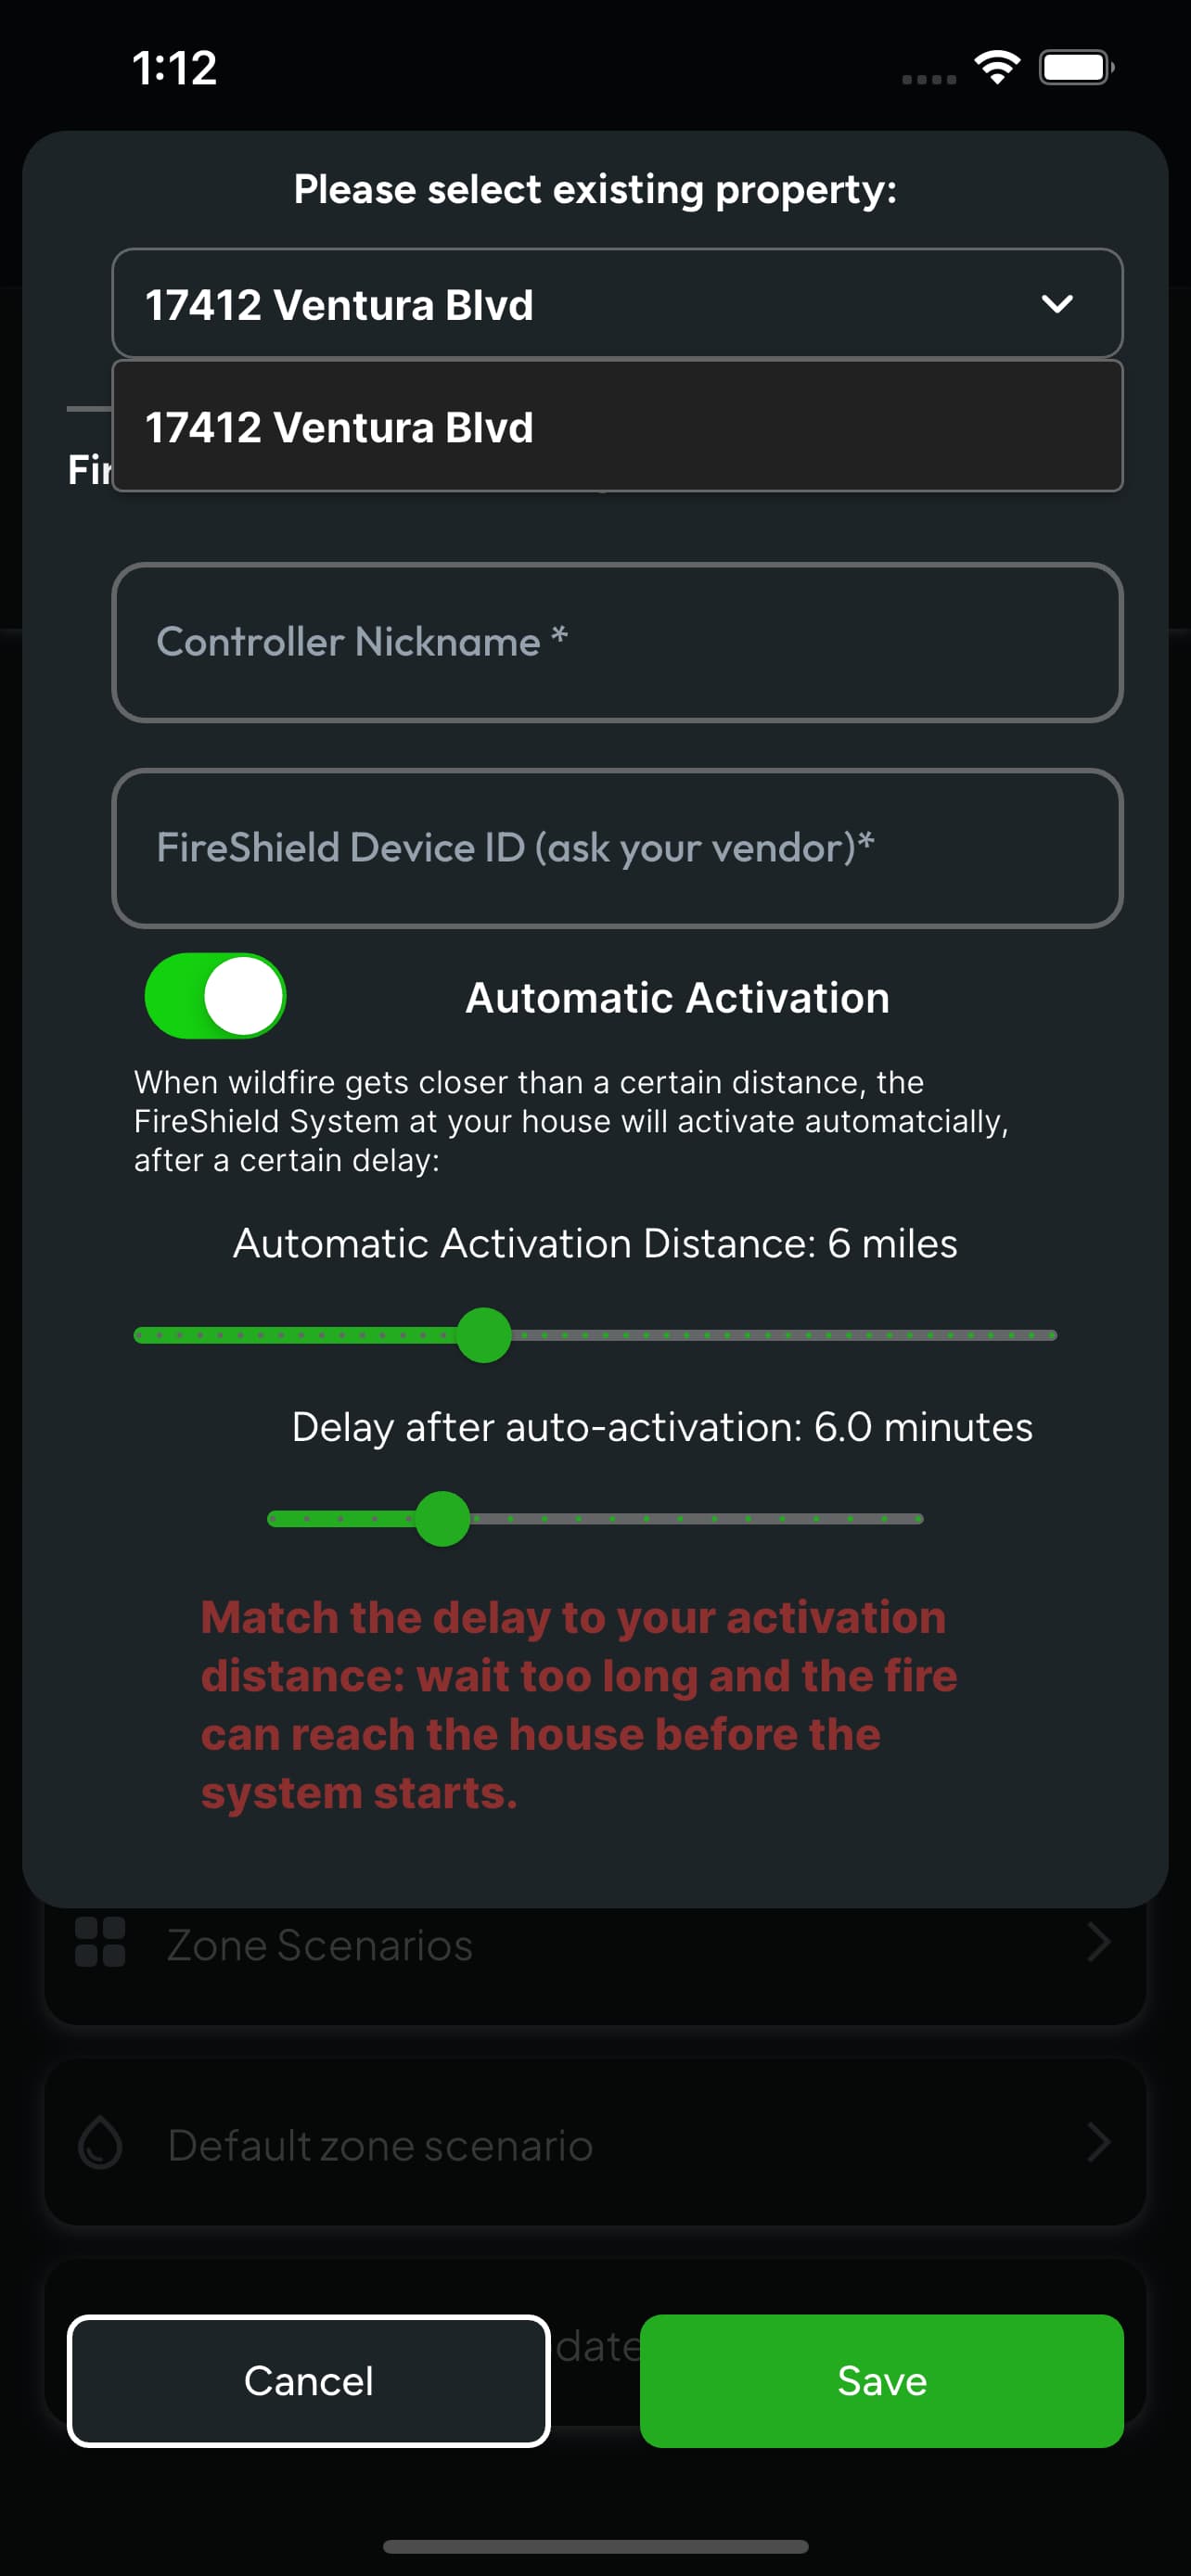
Ask first whether you are adding a whole new property or another controller at a property you already have. Add Property takes the address, a nickname you will recognize in the app, then the controller details. Add Controller to Existing Property skips straight to the controller: pick the property from the list, name the controller, and enter the Device ID from your installer. Both forms end with the automatic activation settings.
- The Device ID comes from whoever installed the system. It is printed on the controller paperwork, not on the app.
- Give each controller a nickname you would use out loud — Main House, Guest House, Barn.
Edit or Remove Controller
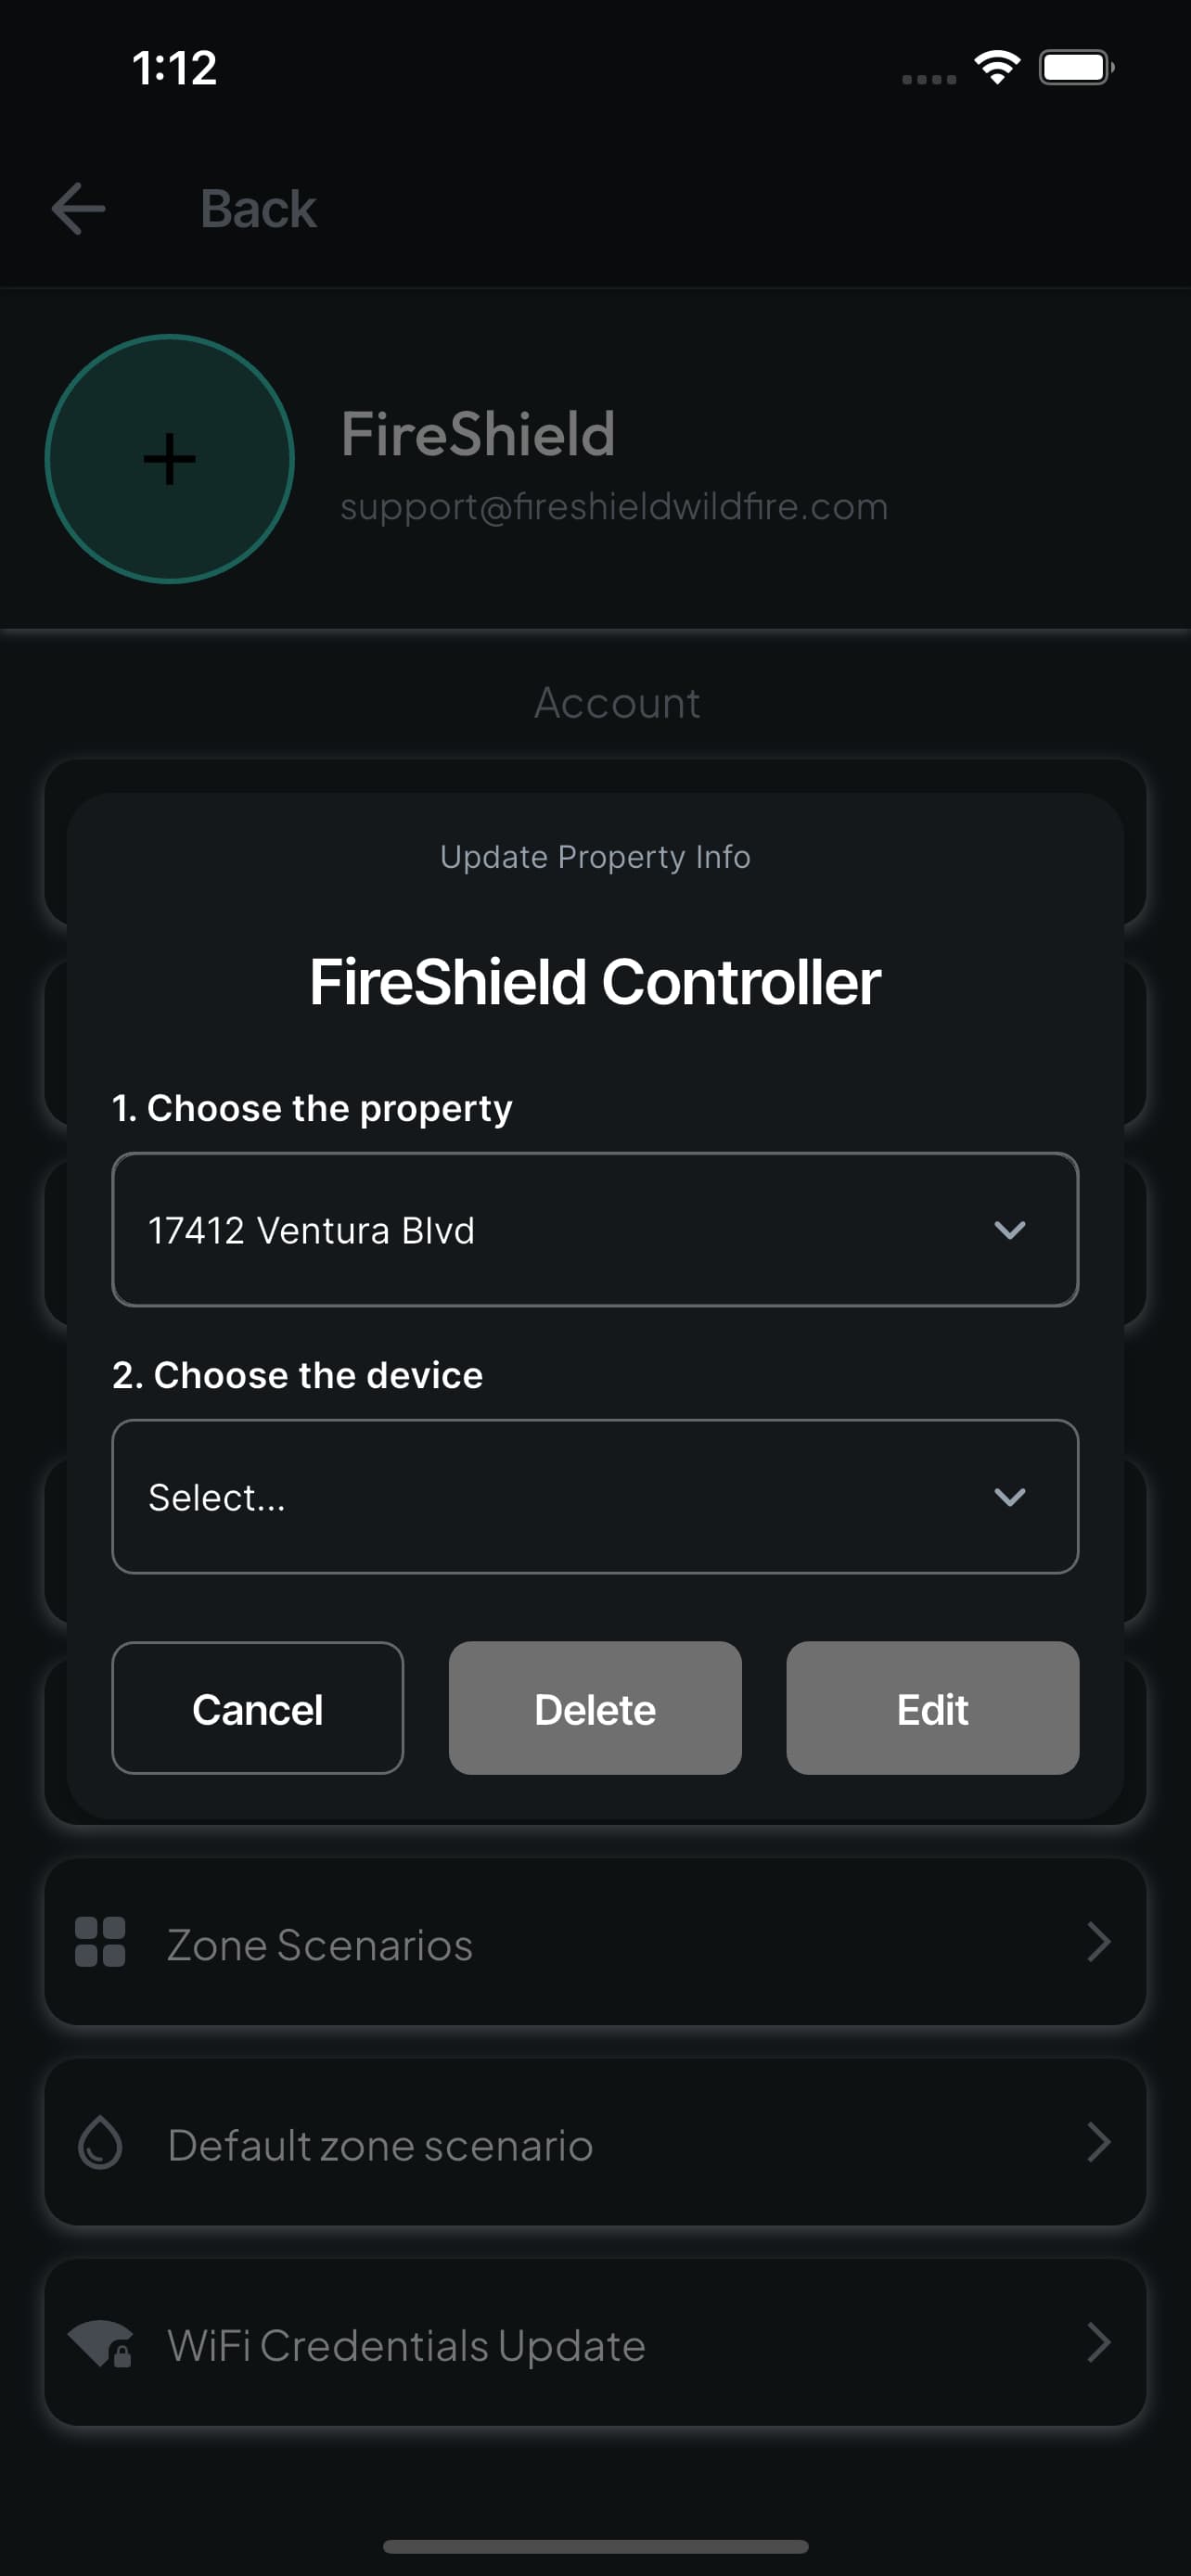
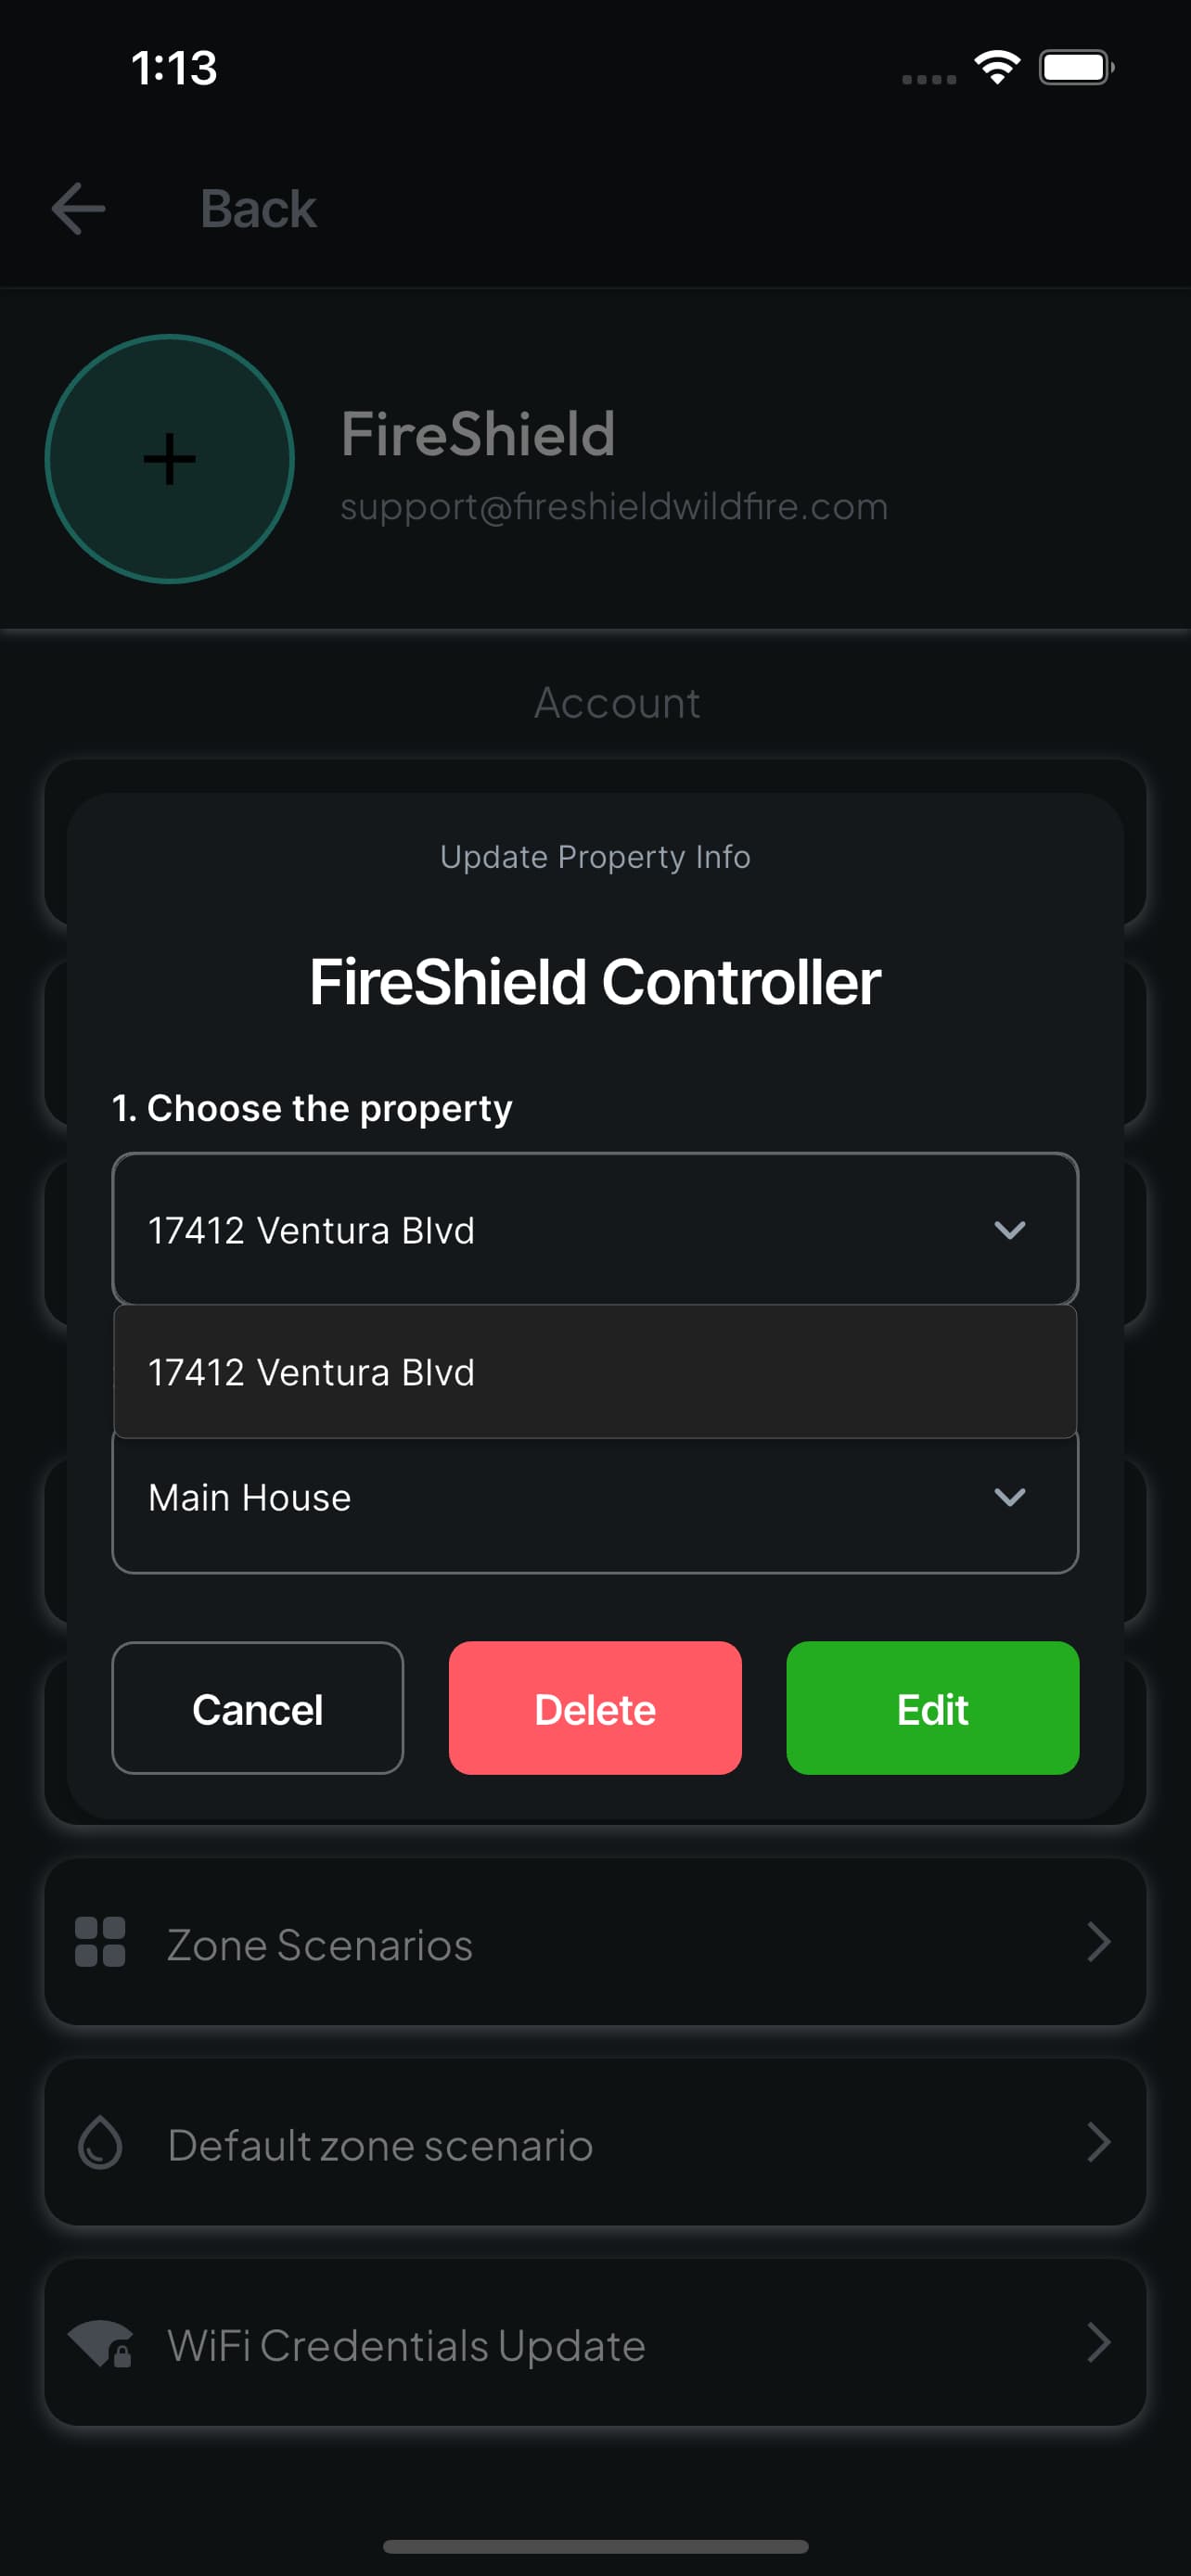
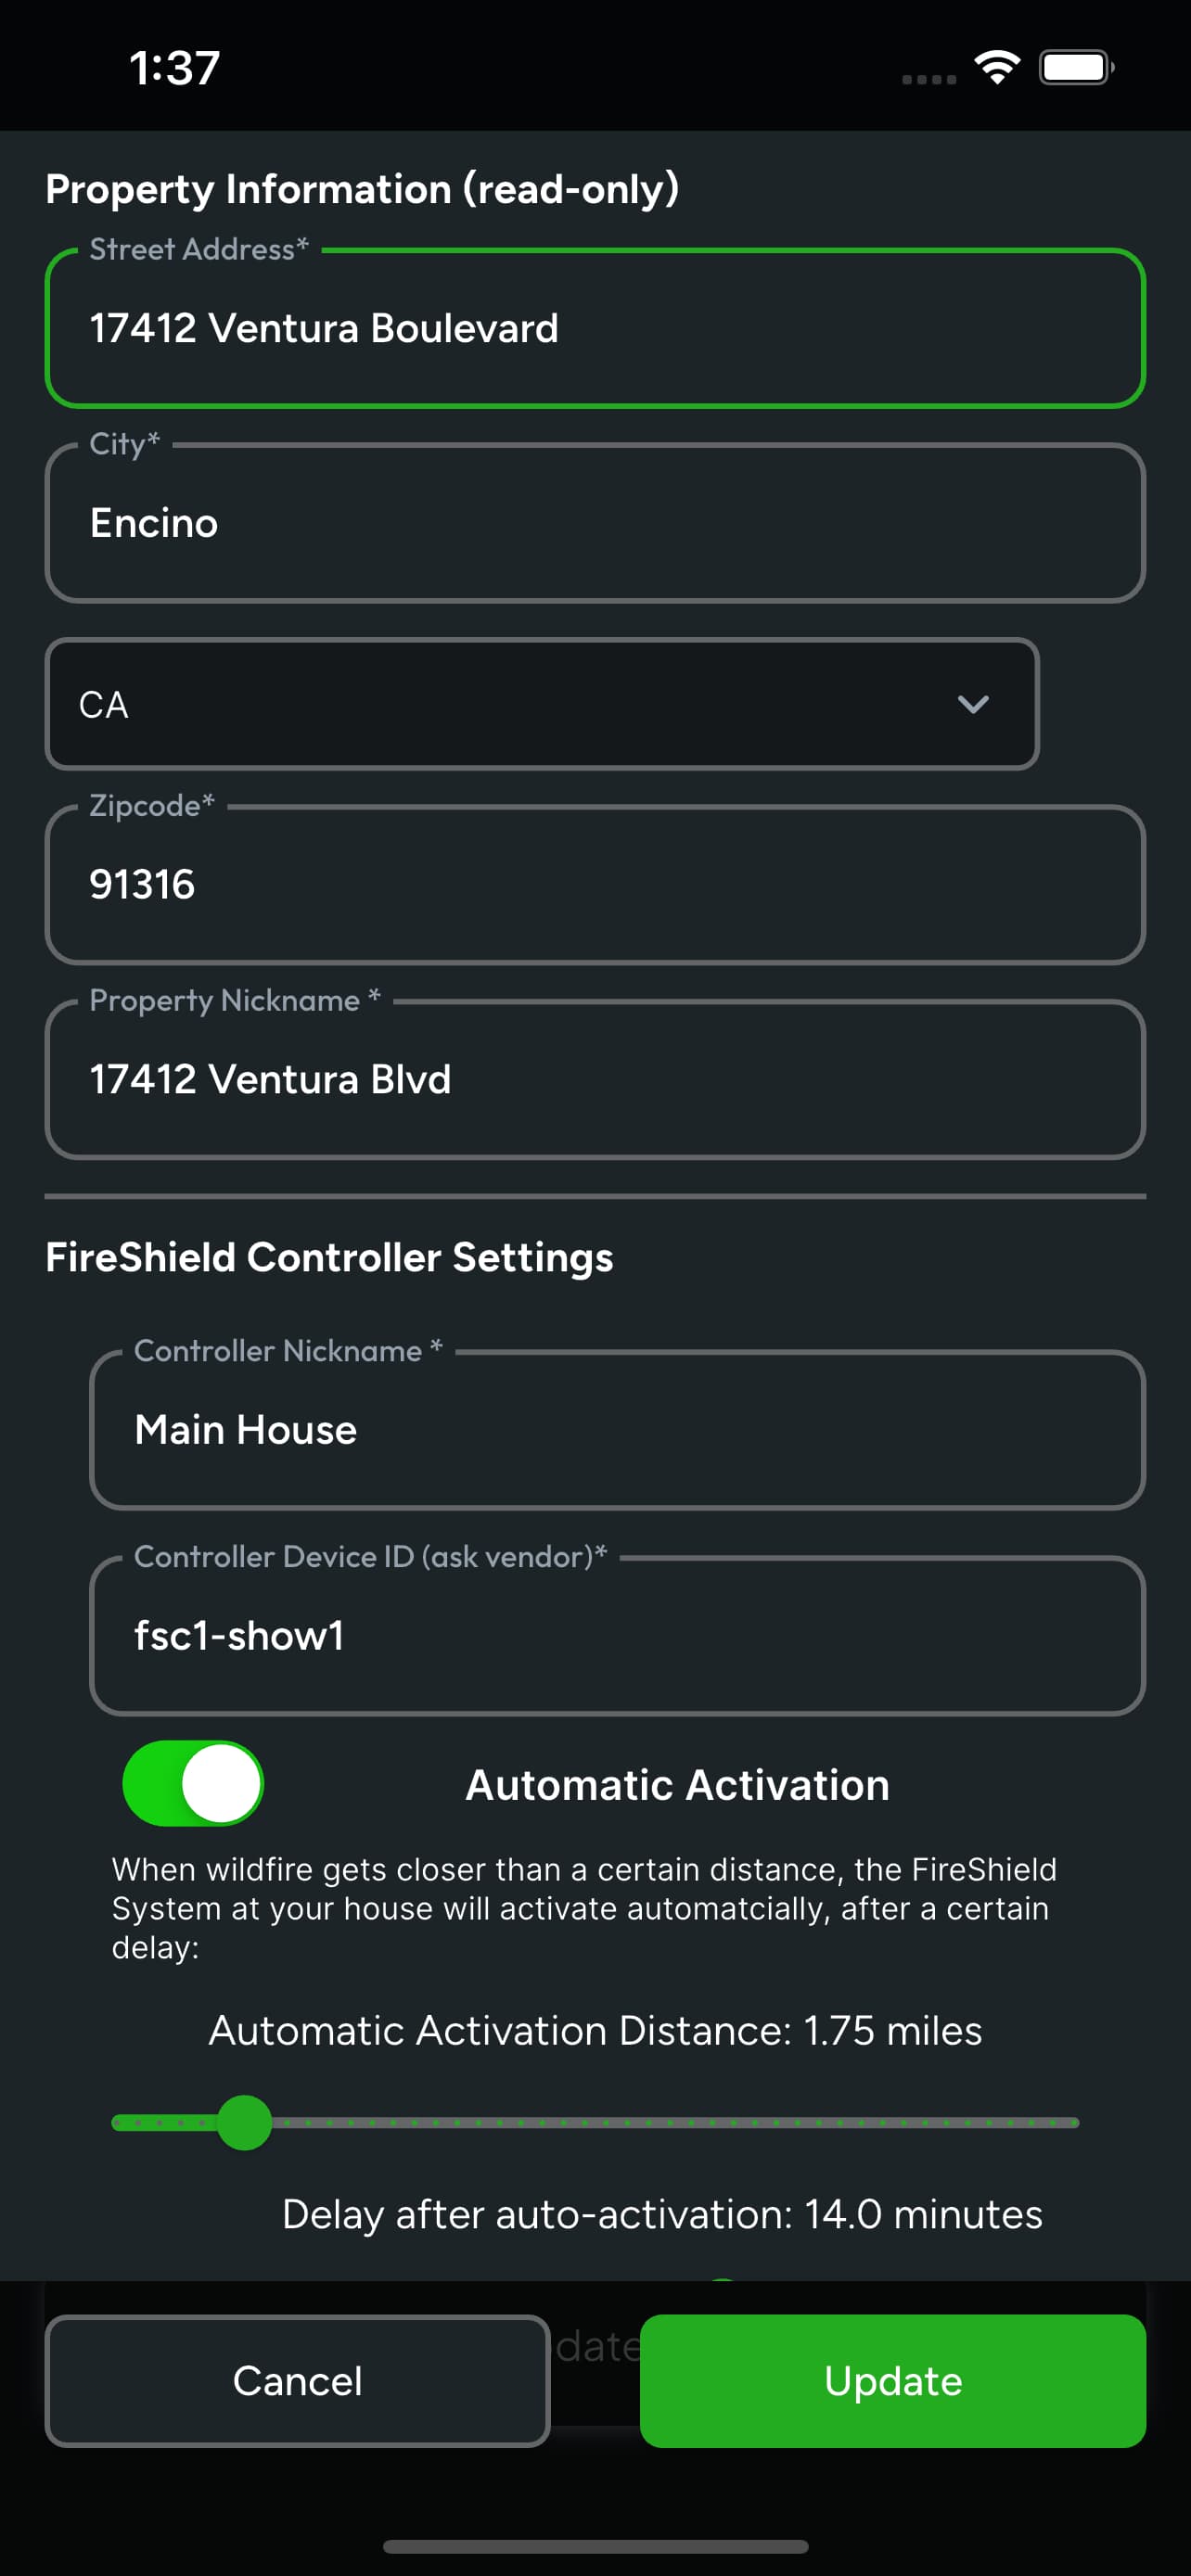
Choose the property, then the controller, and the Edit and Delete buttons come alive. Edit opens everything the app knows about that controller — address, nickname, Device ID, and the automatic activation distance and delay — and nothing is written until you tap Update. Delete removes the controller from your account.
- Both buttons stay greyed out until you have picked a property and a device. That is deliberate.
- This is where you change your automatic activation distance and delay after installation.
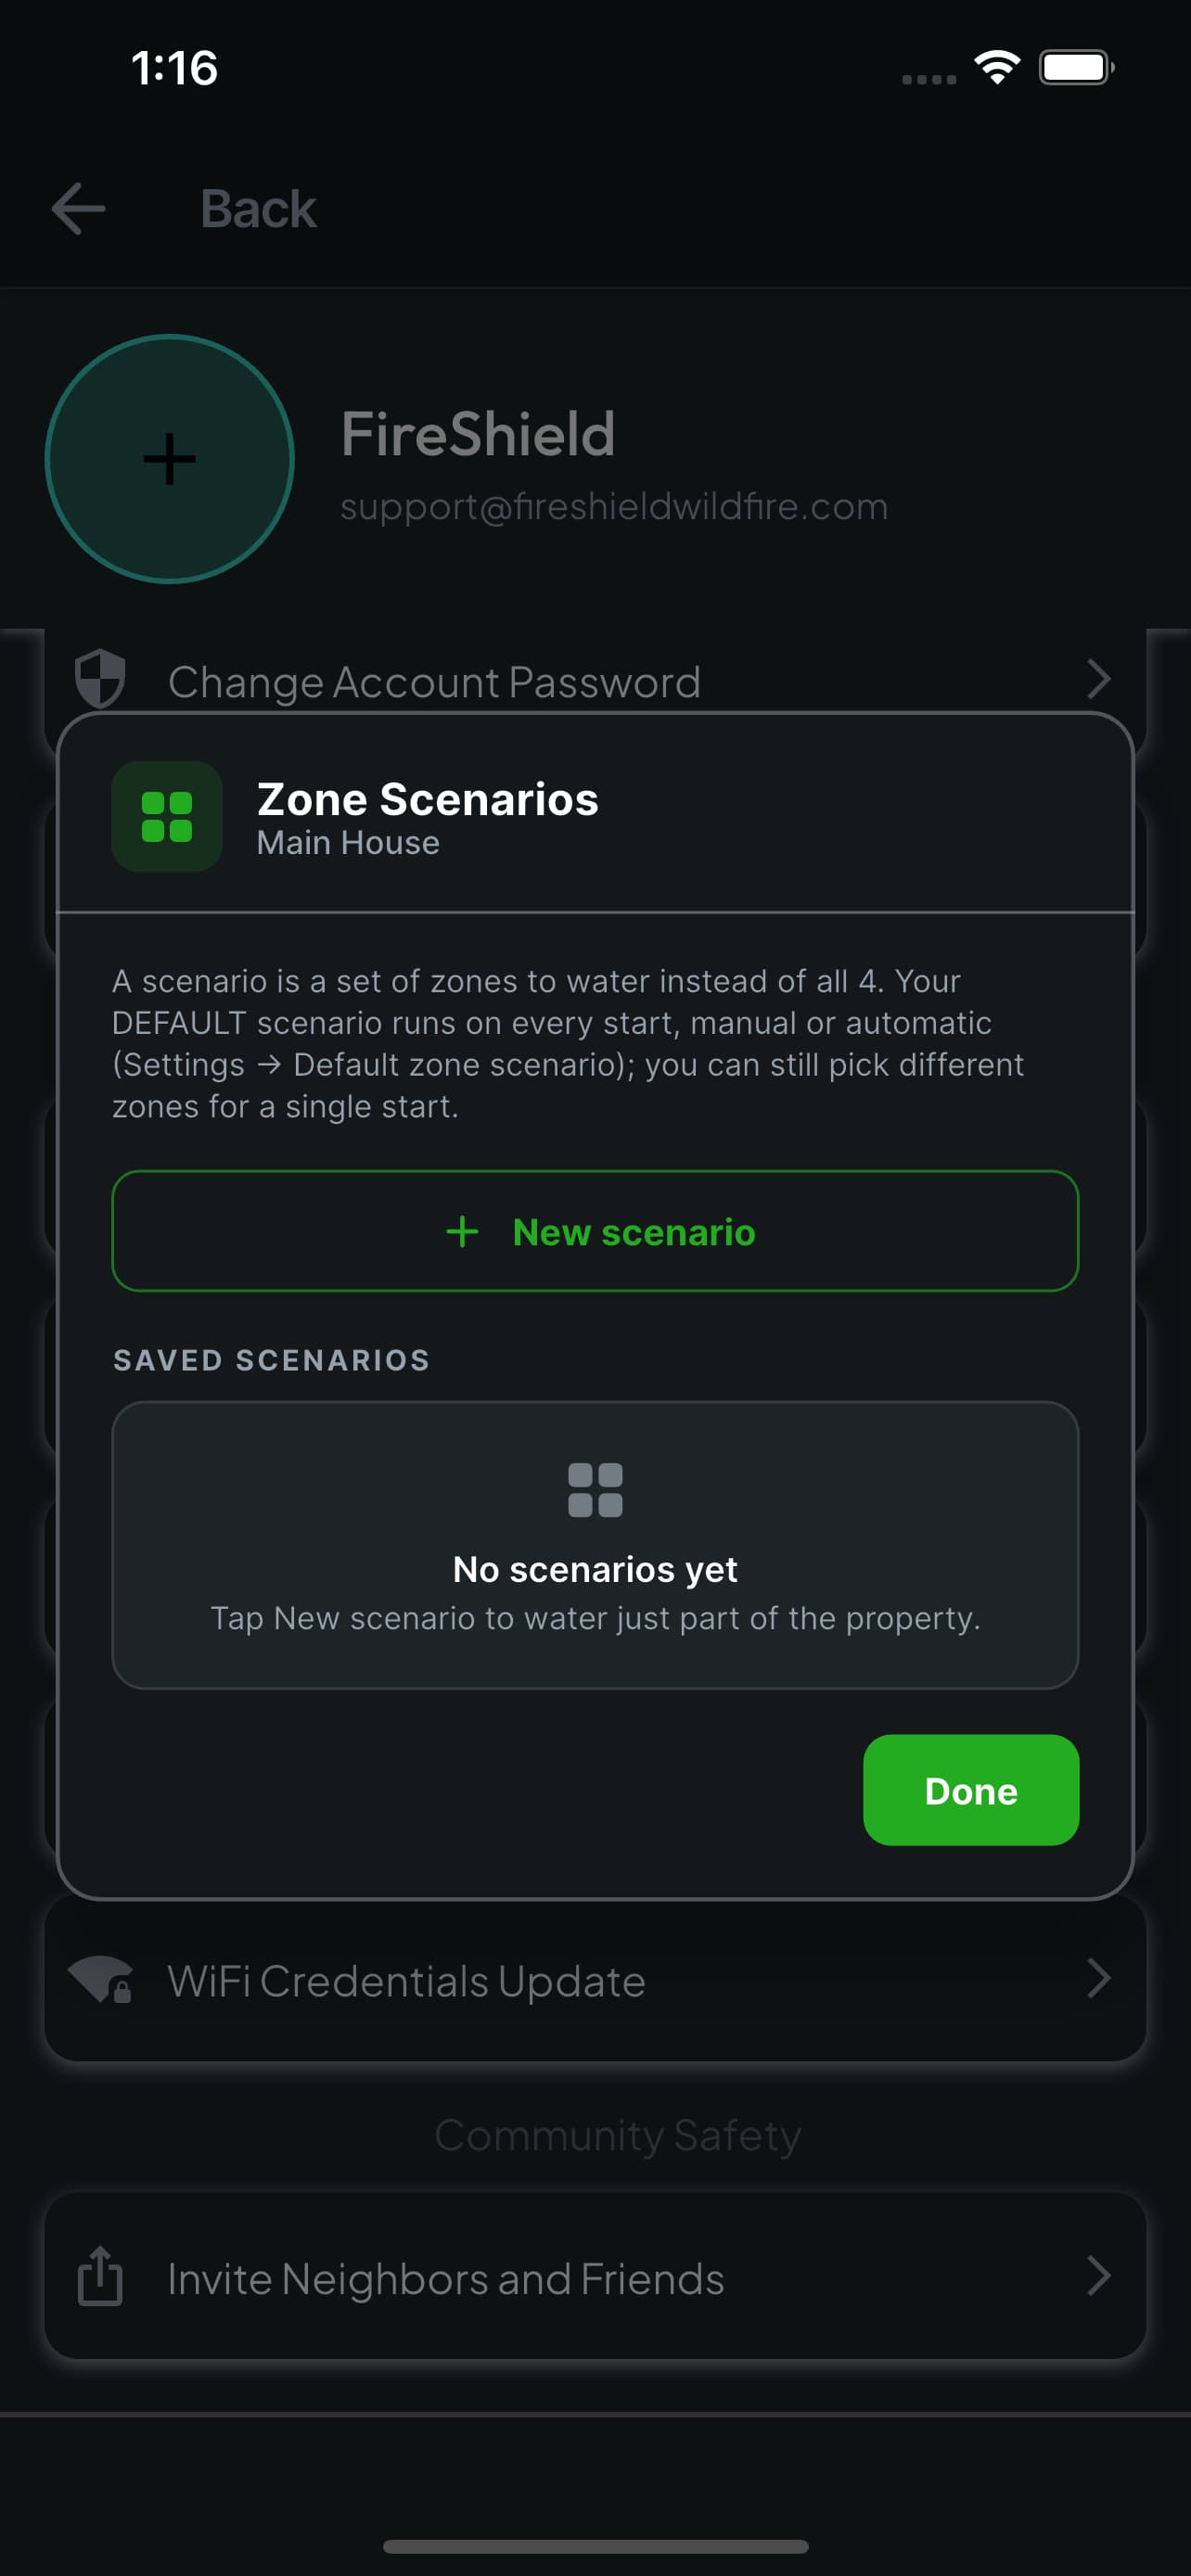
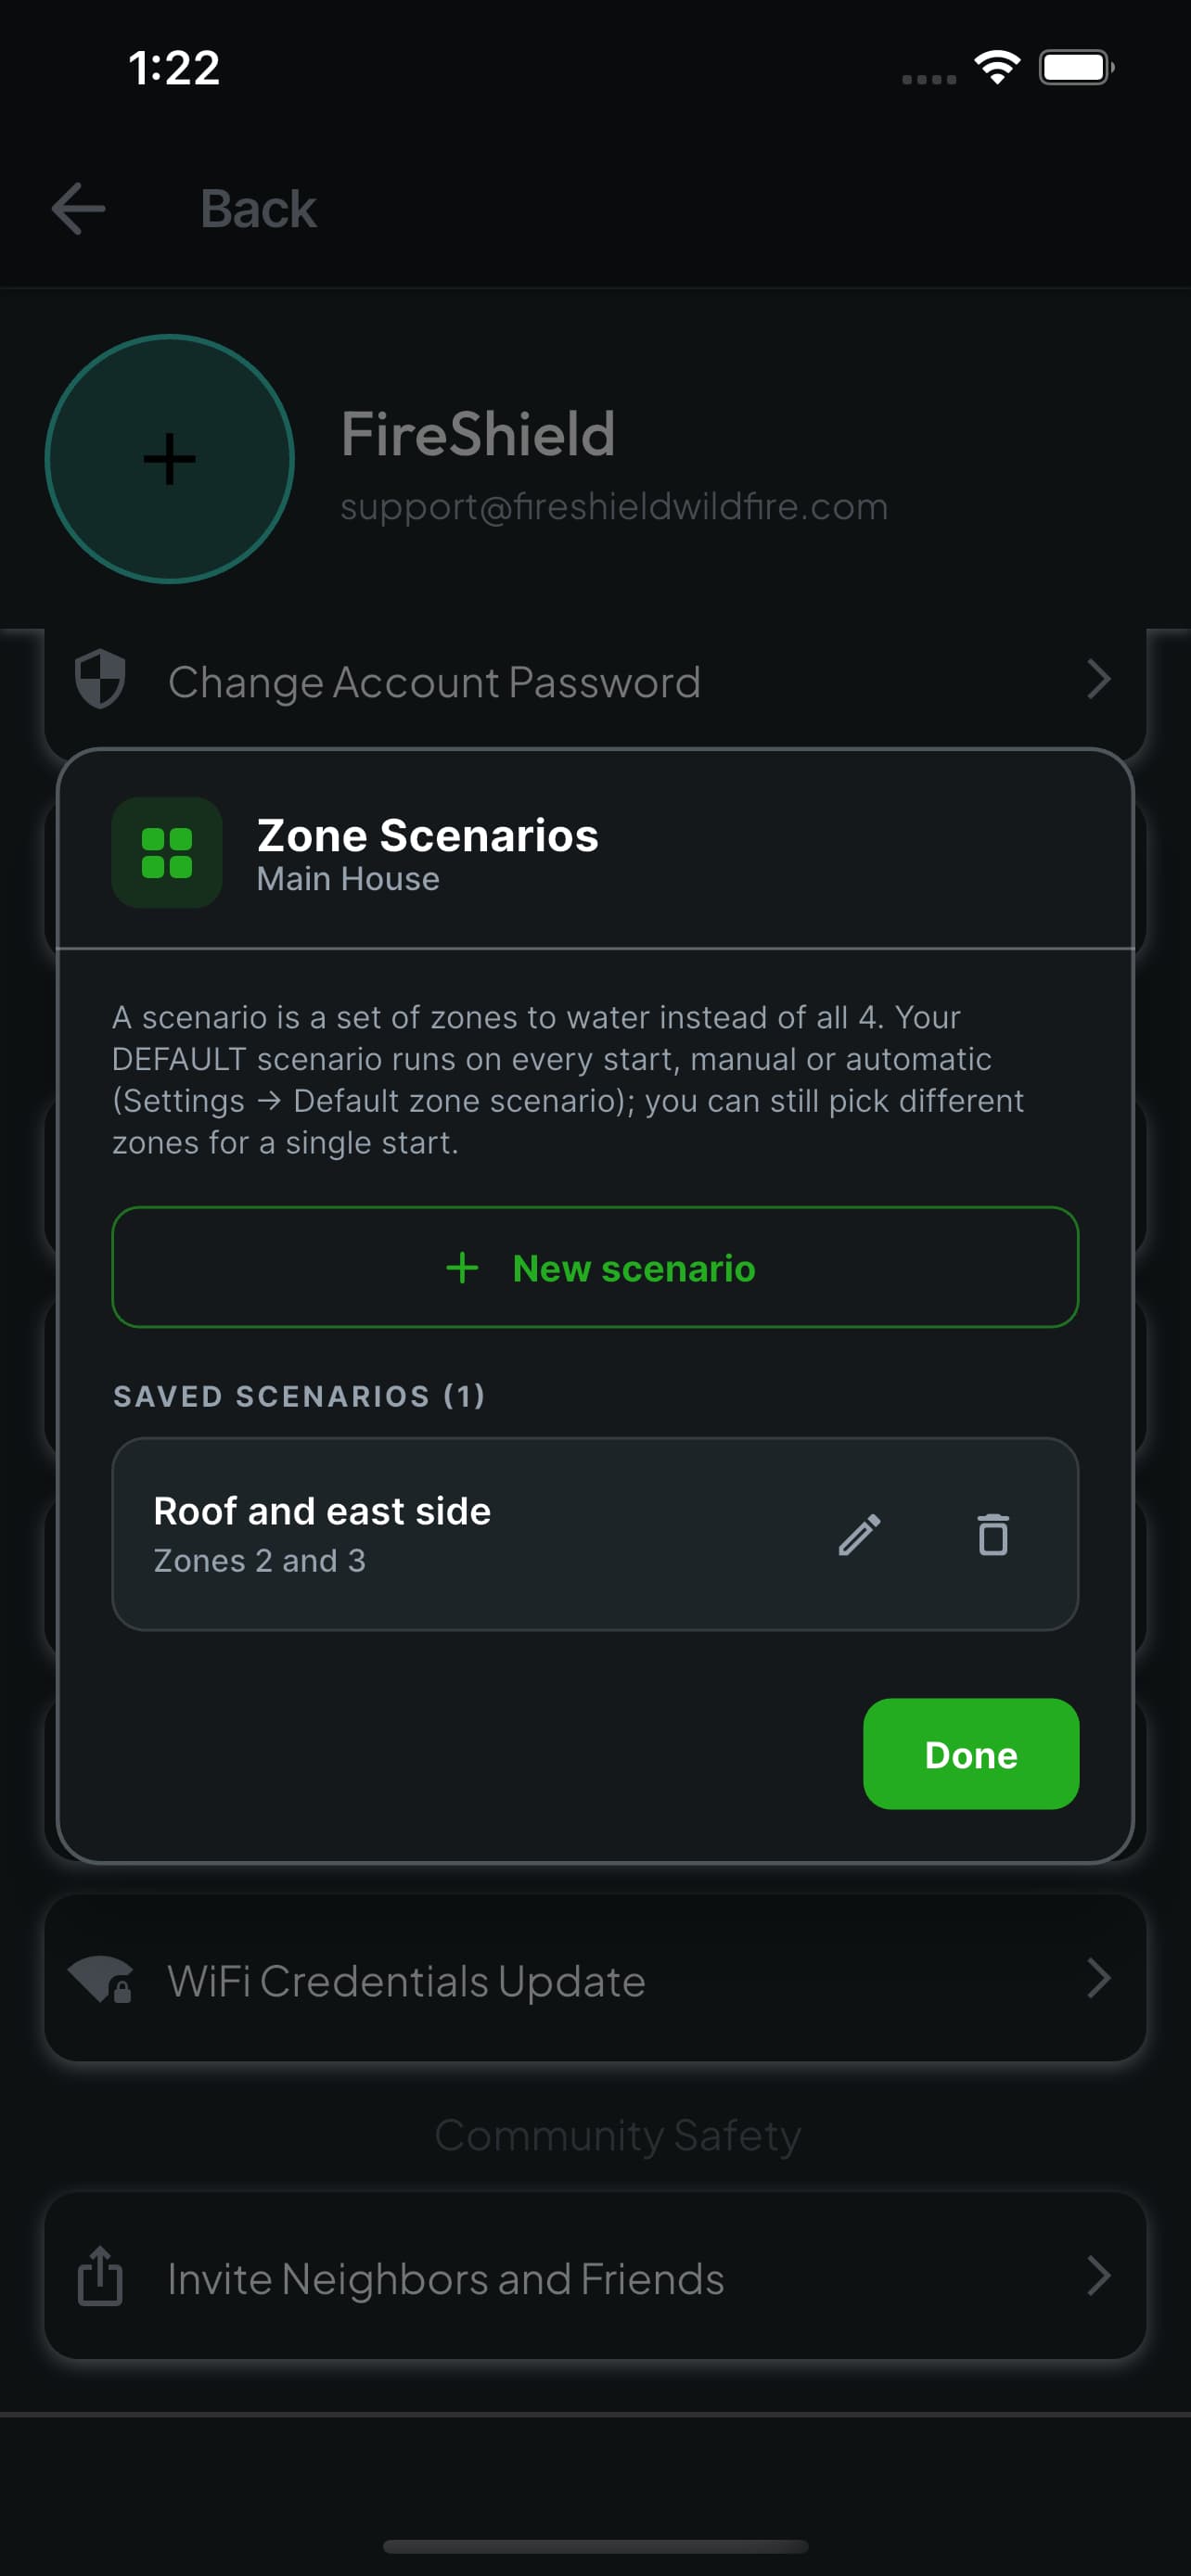
Zone Scenarios
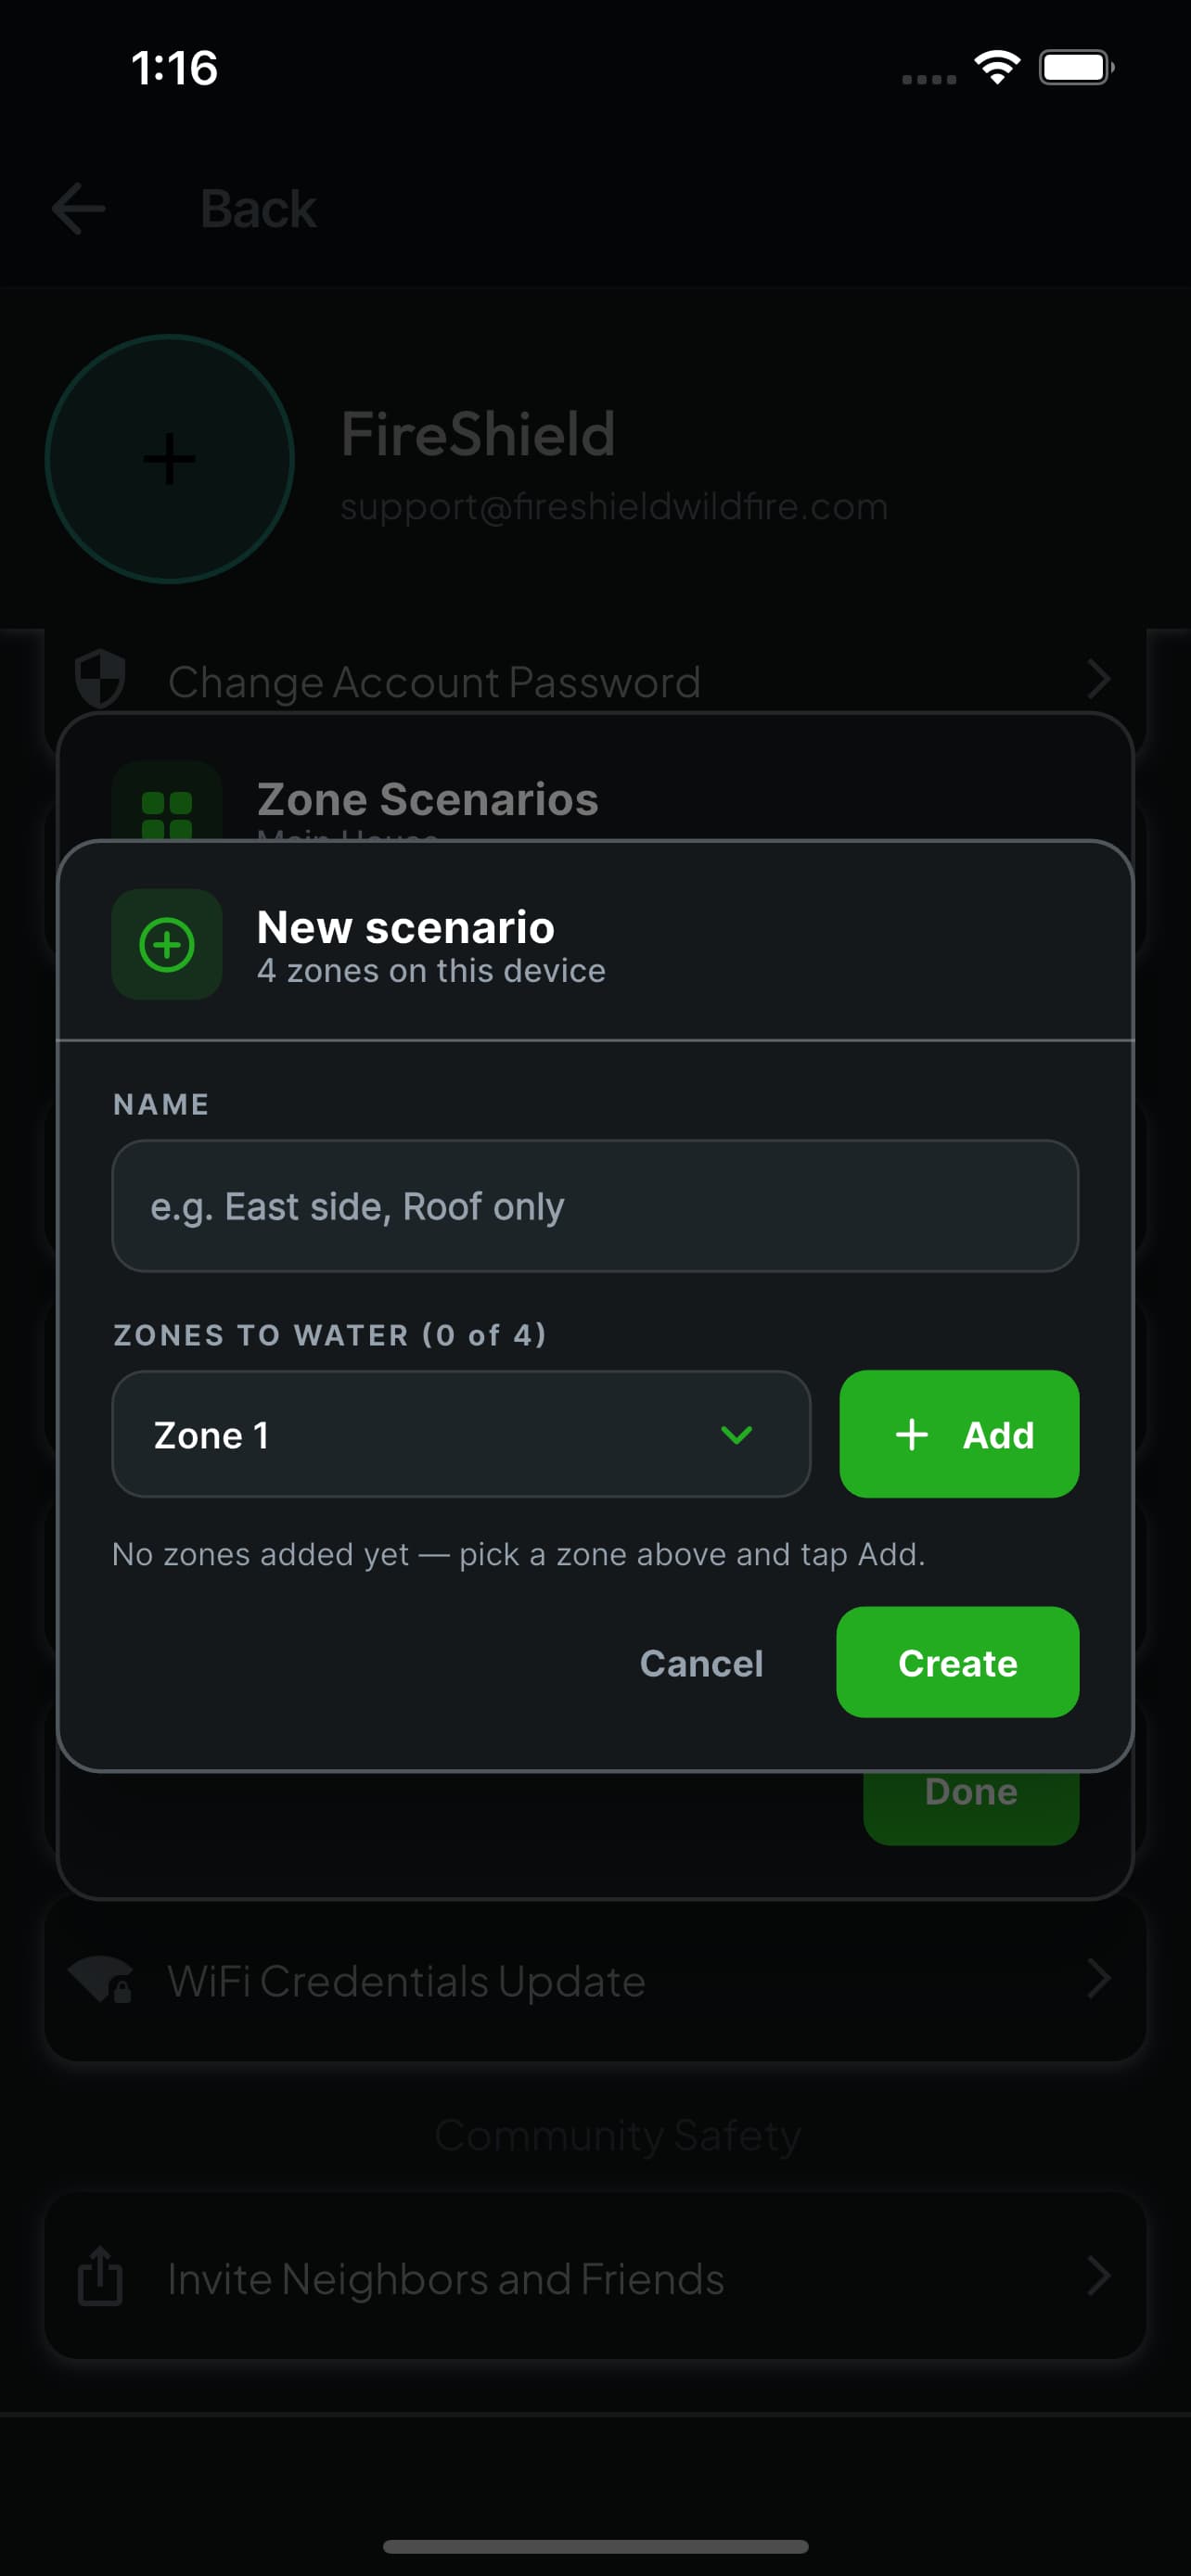
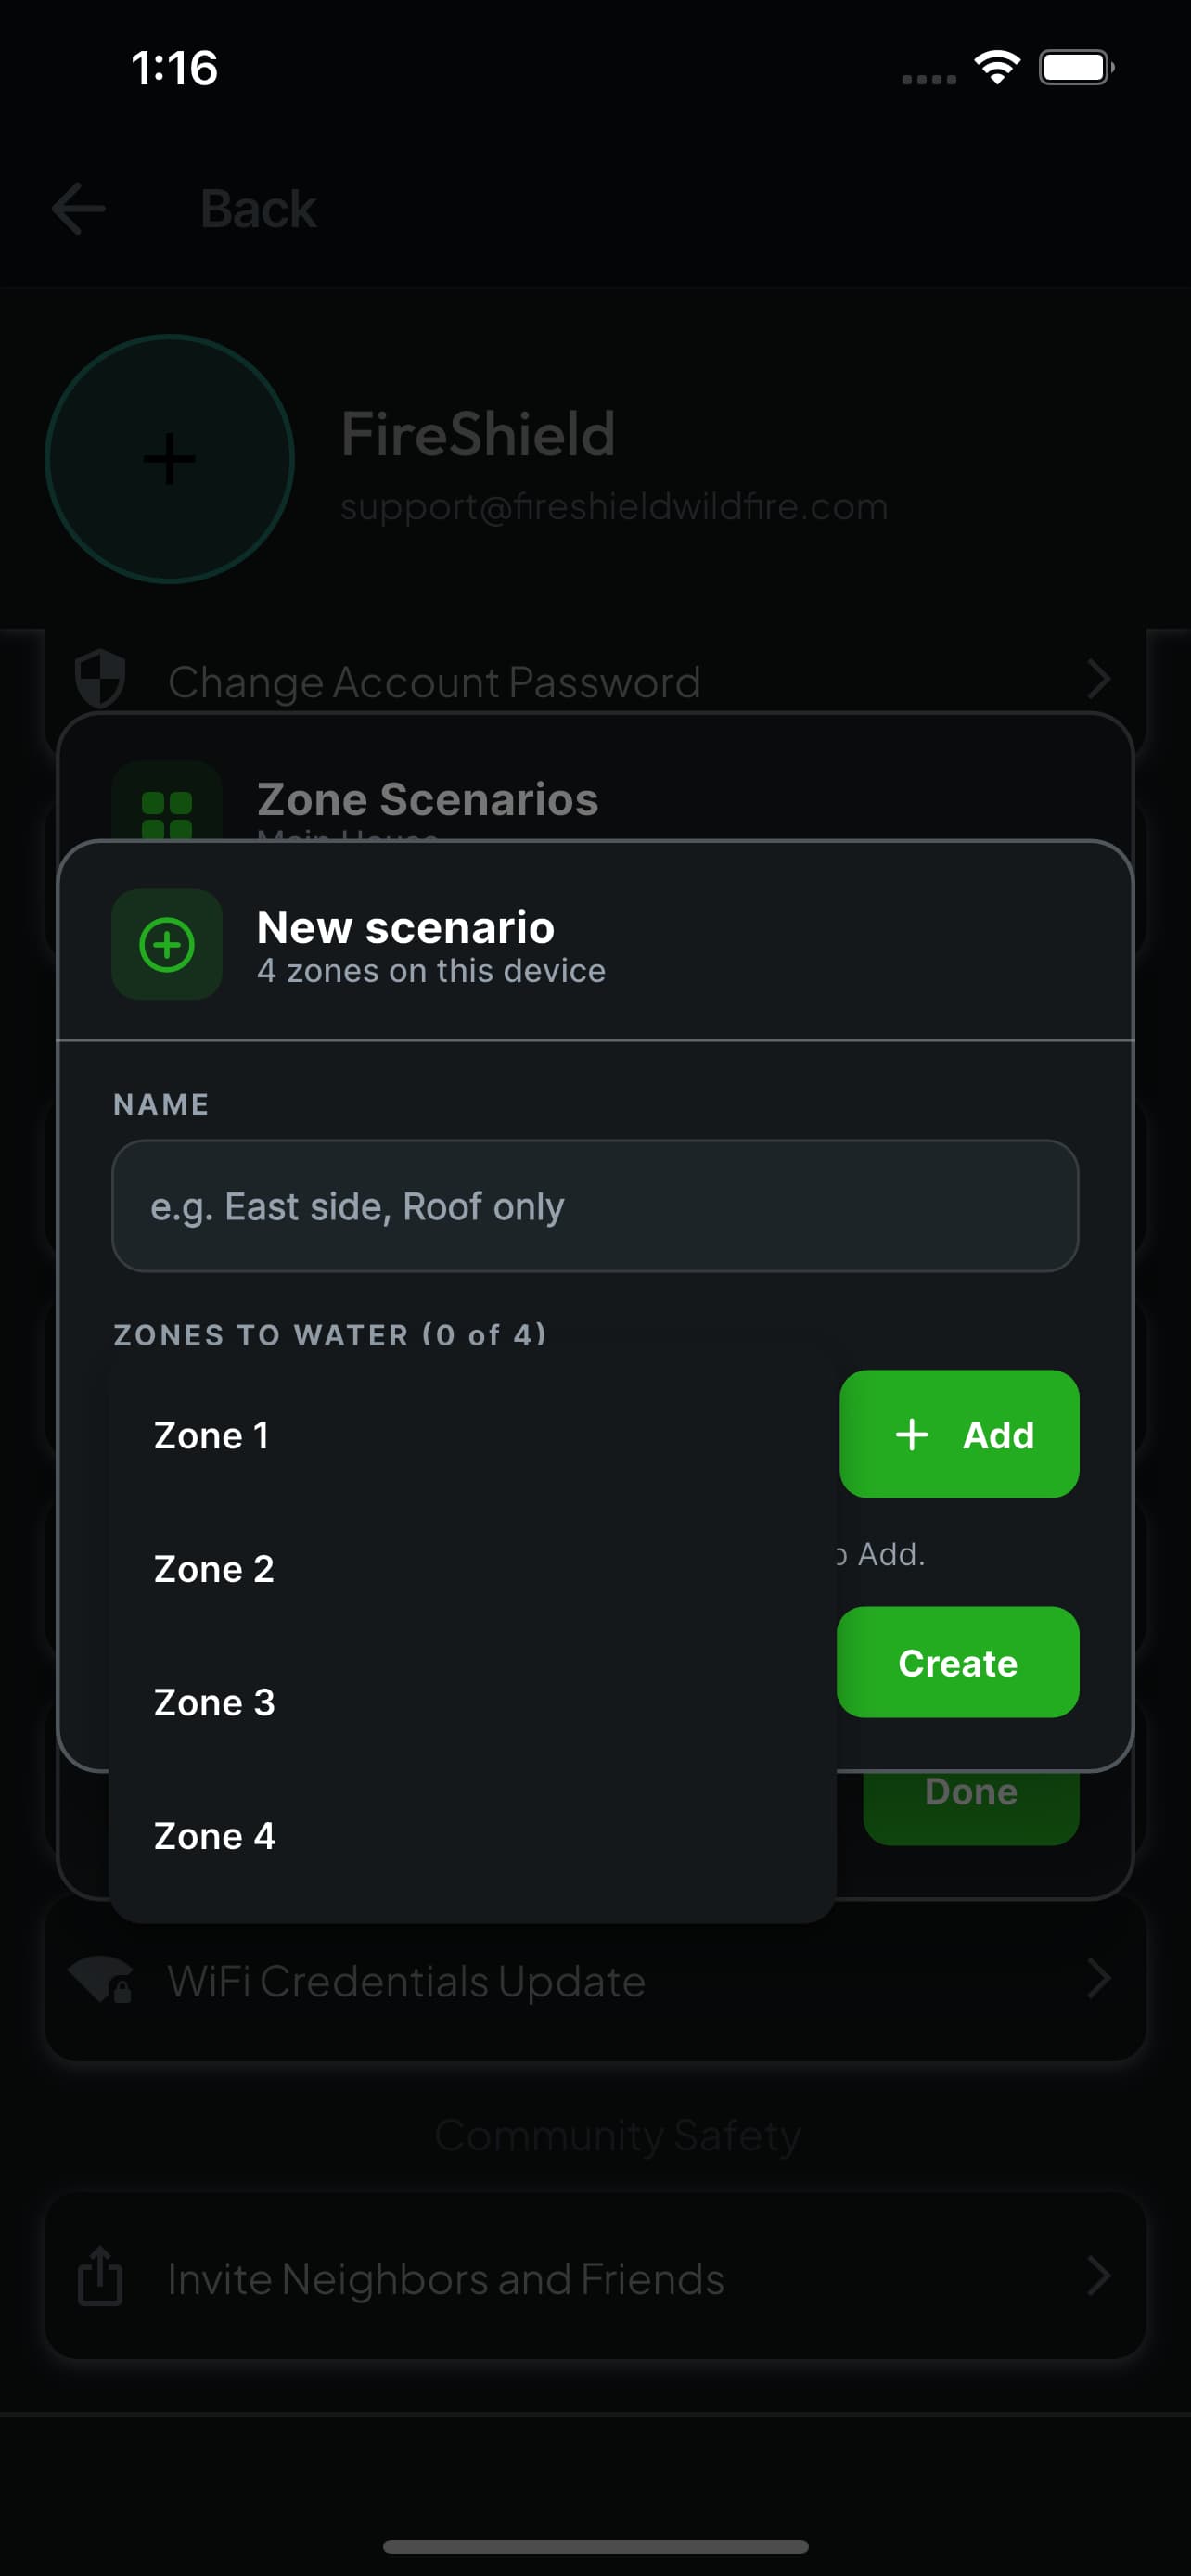
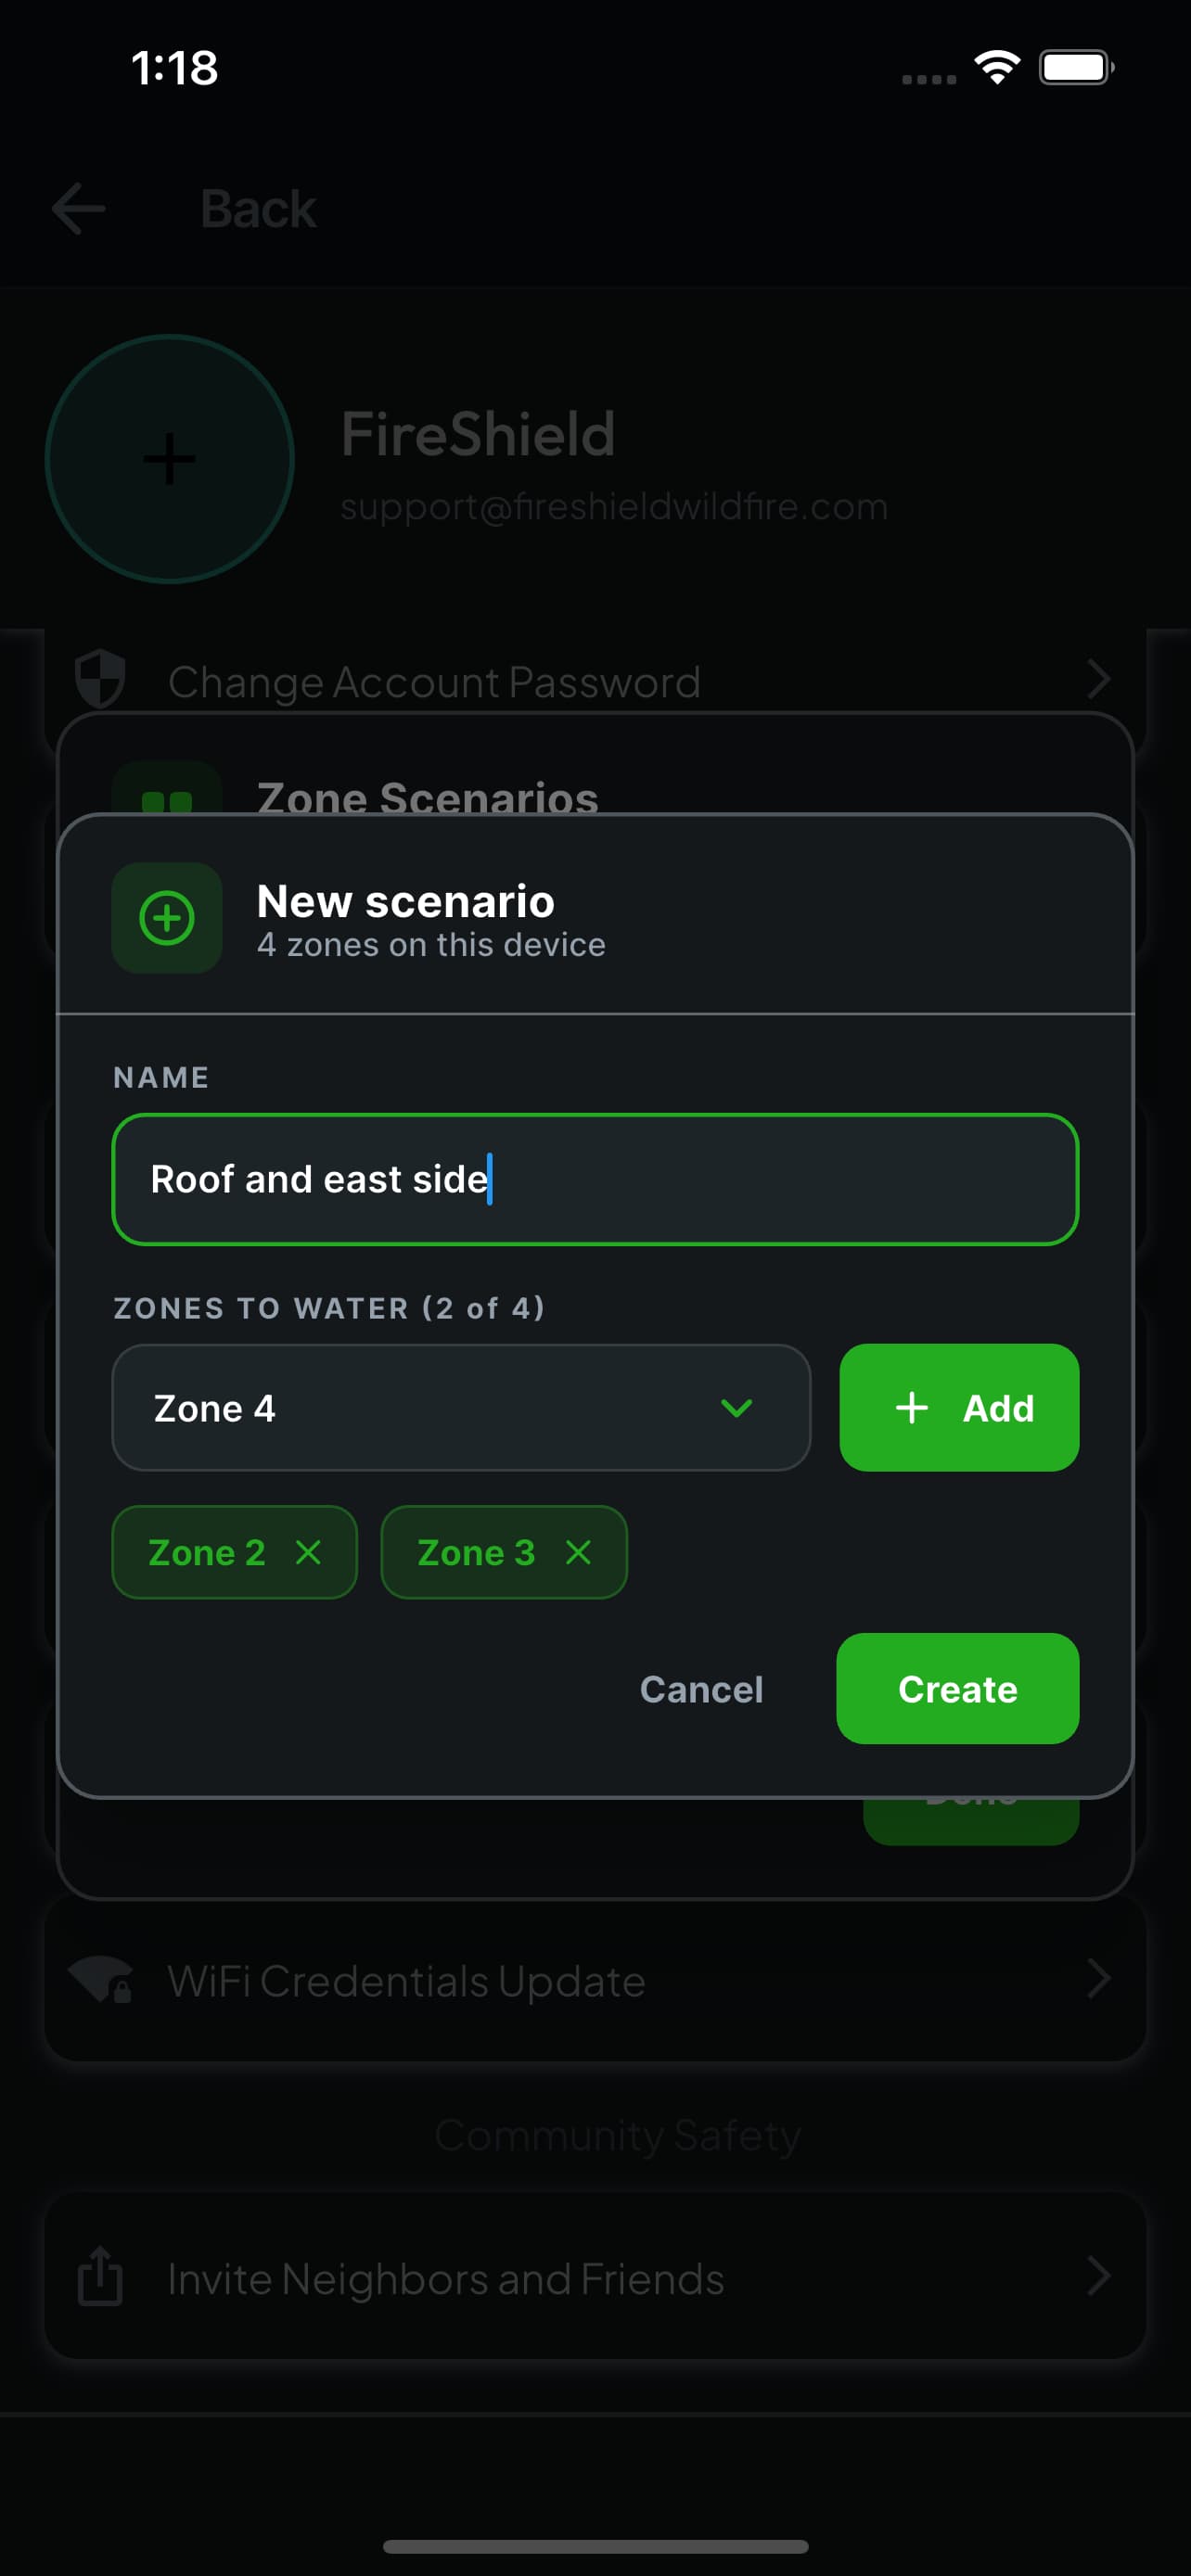
A scenario is a named set of zones to water instead of all four — the east side, the roof line, whatever matches your ground. Tap New scenario, give it a name, then pick a zone and tap Add for each one you want; the zones you have chosen appear as chips underneath. Saved scenarios can be edited with the pencil or removed with the bin, and removing one never changes anything on the controller itself.
- A scenario is a shortcut, not a restriction. You can still pick different zones for a single start from the device screen.
- Name them for the ground, not the equipment: “Roof and east side” beats “Zones 2 and 3”.
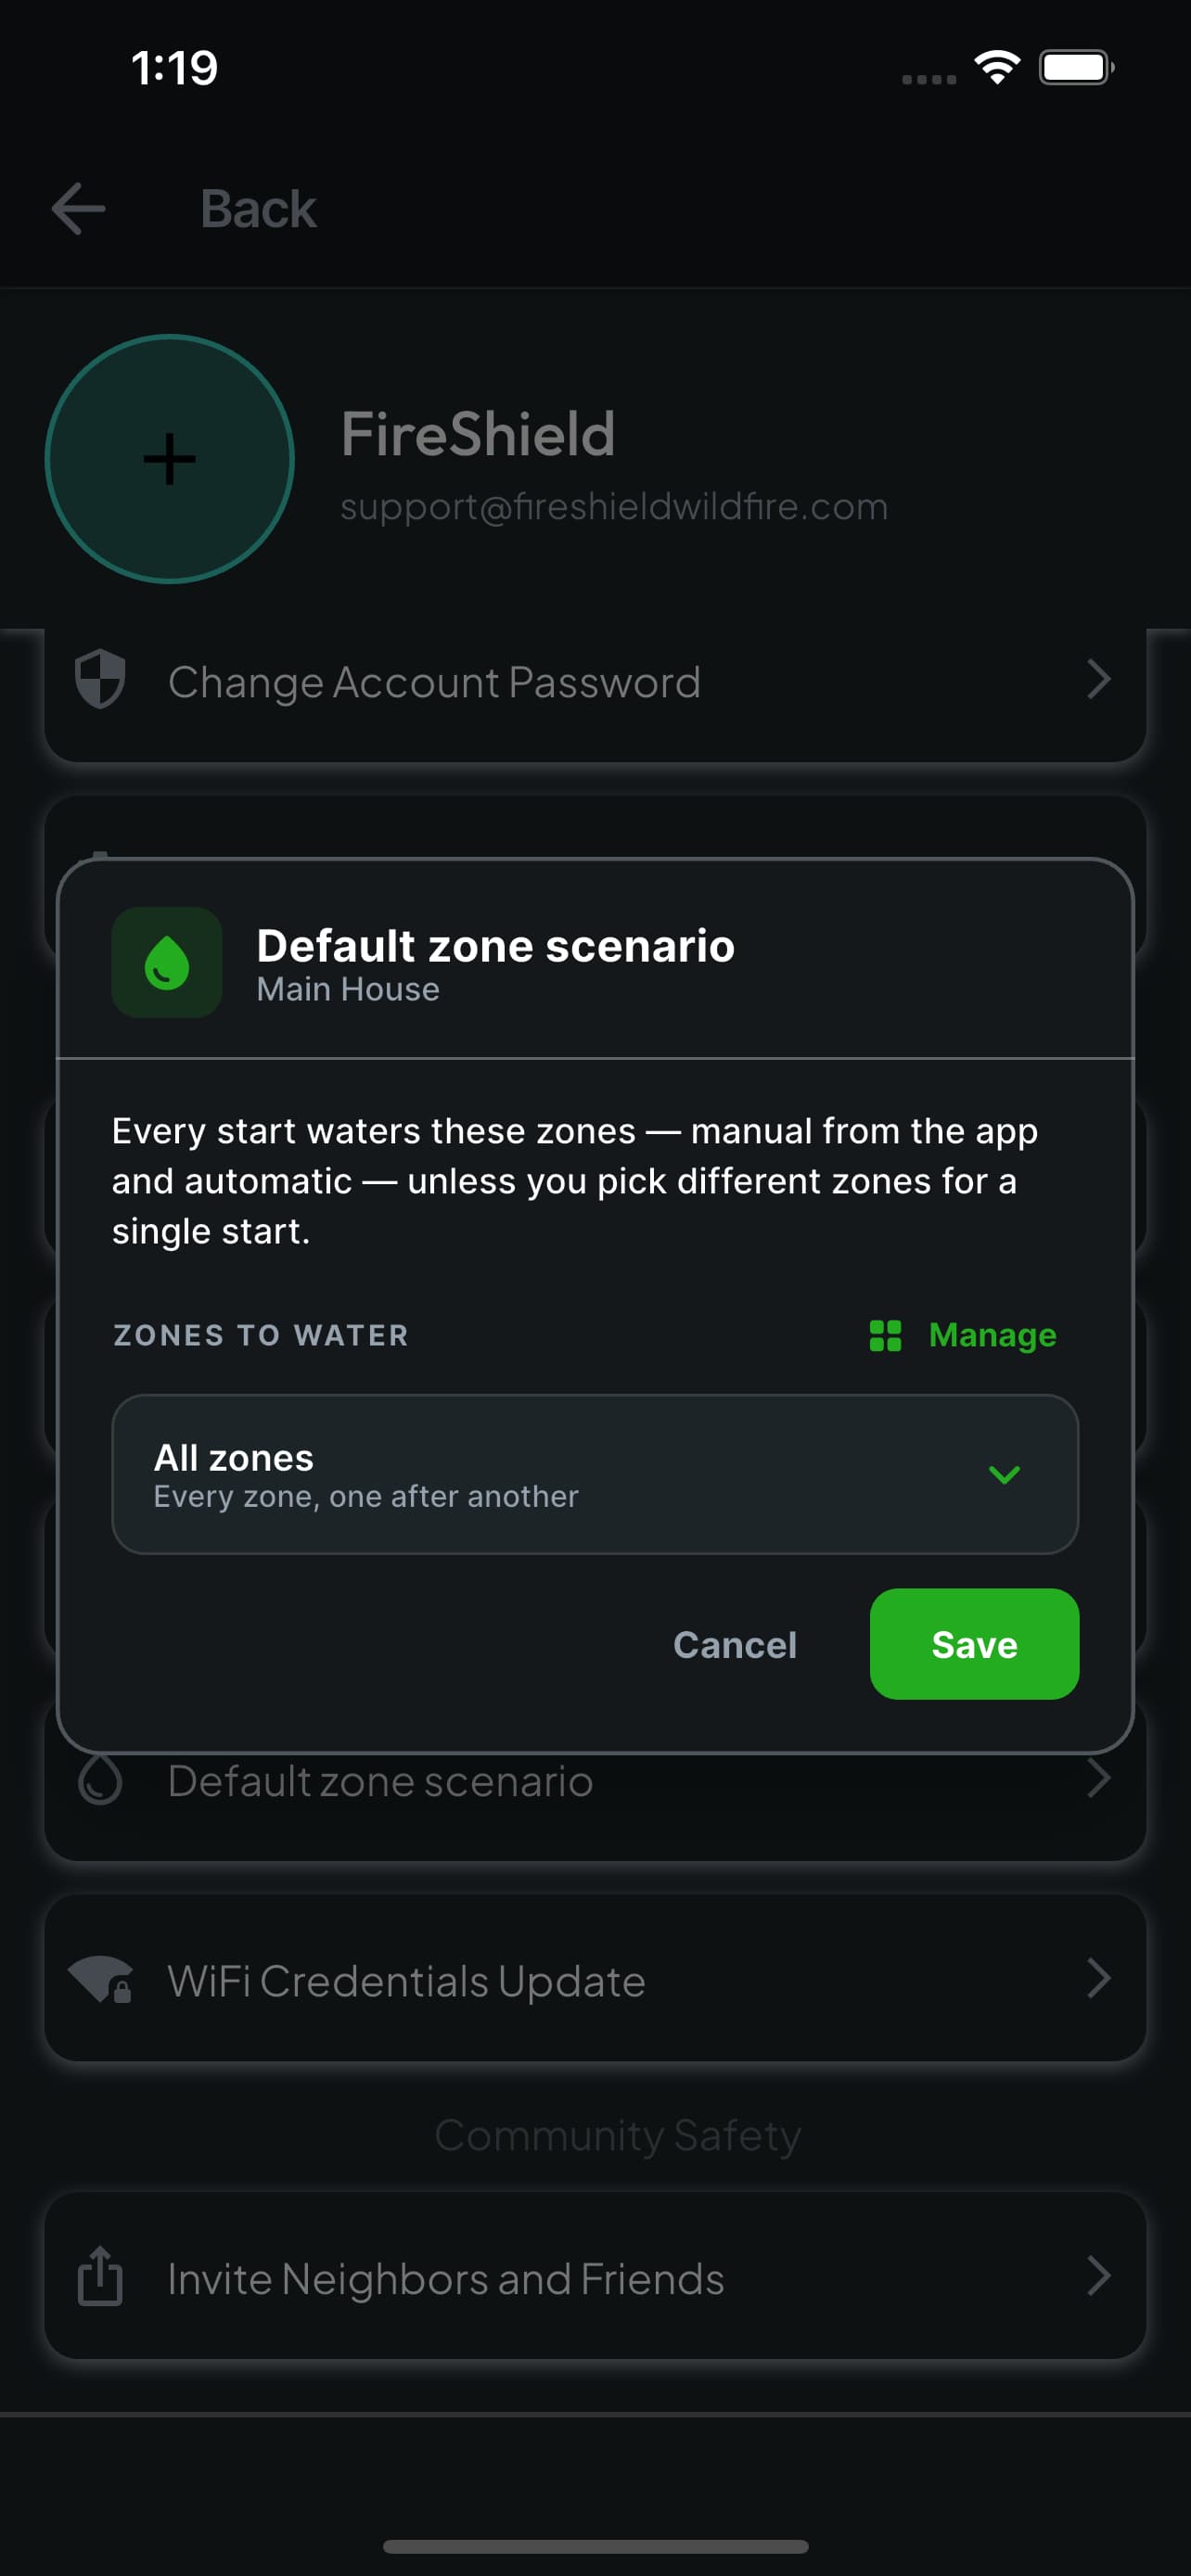
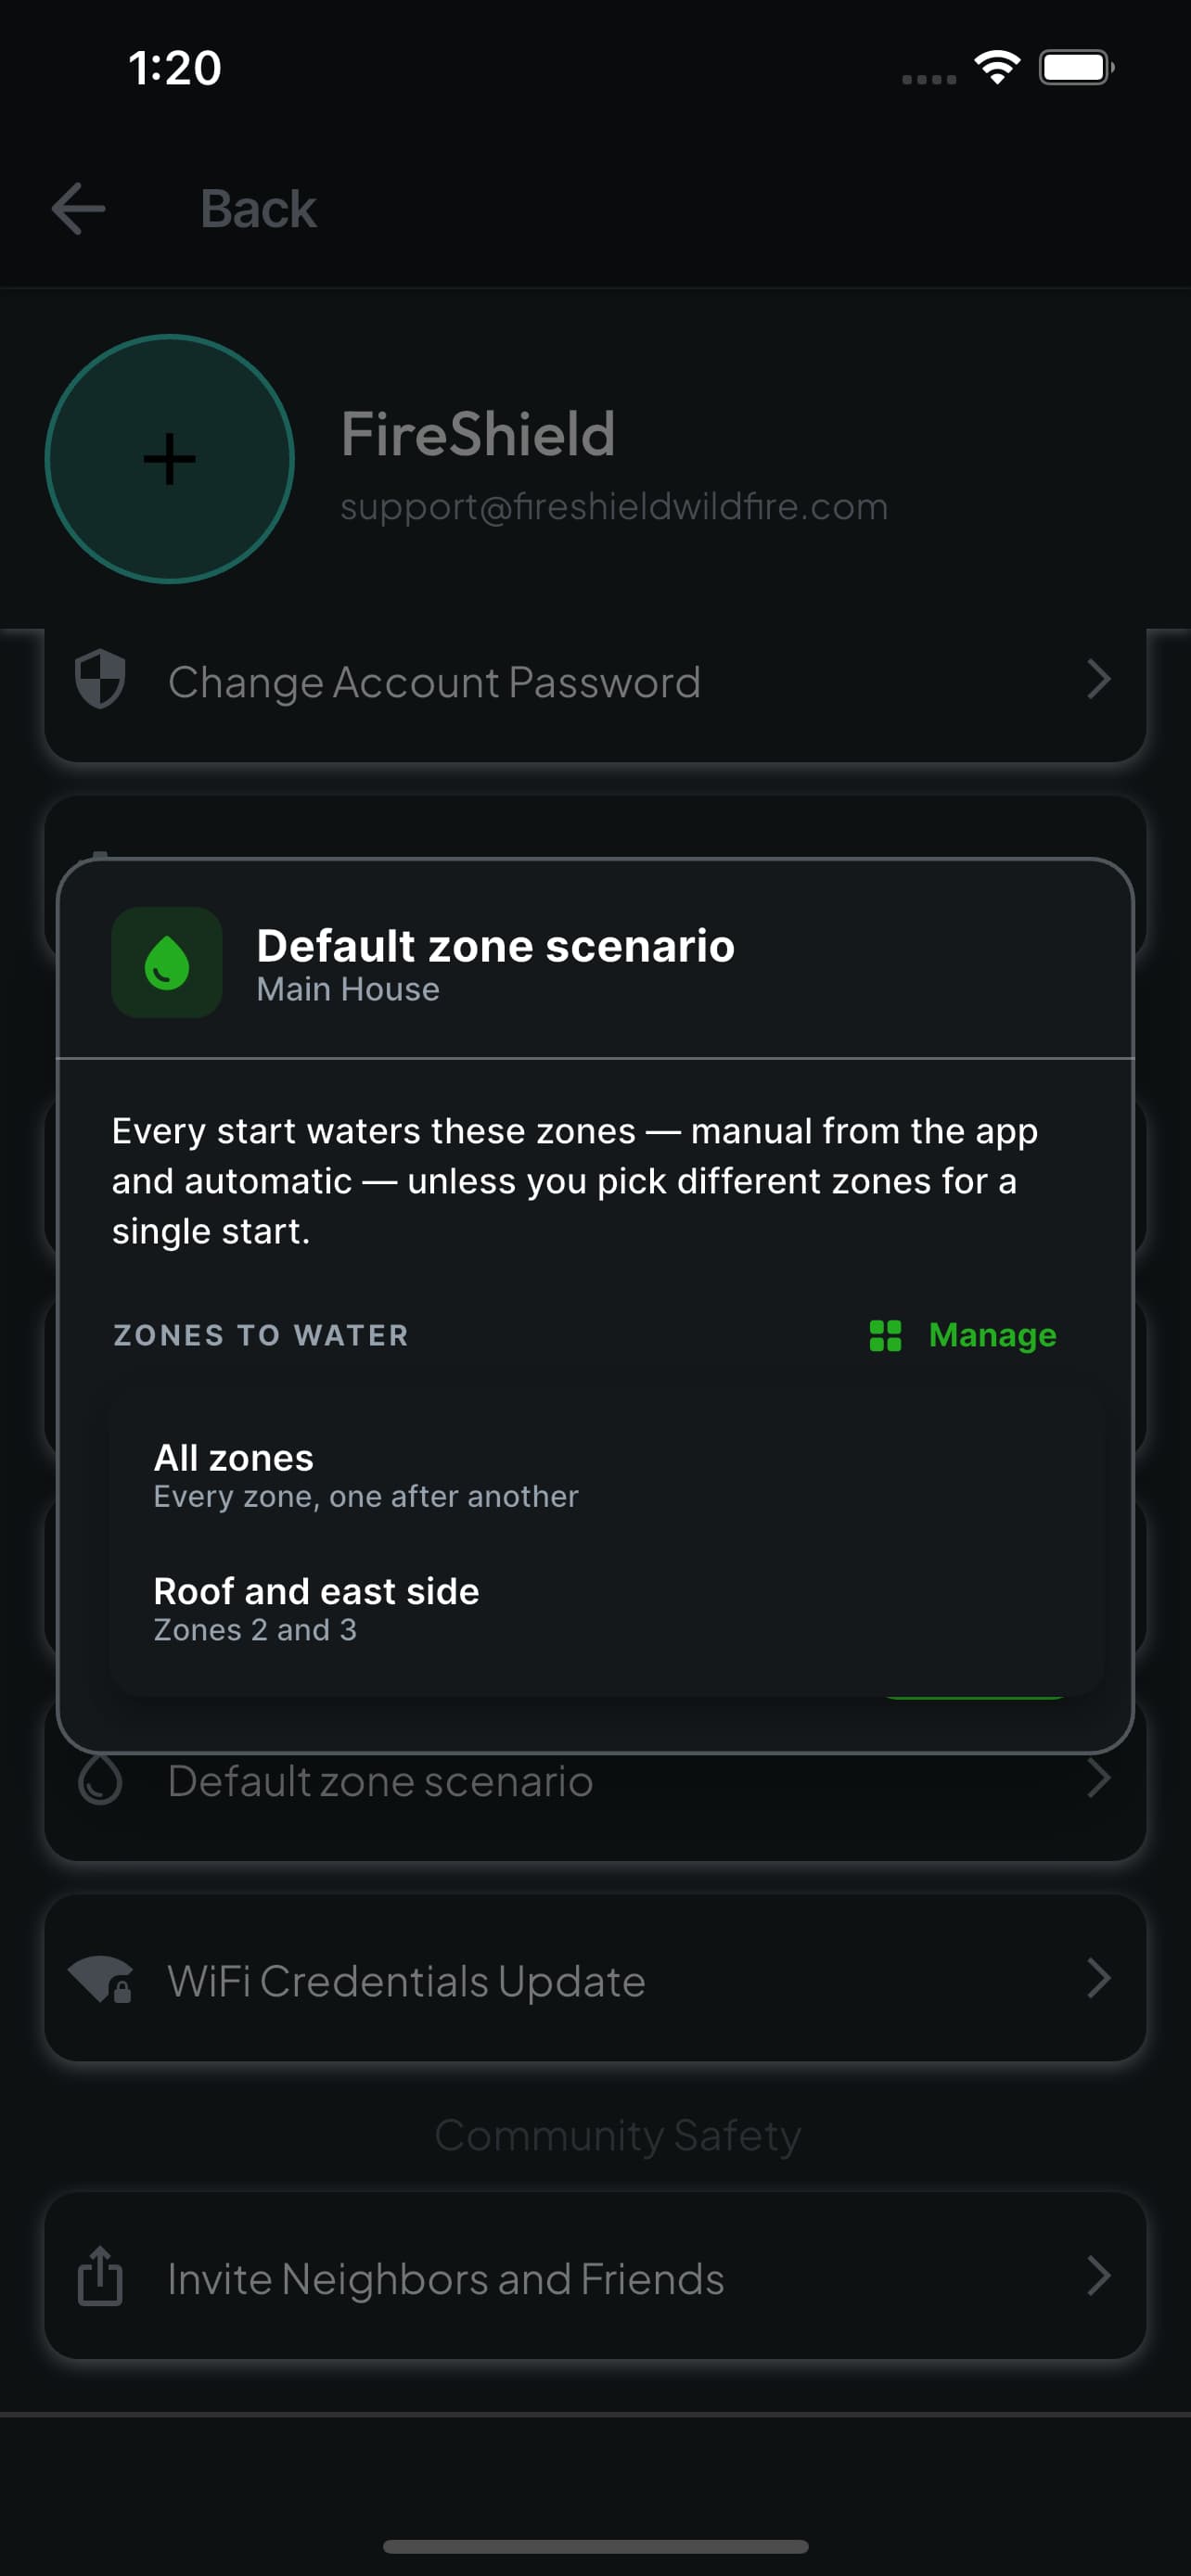
Default zone scenario
This is the one that matters most, because it is what runs when nobody is choosing: every start, manual or automatic, waters these zones unless you pick different ones for that single start. All zones is the safe default and the one we recommend unless you have a reason. Manage jumps straight across to Zone Scenarios if you need to build the set first.
- Automatic activation uses this. If you narrow it, you are narrowing what happens while you are away.
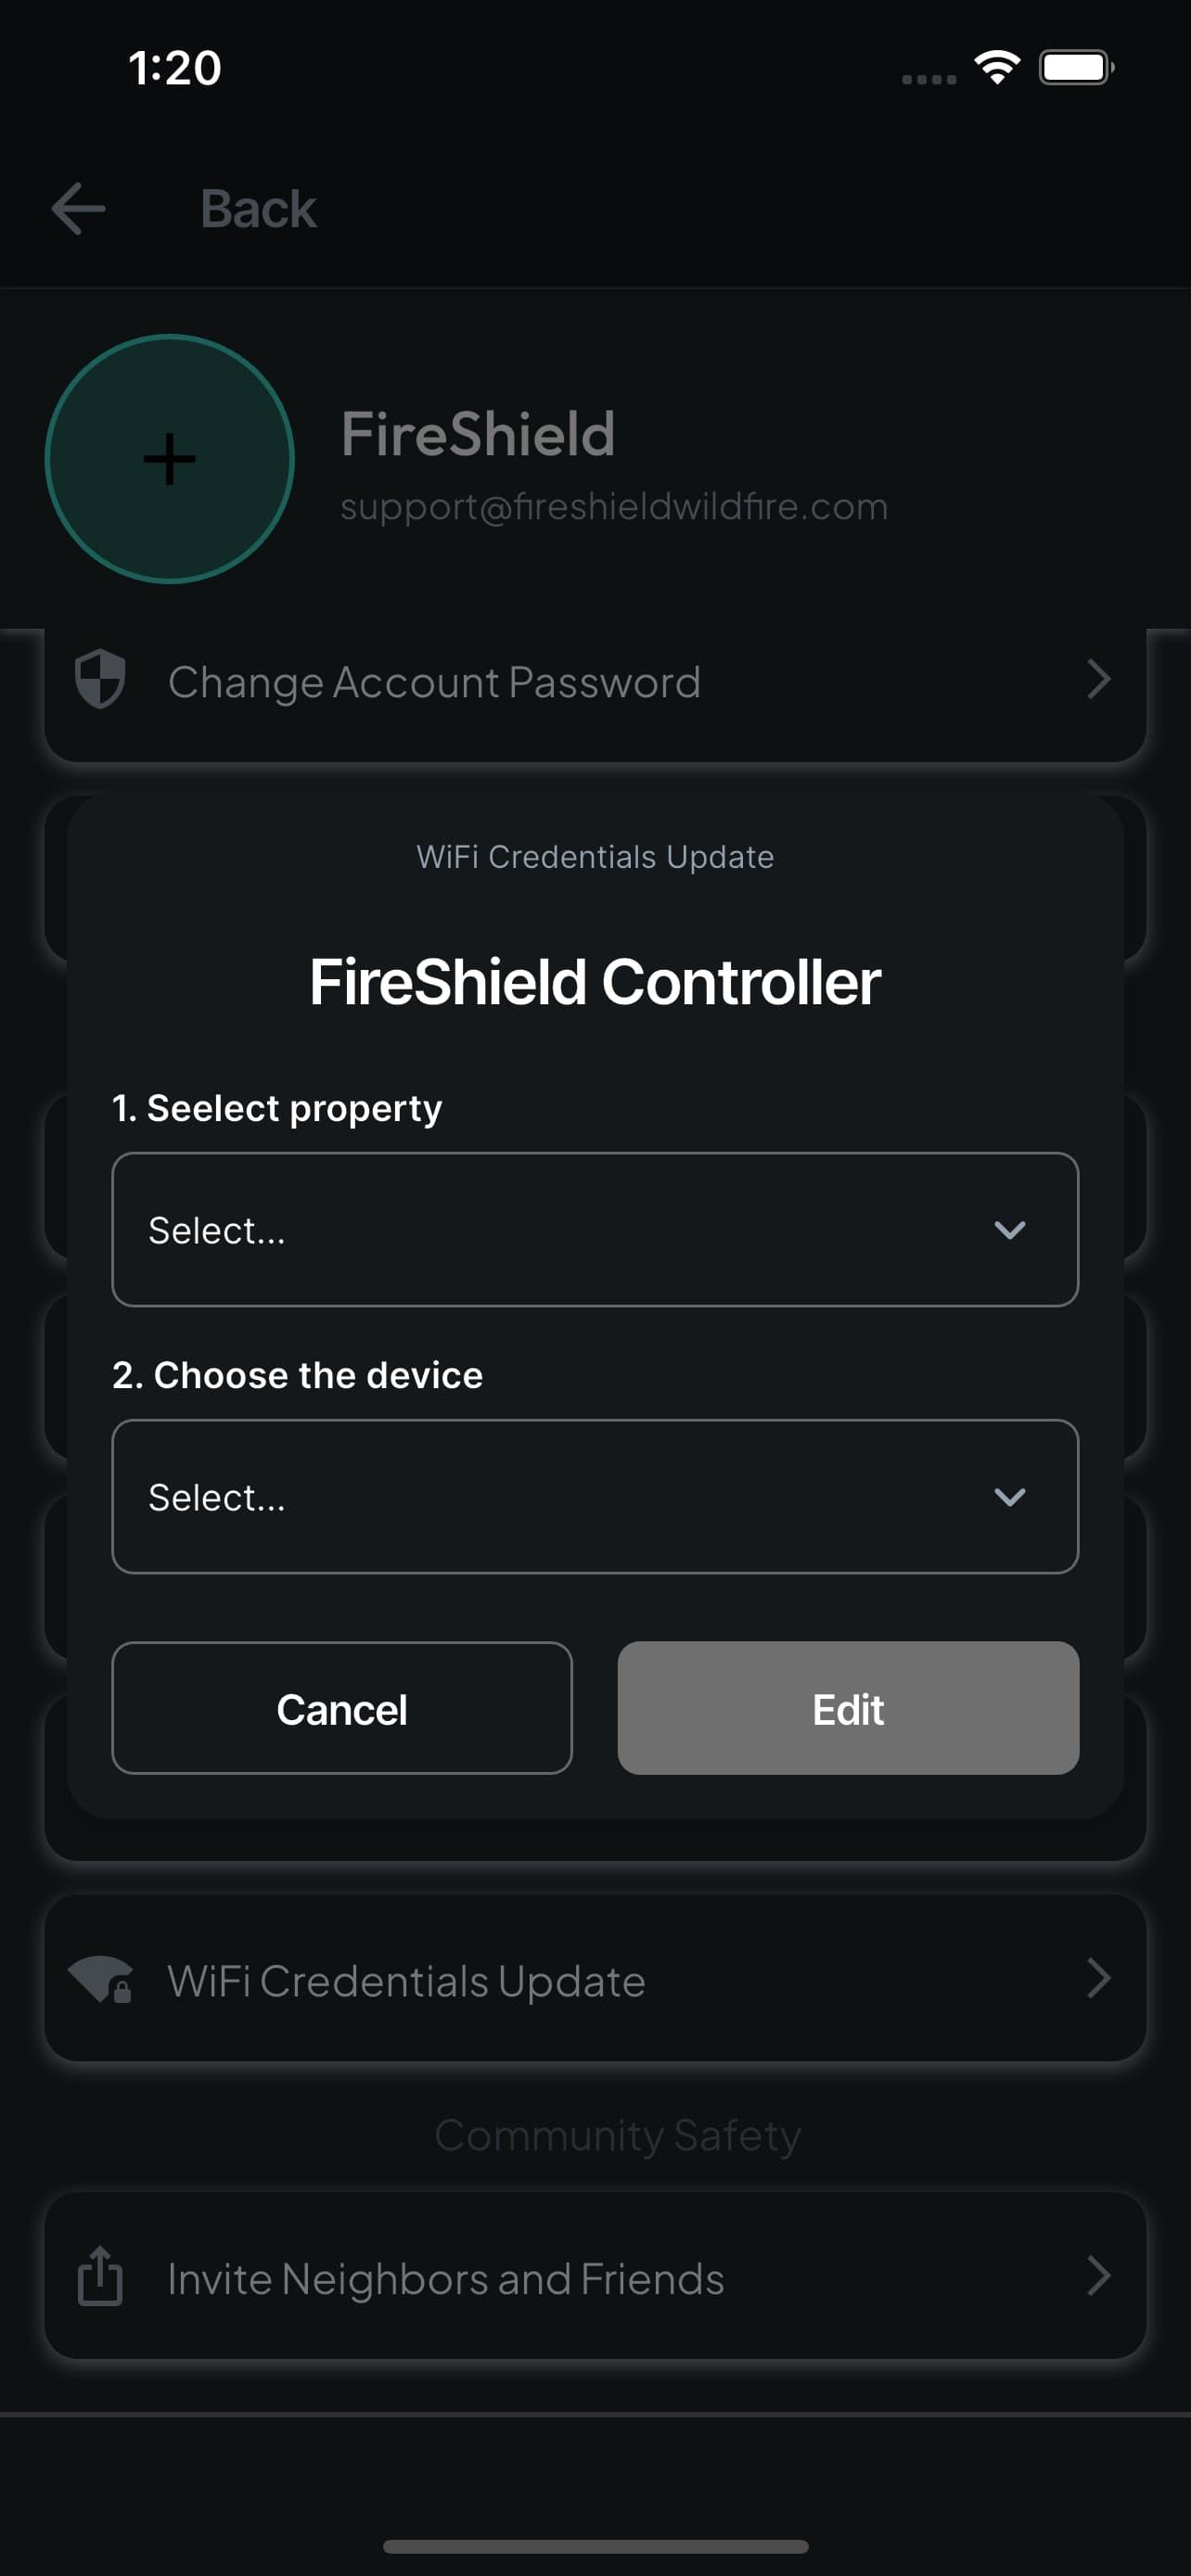
WiFi Credentials Update
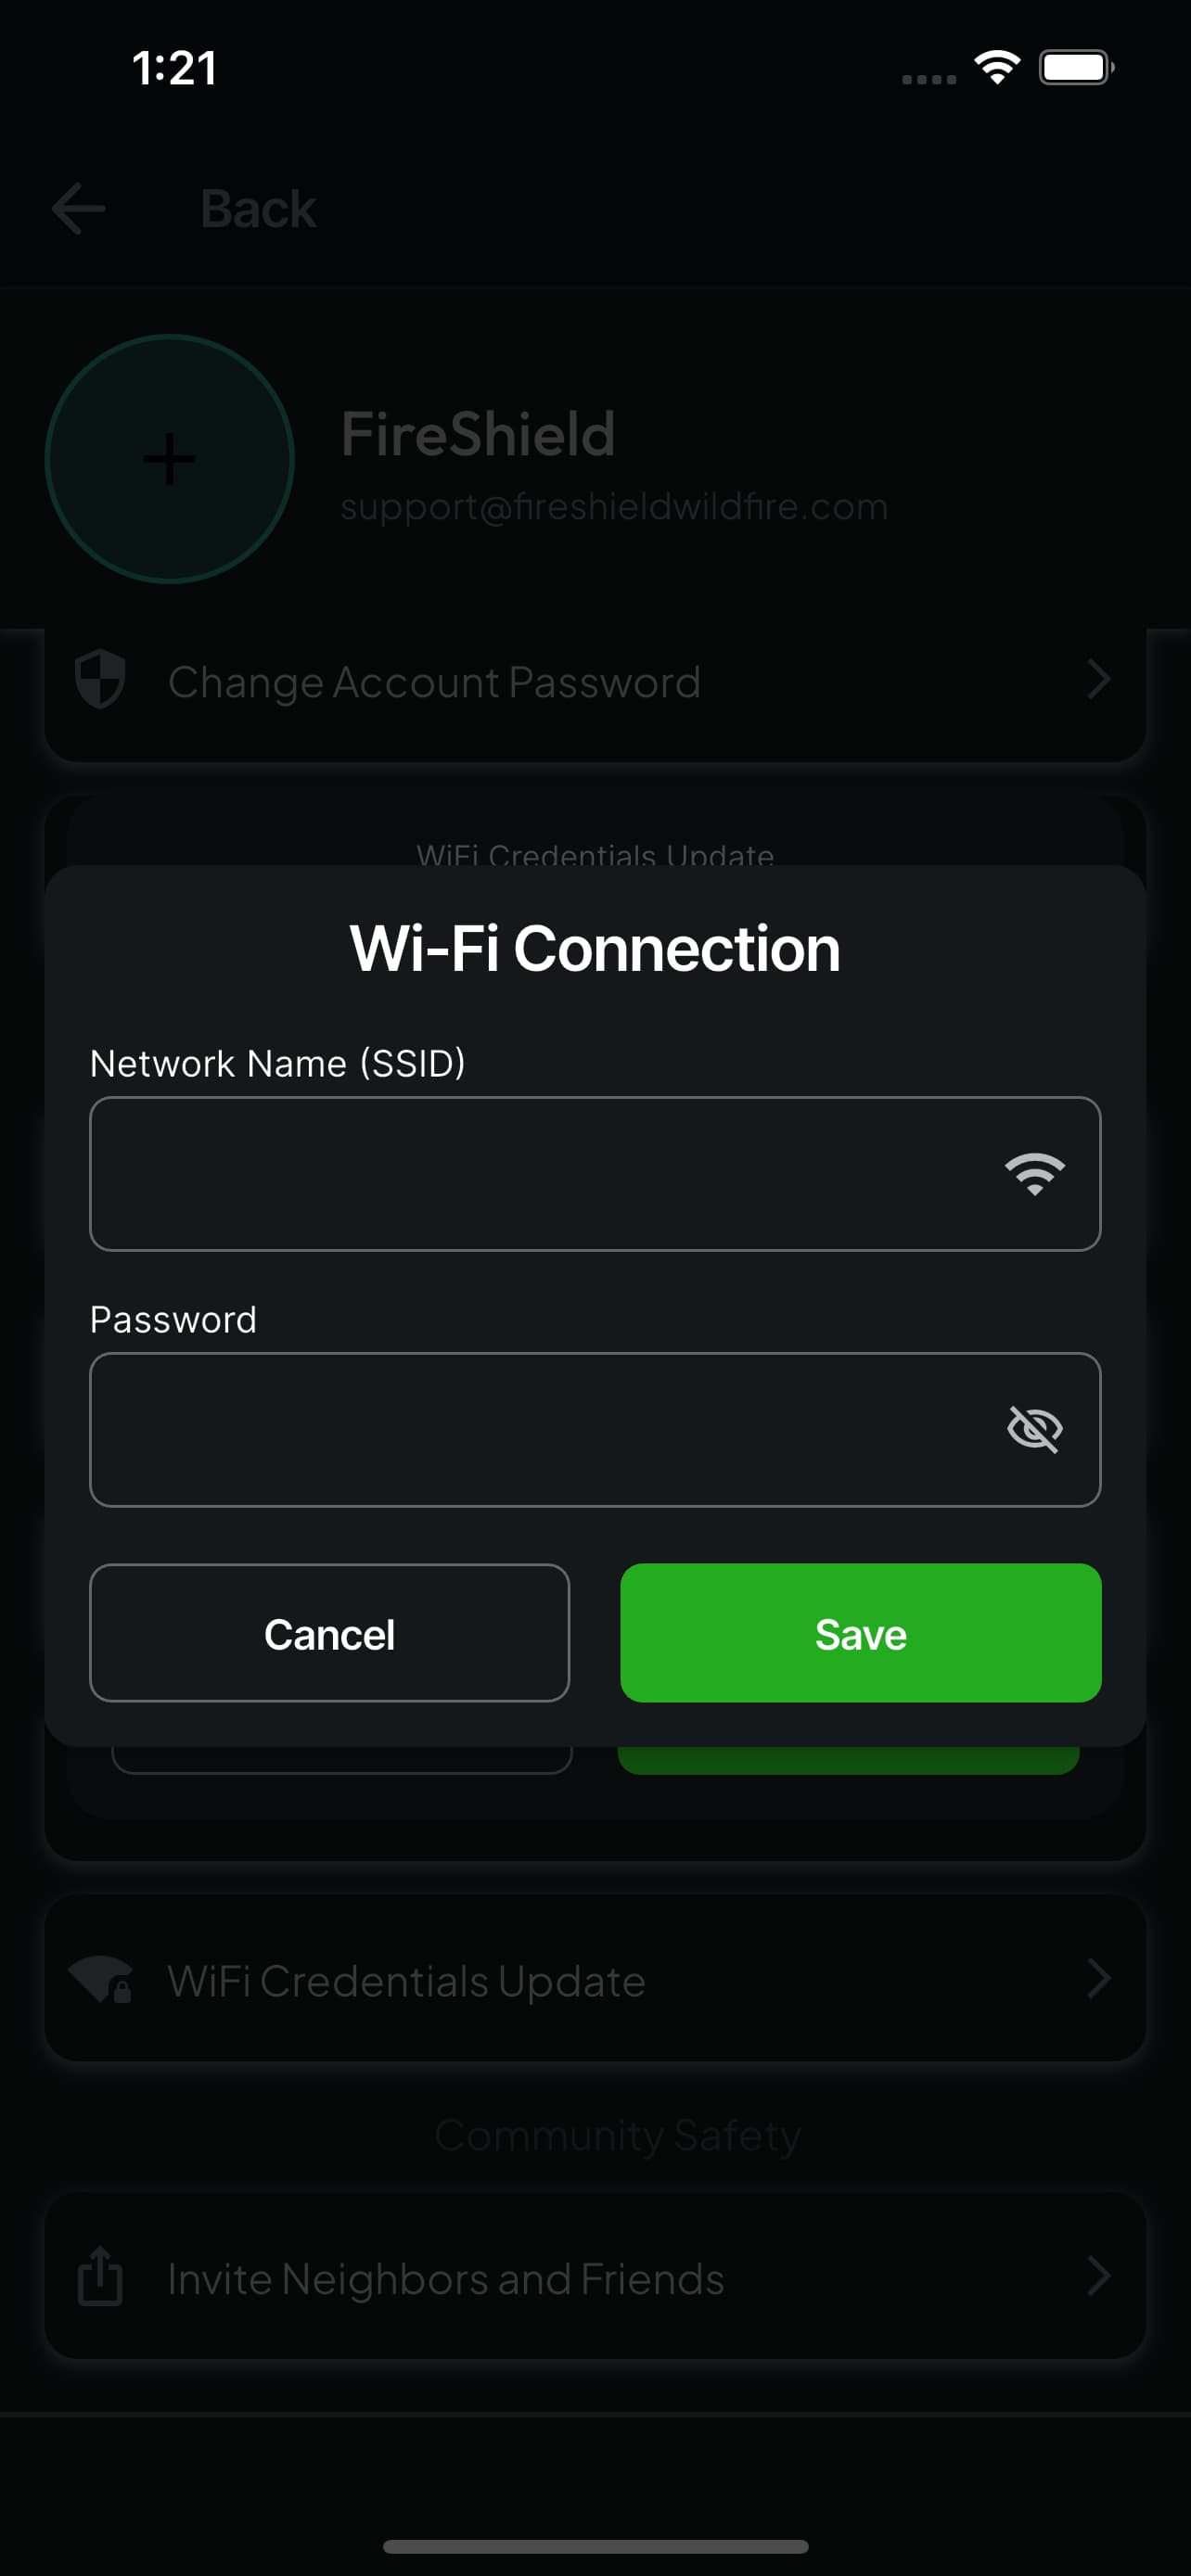
If you change your router, your broadband provider, or your network password, tell the controller here. Choose the property and the device, tap Edit, and enter the network name and password. The controller keeps working on its cellular link while it reconnects.
- The network name is case sensitive, and the eye icon lets you check the password before you save.
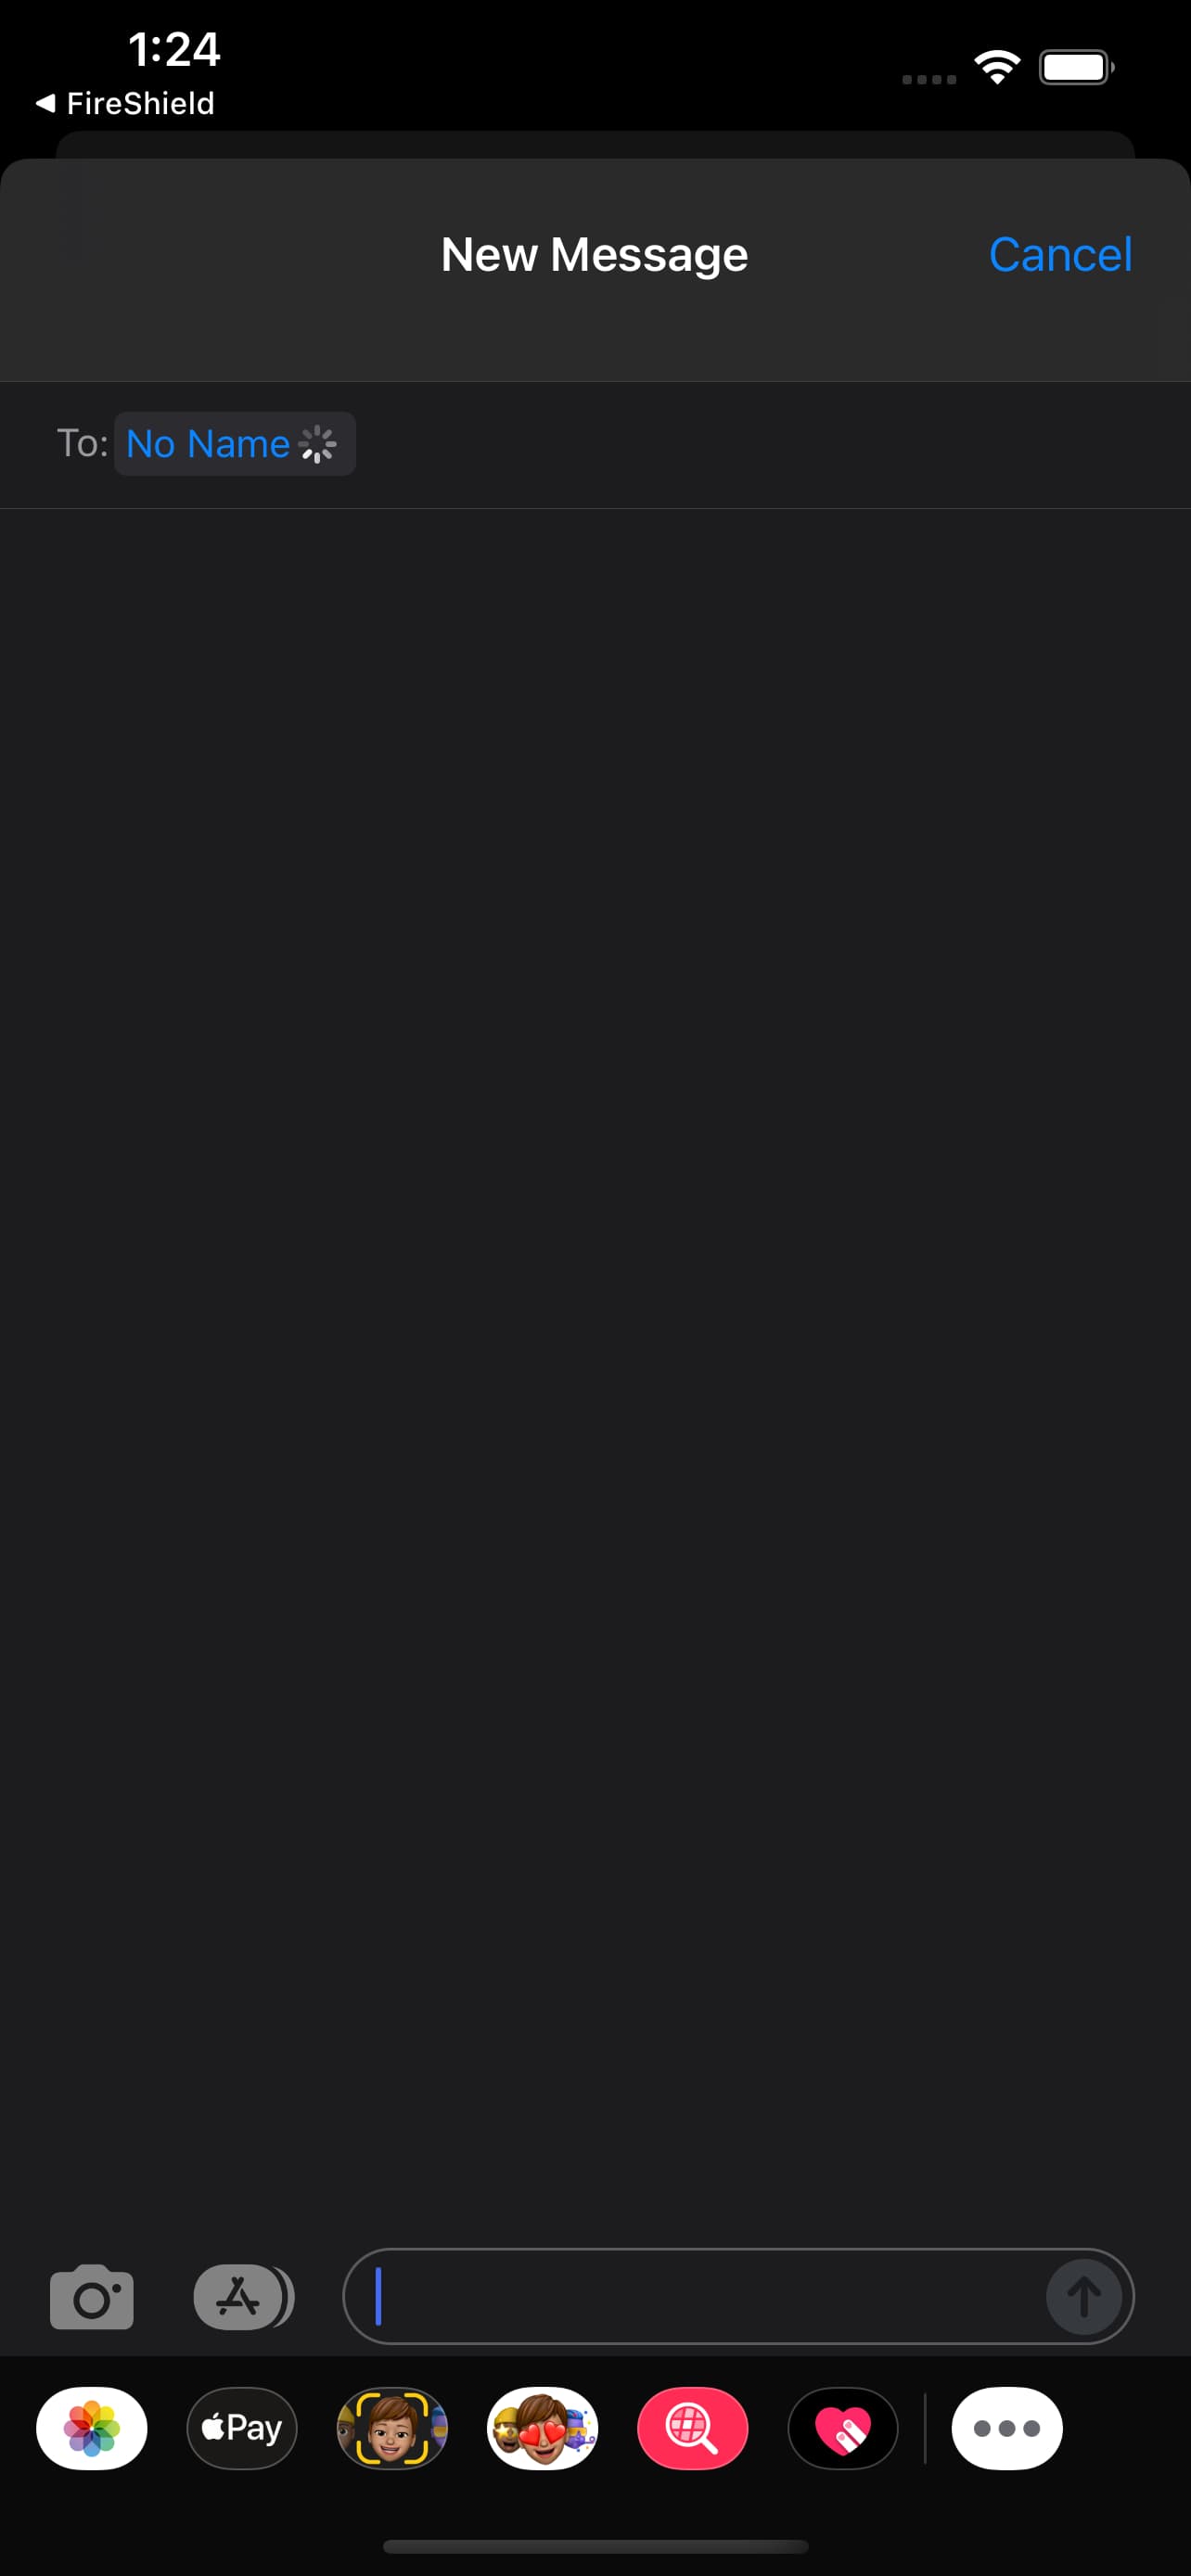
Invite Neighbors and Friends
Under Community Safety. It opens a message on your phone with the invitation already written, so you only pick who it goes to. Wildfire is a street-level problem before it is a property-level one — a protected house between two unprotected ones is doing more work than it should.
Your readings come from the indicators either side of the status panel and from the panel itself. The round dial below them is part of the app’s design, styled after the controller on your wall, and is not a gauge.
Still stuck?
- App
- 3.0.0 (build 4)
- Updated September 17, 2026
- Controller firmware
- 4.8.0.31
- Updated September 17, 2026
If the app is showing something this guide does not explain, or a device is not reporting, tell us what you are seeing and we will look at the system from our side.